HELLO WORLD REST Remediation Workflow: End-to-End Scenario
Your system contains sample Workflows and two HELLO WORLD Workflows by default. With the HELLO WORLD Workflows, you can easily get acquainted with the basics of remediation Workflows. The HELLO WORLD Workflows are stored in the AIOPS folder in the Explorer view of the Process Assembly perspective. This topic describes one of these Workflows, namely JOBP.AIOPS.HELLO.WORLD.REST.
JOBP.AIOPS.HELLO.WORLD.REST picks the text provided in the message of an alarm and makes a Google search using this text. The result of the search is displayed in the Workflow The Workflow consists of two tasks:
-
PCK.AUTOMIC_AIOPS_SHARED.PUB.ACTION.PARSE_JSON_INTO_VARIABLES
Always available with Workflows that have been created using the AIOPS template. This is the template you need to design remediation Workflows.
The AIOPS template is pre-configured. It creates a Workflow that already contains the first task, which is itself a Workflow called PCK.AUTOMIC_AIOPS_SHARED.PUB.ACTION.PARSE_JSON_INTO_VARIABLES.
The purpose of this Workflow is to parse the data of the alarm provided by the JSON payload into variables. The remediation Workflow uses these variables for its execution. You add the tasks you need after this first Workflow.
-
CHECK_ENDPOINT
Web Service Job that makes the actual search and writes the result to the report. It uses a REST RA Agent.

This page includes the following:
Prerequisite
Create a Login object that contains the credentials you need to access the REST RA Agent.
Job objects execute commands on target systems through the target-specific Agents that are installed on those systems. For this purpose, Jobs need Login objects that contain and submit the credentials to the target system.
For more information, see the Automic Automation documentation:
Triggering the HELLO WORLD Workflow
-
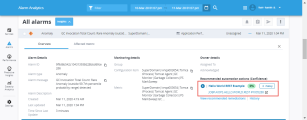
In the Alarms view in DX Operational Intelligence, select the alarm that you want to solve and open the Overview tab. In our environment, we will use the following alarm to describe the HELLO WORLD Workflow:
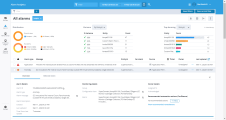
There are no recommended actions yet. We will execute the first action on this alarm using JOBP.AIOPS.HELLO.WORLD.REST.
-
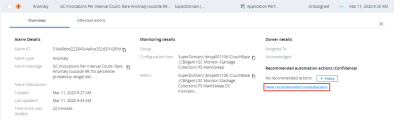
Click View recommended remediations to open the list of remediation Workflows that are available by default with Automic Automation for AIOps
-
The list shows all remediation Workflows that are available by default in Automic Automation for AIOps, also the HELLO WORLD Workflows:
This list provides the following options/information:
-
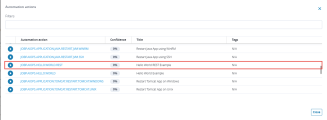
Play button
Click it to trigger the execution of the Workflow in Automic Intelligent Remediation
-
Automation action
Name of the remediation Workflow
-
Confidence
Rating provided for this Workflow, which is based on both implicit and explicit user feedback. For more information, see How Relevant Remedial Actions Are Recommended.
-
Title
Title of the remediation Workflow, which is a brief description of its purpose
-
Execution count
How often this remediation Workflow has been executed
Depending on your user role, you have the following options:
-
As an operator
Trigger the execution of the HELLO WORLD Workflow in Automic Automation for AIOps
-
As a designer or administrator
- Trigger the execution of the Workflow
- Open the Workflow definition in Automic Automation for AIOps
-
-
Click the play button to execute the Workflow.
This closes the list of recommended alarms. The following options are available in the Overview tab now:
- Play button to execute the Workflow again
- Monitor the Execution
- View the Workflow Definition
- Open the list of recommended remediation Workflows again
- View the history of Workflow executions for this alarm


Monitor the Execution
(Operators, designers, administrators)
As soon as the Workflow has started executing in Automic Automation for AIOps, a link to the Workflow monitor is available in the Overview tab. The link consists of the Workflow name followed by the run ID assigned to this particular execution of the Workflow.
-
Click the Workflow name (JOBP.AIOPS.HELLO.WORLD.REST):

Automic Automation for AIOps opens to the Workflow monitor in the Process Monitoring perspective; this is the area in the Automic Web Interface where you have all the details about the execution of Workflows.
-
Check the status of the Workflow and of its tasks. The Workflow monitor provides various status indicators that help you evaluate the progress of the execution.
-
Click the Details button to open a pane with data about the execution, the variables used for it and the values with which the variables have been populated. These variables represent the data contained in the alarm that the Workflow will solve.
Example of the variables for this particular alarm:
-
&A_MESSAGE#
Message provided by the alarm. This is the text that will be searched for.
-
&A_HOST#
Host where the alarm occurred.
-
-
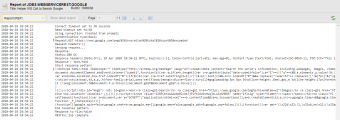
Automic Automation for AIOps provides extensive reports that track every step of the execution. To see the outcome of the google search that the CHECK_ENDPOINT Job carried out, open its report:
- In the Workflow monitor, right-click the CHECK_ENDPOINT task box and select Open Report.
-
The Report window is displayed. In the screenshot, 1 indicates the input used to carry out the search and 2 indicates the output:


For more information, see:
View the Workflow Definition
(Designers, administrators)
If you are an administrator or a designer user, you have access to the Workflow definition. This means that you can open it in the Process Assembly perspective also directly from the DX Operational Intelligence console. The Process Assembly perspective is the area in the Automic Web Interface where you create and configure Workflows.
-
Click the Workflow title (Hello World REST Example in the screenshot)
-
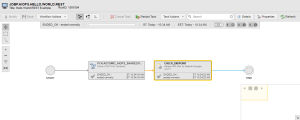
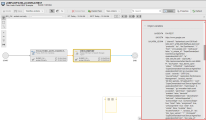
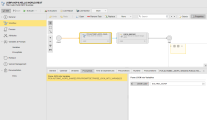
Automic Automation for AIOps opens to the Workflow editor:
The Workflow editor provides a graphical view of the Workflow and its tasks. It also gives you access to the configuration of the Workflow and of its tasks:
- The left pane displays the definition pages where the Workflow properties are configured.
- Select a task in the Workflow and click the Properties button. A pane is displayed that shows the properties of the selected task.
-
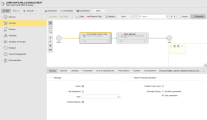
Open the Workflow Variables definition page.
The variables that you define in a Workflow can be passed onto the tasks that are executed in the Workflow. In our HELLO WORLD Workflow, Inherit from Parent is set to Only defined variables. This means that the variables defined in the table will be passed on to the Workflow tasks.
These variables are also passed onto and used by the PromptSets defined in the Workflow. When you define your remediation Workflows, you modify the values of the variables here to adapt the Workflow to the specific case that you want to remediate.
In this example, the &AGENT# refers to the RA REST Agent that the Web Service Job needs to execute and &HOST# to the system where the alarm occurred.
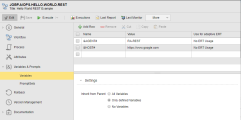
Tip: When you define your own remediation Workflows, you modify the Value of these variables to suit your case.
-
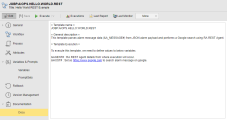
Open the Workflow Documentation page. It contains a brief explanation of the purpose and configuration of the Workflow:


For more information, see:
View the Definition of the Tasks in the Workflow
To check the configuration of the tasks in the Workflow, you open the Properties pane.
-
Select the first task (the JOBP.AIOPS.HELLO.WORLD.REST) and click the Properties button.
-
Open the PromptSets tab.
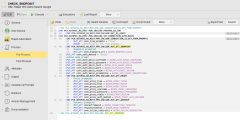
This is where the information provided by the raw JSON payload is split into individual variables that Automic Automation for AIOps can use for executing (and remediating) the alarm.
Important! Do not change or manipulate the definitions in the PromptSet tab. They guarantee that the information about the alarm is passed onto the remediation Workflow correctly.
-
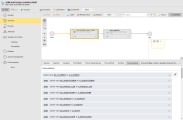
Open the Postconditions tab
The conditions defined here publish the values rendered by the variables so that they can be further used in subsequent tasks:
-
Select the second task (CHECK_ENDPOINT) and right-click to select Source Object > Open. The Job opens to its Web Service page.
Open the Process > Pre-Process page, which contains the script that performs the search. The script is comprised of various Include objects:


For more information, see: