Custom Rule
The Event Engine uses Apache Flink for continuous data stream processing. All Event Engine rules use Flink's functionality. The Custom Rule feature lets you to create your own Event Engine rules.
Providing you with a framework that lets you design and build your own rules, gives you control and flexibility to implement your own functionality on received events.
For further information on a use case see:
This page includes the following:
Who is the Custom Rule designed for?
There are a number of participants who are involved in the Custom Rule design, installation, configuration, and usage.
Java Developers
As a Java developer CA Automic will provide you with the necessary Custom Rule framework to prepare code for the Event Engine. The framework lets you to design, and build unique custom rules tailored to your business requirements.
Important! Custom Rule projects require a Java environment, that uses Maven for building and packaging.
Administrators
As a Administrator you will take the package designed by the developer and import it to the Automation Engine.
Operator
As a Operator, you will be able to change the rule configuration to match your specific requirements.
Overview
The following diagram is design to give you an overview of how the Custom Rule works from start to finish.
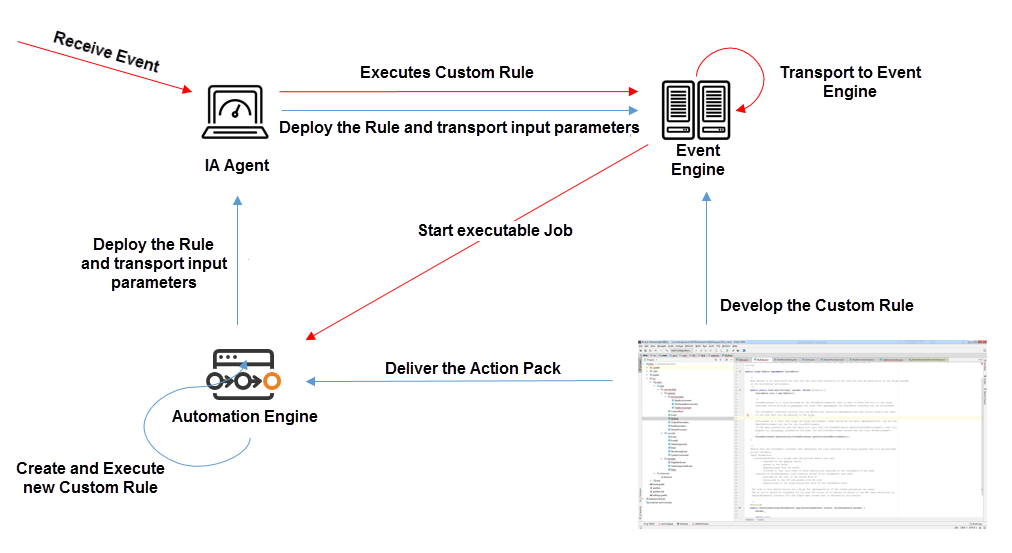
Designing a Custom Rule
The design and rule logic is provided by your developer, there are number of steps required before an Automation Engine Administer can create the event definition in AWI.
The following chart shows the various tasks and responsibilities of creating a Custom Rule:
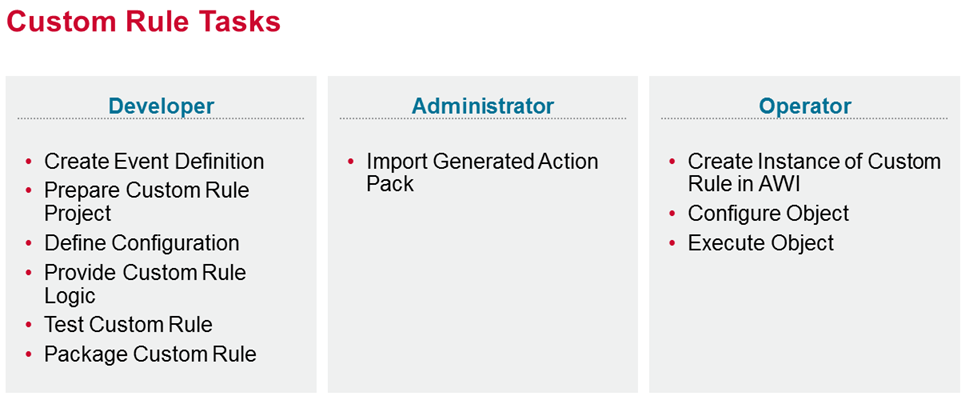
As a developer you will need to:
- Create a new maven project your local IDE
- Link a dependency to our framework in the pom.xml
- Add our maven plugin to the framework in the pom.xml
- Specify a custom rule name in the pom.xml
- Create a class with the main method
- Create a class that implements the CustomRule interface that will contain the rule logic
- create a file ruleProperties.properties in the resources folder and specify there all rule parameters needed in the implementation of CustomRule interface
- create a file outputParameters.propeerties in the resources folder and specify there all output parameters
- in the main method configure the TestEnvironment and start the implementation of CustomRule using the StreamProcessor.execute method
- create instance of the RuleProperties and set all the values needed for the the execution of the CustomRule
- provide a source of the test events that will be added to the TestEnvironment as a reference to the Iterable object
- once everything works replace the TestEnvironment by the DistributedEnvironment
- Run mvn package to build the project and to build the action pack
- Deliver the action pack to the administrator
As an administrator user you will need to:
- can create event definition
- can create webhook object
- can create simple / state change rule and execute it
- import action pack with the custom rule
- create instance of the custom rule
- select event definitions
- provide values to the rule properties fields based on the description of each field
- select an executable object
- map the outputParameters of the custom rule to the promptset variables of the executable object
- execute the instance of the custom rule
As a user you can:
- set/update values of the rule properties fields in the UI
- execute the instance of the Custom Rule object from the UI
Defining a Custom Rule
To define a Rule you must satisfy two key elements.
- Set a Trigger using the Event Definition box.
- Define an Action to execute when one or more defined Event condition are met.
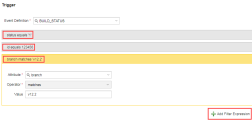
Trigger Section
Select at least one Event Definition variable before you define a specific rule. An Event Definition variable is a static XML variable: it stores static values or retrieves them from a particular dynamic data source. For more information, see Variables and VARA Objects.
-
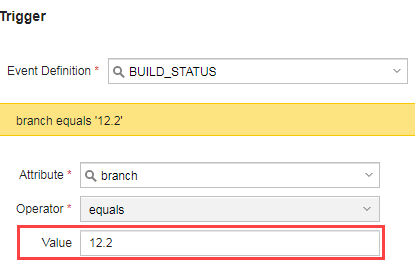
Enter the Event Definition name into the box, or select an Event Definition using the combo list.
-
Click Add Filter Expression to define multiple filter expressions.

| Field | Description |
|---|---|
| Add Filter Expression |
Adds a new Filter Expression box, this allows you to create multiple Expression Definitions. |
| Attribute |
This combo box allows you select an attribute that has been defined in the Event Definition file. For example an Attribute of the AGENT_DOWN Event might be agent.name. |
| Operator |
Notes:
The combo box that allows you to select operators that are used to evaluate a condition. See: Operator Table |
| Value |
Set a value according to the pre-filtered attribute and operator. This set value is then compared with the attribute value in the external event using the specified operator.
Note: Some operators do not require a value, see Operator field above. |
Operator Table
| Operator Type | Applicable to Attribute Type | Value Required | Condition Satisfied |
|---|---|---|---|
| equals | All types | Yes | If the value of the attribute in the external event is equal to the provided value. |
| not equals | All types | Yes | If the value of the attribute in the external event is not equal to the provided value. |
| greater than | Number types only | Yes | If the value of the attribute in the external event is greater than the provided value. |
| less than | Number types only | Yes | If the value of the attribute in the external event is less than the provided value. |
| less than or equal to | Number types only | Yes | If the value of the attribute in the external event is less than or equal to the provided value. |
| greater than or equal | Number types only | Yes | If the value of the attribute in the external event is greater than or equal to the provided value. |
| is present | All types | No | If the attribute is present in the external event. |
| is not present | All types | No | If the attribute is not present in the external event. |
| contains | String types only | Yes | If the value of the attribute in the external event contains the provided string. |
| does not contain | String types only | Yes | If the value of the attribute in the external event does not contain the provided string. |
| starts with | String types only | Yes | If the value of the attribute in the external event starts with the provided string. |
| does not start with | String types only | Yes | If the value of the attribute in the external event does not start with the provided string. |
| matches (regex) | String types only | Yes | If the value of the attribute in the external event is matched by the provided regular expression. |
| does not match (regex) | String types only | Yes | If the value of the attribute in the external event is not matched by the provided regular expression. |
| ends with | String types only | Yes | If the value of the attribute in the external event ends with the provided string. |
| does not end with | String types only | Yes | If the value of the attribute in the external event does not end with the provided string. |
| is empty | String types only | No | If the value of the attribute is empty (but the attribute is present in the event). |
| is not empty | String types only | No | If the value of the attribute in the external event is not empty. |
Action Section
Define the Action to be taken when a condition or a number of conditions have been met.
| Field | Description |
|---|---|
| Execute |
When a condition is met, the defined Action will be executed. For example an Agent has gone down and if this occurs a workflow is immediately started to restart it. |
| Alias |
Specify an alias if required. |
| Map Variables |
It is possible to map the values from an event attribute to PromptSet variables of a executable. Example: If your executable has a promptset variable named "&STATUS#" and your Event Definition has an Attribute Key field called "status", they can be mapped using this feature.The "status" field value that the IA agent receives on its REST endpoint, is available to the executable, which is mapped to the variable "&STATUS#" . |
| Add (Button) |
Adds the specified mapping between the Attribute and Executable Variable. |
To Execute a Rule
- Select the Attributes page in the Rule Event object
- Select the IA Agent in the Agent combo box, and click Save.
- Click Execute to run the Rule.
