Creating your First Workflow
This topic is interesting for first users of Automic Automation. It describes how to create a basic Workflow. The Workflow contains a Job and a Notification object. When the Workflow is executed, the Job is processed and, if it ends successfully, the Notification is triggered. For more information, see Creating Your First Job, Enhancing Your First Job and Creating Your First Notification.
The example described here addresses not only developers and object designers. It is also relevant for operators and managers. As an operator or manager, to be able to monitor processes, analyze them and identify potential problems, you must understand how objects work and how they interact.
Tip: Have a look at the following topics to get acquainted with the look and feeling of the Workflow editor.
What You will Learn
- How to orchestrate the execution of both objects by adding them to a Workflow
- How to check their dependencies
- How to execute the Workflow
- How to access the execution report
What You Should Know Beforehand
Before we start, you should know what these basic concepts mean:
-
What is a Workflow?
Workflows (JOBP) are containers for objects that must be executed in a specific sequence with specific parameters. You insert the objects whose execution you want to orchestrate in a Workflow, you connect them, and (optionally) specify additional dependencies between them.
For more information, see Workflows (JOBP).
-
Are there different types of Workflows?
Yes, there are three types of Workflows:
-
ForEach
ForEach Workflows represent loops. They repeat one or more tasks depending on the defined loop conditions. For more information, see FOREACH Workflows.
-
IF
IF Workflows represent IF statements. They contain two branches to which you can assign tasks. Depending on the conditions you specify, one of the two branches is processed. For more information, see IF Workflows.
-
STANDARD
You can design STANDARD Workflows by adding, ordering and linking tasks within them.
-
-
What is the Workflow editor?
The Workflow editor is the canvas that you see when you open the Workflow page after creating a Workflow object. The editor contains graphic tools to insert, connect, move and work with the tasks in the Workflow. For more information, see Designing Workflows in the Editor.
-
What is the Workflow monitor?
As soon as a Workflow is activated, its monitor is available. The Workflow monitor provides the information you need to track the progress of a Workflow. It is very similar to the Workflow editor, but it contains monitoring tools. For more information, see Workflow Monitor Overview.
Overview
- Create a Standard Workflow
- Add the Job and the Notification Objects
- Connect the Objects
- Check the Dependency
- Execute the Workflow
- Open the Workflow Execution Report
Create a Standard Workflow
Add a STANDARD Workflow to the GETTING_STARTED_OBJECTS folder that you created here: Creating Your First Job.
-
Click the Add Object toolbar button.
-
Select Workflow > STANDARD and click OK.
-
On the Object Name dialog enter the name of the Workflow. Call it JOBP.FREE.DISK.SPACE.QUERY.
-
Click OK.
-
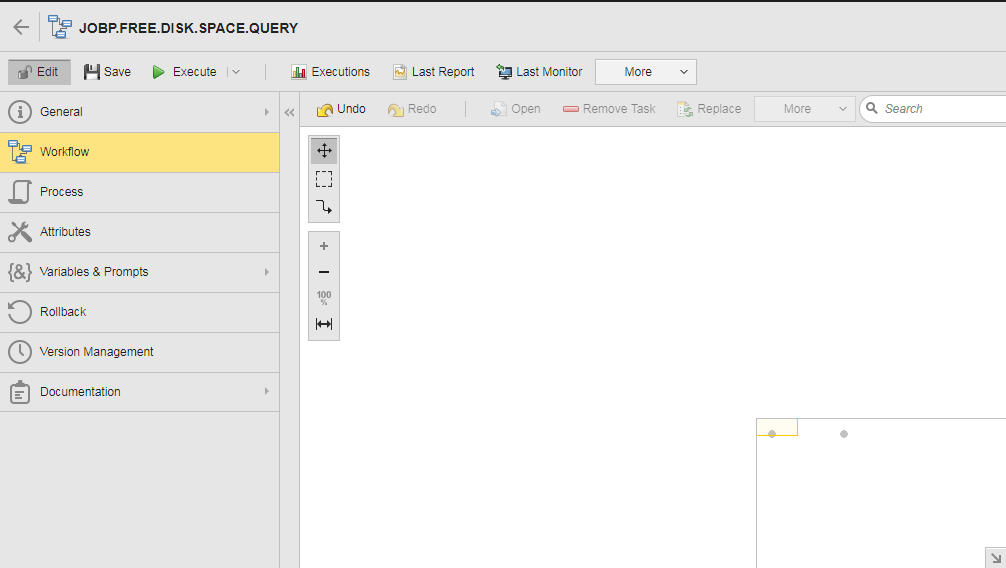
The Workflow opens to the Workflow editor page. It displays the object definition tabs on the left and the canvas where you design the Workflow on the right. This is what it looks like:
Add the Job and the Notification Objects
You have several options to add objects to a Workflow:
-
Click the Objects button in the toolbar and pick objects from the Objects pane to drag and drop them onto the canvas.
-
Right-click anywhere on the canvas and select Add > Add Existing Object.
-
Use the Global Search to search for the objects you want to insert and drag and drop them from the resulting list onto the canvas.
-
Open the Explorer in the Process Assembly perspective in a new browser window. Drag and drop the objects from the list onto the Workflow canvas in the second window.
We will use the Global Search option.
-
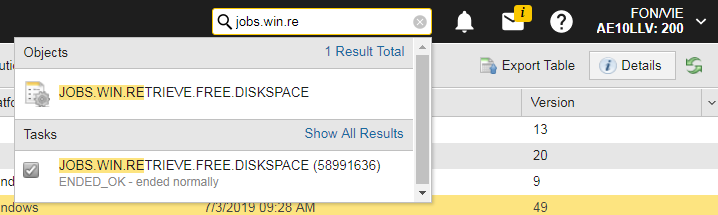
To insert the Job, start typing its name in the Search field. The Global Search opens a drop down list with a selection of the results of the search. This is what it looks like:
-
Click the Job in the drop down list and drag and drop it onto the canvas.
-
To insert the Notification, start typing its name in the Search field. When it is displayed in the list, drag and drop it onto the canvas.
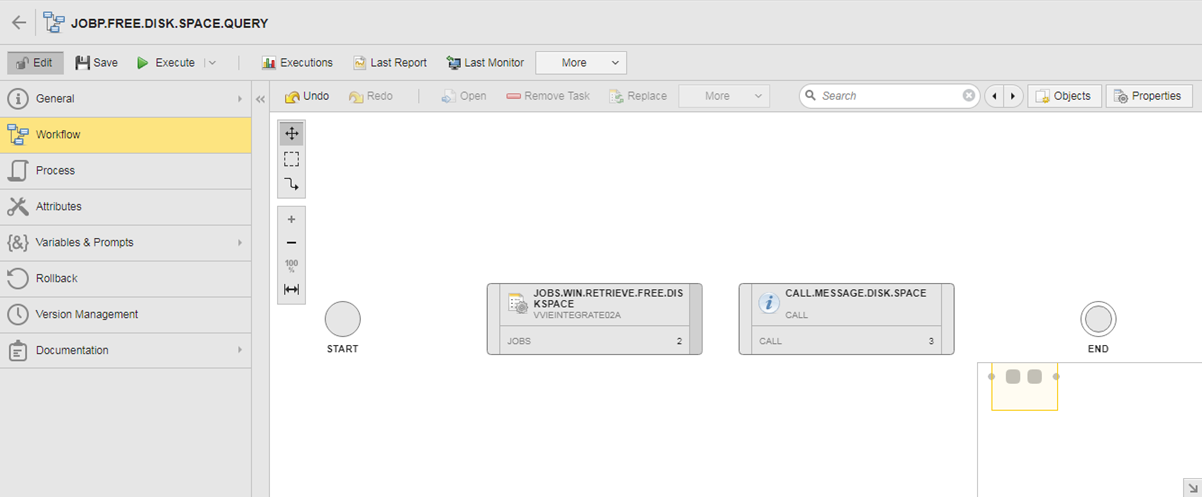
The two objects are inserted in the Workflow now. This is what it looks like:
Connect the Objects
After adding tasks to your Workflow, you connect them to establish their execution sequence. Connecting tasks means establishing a dependency among them. You connect tasks by drawing a line between them. The task where the line starts is the predecessor. The target task is the successor.
To connect tasks, you use the floating toolbar in the canvas. This toolbar contains tools that help you when designing a Workflow. Let's have a closer look at its upper part:
-
The first button toggles the Move mode on and off. When it is on, which it is by default, you can pan the workflow by clicking and dragging the cursor. The following animated gif illustrates how it works:
-
The second button toggles the Selection mode on and off. When it is on, you can select a group of tasks by clicking and dragging the cursor to draw a rectangle around the tasks. The following animated gif illustrates how it works:
-
The third button toggles the Connection mode on and off. When it is on, you can connect tasks by clicking the end of the predecessor task and the beginning of its successor task. The following animated gif illustrates how it works:
After you have connected the tasks, you have a functioning Workflow. Notice that if you hover your mouse over the task boxes, or over the START and END nodes, a tooltip shows relevant configuration data about the task. For more information, see Task Boxes in Workflows.
Check the Dependency
Before executing the Workflow, let's have a look at the dependencies between the Job and the Notification.
An object that is inserted in a Workflow has additional configuration options that apply only when it is executed from within the Workflow. These options can influence when and how the tasks in the Workflow are executed.
When you draw a connection line between tasks, you establish a basic dependency between those tasks. By default, this dependency means that the successor task will only be executed if the predecessor has finished successfully. You can check this in one of the task properties of the successor task:
-
Select the Notification.
-
Click the Properties button in the toolbar. The properties pane is displayed on the bottom half of the canvas. It contains tabs with the task configuration options.
-
Open the Time & Dependencies tab.
In the Dependencies section, the table shows the Job in the Task Name column. The value entered in the Status column determines the status that the predecessor task must have for the Notification to be executed. By default, the Status is empty. You can change the status here, or you can define a Client-wide default status for all tasks in Workflows. You do this in your user settings. For more information, see Default Task Status for Workflow Dependencies .
Configure the Tasks in the Workflow
Tasks that are inserted in a Workflow keep the properties that have been defined in the corresponding objects. Sometimes it is necessary to define additional properties for the tasks in a Workflow. To define such properties you have two options:
- Select the task and click the Properties button in the toolbar
- Right-click the task and select Properties in the context menu
A pane with several tabs opens on the bottom half of the Workflow canvas. Each tab contains options that you can configure for the selected task. The properties that you define this way apply to the selected task only when it is executed from within the current Workflow.
So far, we have configured the following:
- A Job that queries the space on the disk and writes the value to a variable.
- A Notification object that creates a request and that uses the same variable.
- A Workflow that, when executed, will process the Job first and then the Notification object.
We want the request created by the Notification to write the result of the resolved variable both to the request and to the report. For this purpose, we have to configure the properties of the Job in the Workflow. We have already defined the variable in the Job, and the Workflow takes over this configuration. You can check it by right-clicking the Job, selecting Properties and opening the Variables tab.
Define the Post Condition that Publishes the Value of the Variable
Tasks in Workflows can have preconditions and postconditions. Preconditions are processed before the task runs, postconditions after it has run. In our example, the value of the variable is resolved after the Job has run. For this reason, we have to define a postcondition in the Job.
- Go to the Postconditions tab.
- Click Add Postconditions.
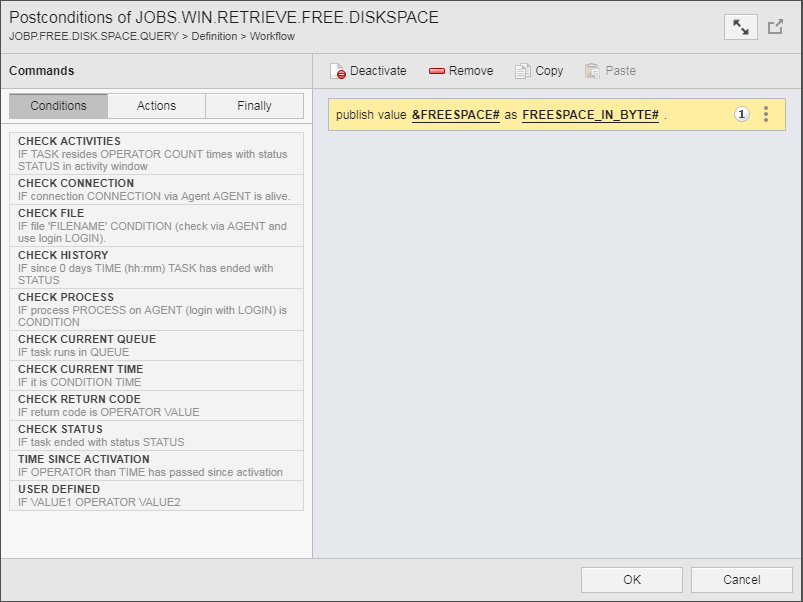
- On the Postconditions of JOBS.WIN.RETRIEVE.FREE.DISKSPACE dialog open the Actions tab.
- Grab the PUBLISH VALUE option from the Action pane and drop it on the right.
- Click either VALUE or VARIABLE NAME to activate the input box.
-
Enter the following values:
- Value: &FREESPACE#
- Variable name: FREESPACE_IN_BYTE#
This is what it looks like:
- Click OK.
- Save the Workflow.
Execute the Workflow
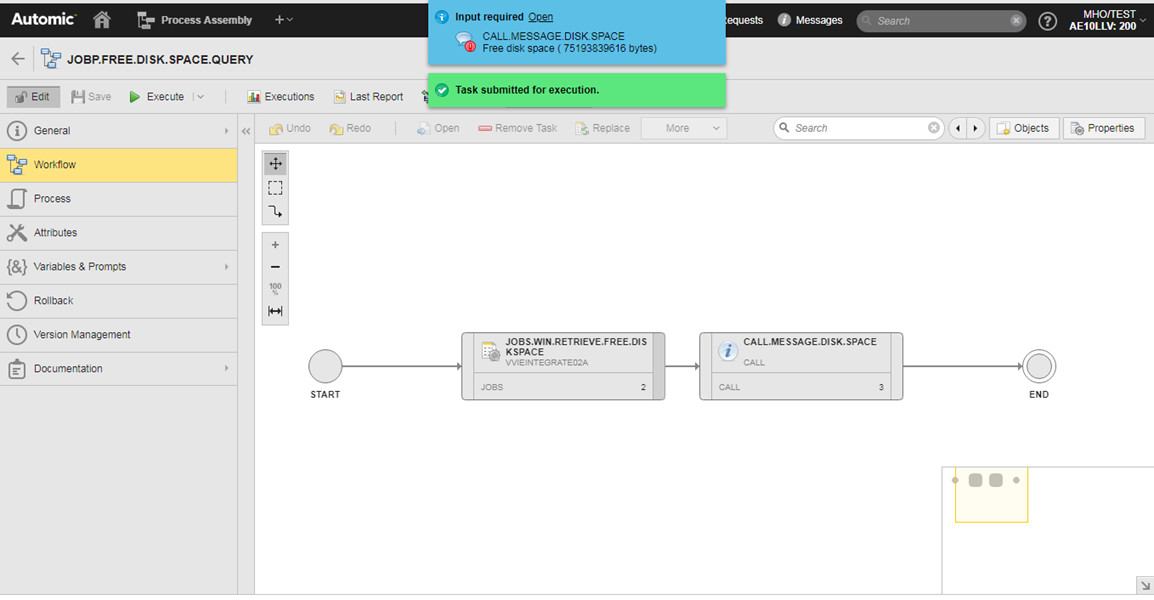
Let's execute the Workflow and have a look at its report. Click the Execute button in the toolbar. The following happens:
- A green pop up message at the top of the screen indicates that the Workflow has started executing. The message provides a link to the Workflow monitor.
- The blue pop up message that opens the request triggered by the Notification object is also displayed.
- The Requests button in the menu bar shows the request count.
Open the Workflow Execution Report
Executable objects go through four stages during execution. The first stage is Activation. The activation report logs all steps that the object goes through during this phase.
Click the Last Report button in the toolbar. The report view opens to the Activation (ACT) report.

The report provides the following information:
- The Job is activated and it gets its runID.
- The Notification is activated and it gets its runID.
- The object variable defined in the Job is read and the corresponding value is applied.
The objects and the processing steps in this example are basic, so the report is short and simple. However, complex objects and processes produce long reports. For this reason, as well as for auditing purposes, you have the option to download the report.
To Download the Report
- Open the Activation (ACT) drop down list.
- Select Directory.
- Click the download icon next to the file name.
Next
As soon as a task is executed, it is available in the Process Monitoring perspective. The next step in this Getting Started guide is to monitor the execution of the Workflow. For more information, see Monitor.