Creating Custom In-Product Help
As an Automic Automation administrator, you can customize the in-product Automic Automation Help to display your own custom help content to users in your organization. You can embed links to other resources that you want to direct your users to, including links to videos, or even completely replace the existing content with content of your own creation. You do this with Broadcom's own Lattice Admin tool. This topic describes your customization options and how to create and manage your own custom, in-product help for Automic Automation.
This page includes the following:
Understanding Automic Automation Custom Help Content
By default, Automic Automation provides the in-product Automic Automation Help that you can access by clicking the Help (?) button on the top right corner of the menu bar. If you want to enhance the default help with content that is specific to your organization, you can do this by creating Custom Help that appears to your users when they call up the Automic Automation Help.
Examples of custom content that you could provide include the following:
-
A Section containing a welcome message, embedded pictures, or internal guidelines directly in the help pane.
-
Custom steps with specific values that your users need to enter for various fields, instead of the default help that offers all possible options.
-
A Card with naming convention guidelines on pages where your users add new Clients, Objects, Workflows, and so on.
-
Links to company-internal web pages or to videos that contain helpful support information.
-
Links to third-party tools that your company uses.
You create and manage Custom Help with Broadcom's Lattice Admin tool. In the Lattice Admin tool, you create custom content in chunks using two primary formats — Cards and Sections — which you associate with the view in the Automic Web Interface where you want the content to appear.
Using the Lattice Admin tool, you can customize the in-product Automic Automation Help, in several ways:
-
Creating Custom Sections
Sections are fully editable text boxes that appear at the very top of your custom content area. When you create a Section, you get a free-form information area where you can input text, insert links, and embed pictures to simulate having your own custom title and landing page for that specific help view.
-
Creating Custom Cards
Cards are structured, action-oriented items that consist of a title, an icon, and a description. Every card has a designated click action — depending on how you configure it, clicking a card can either expand to display more information directly within the pane or open an external link in a new tab.
-
Controlling Display Order and Replacing Content
You have full control over how your custom content interacts with the standard Automic Automation documentation. You can choose to display your custom content above the default product cards, below the default cards, or you can completely hide the default content to replace it exclusively with your own.
-
Linking Custom Videos
You can create custom videos that walk users through the use of a view or functionality that conforms to your own standards and policies. You can host these videos on your local Google Drive or YouTube and link to them using a custom Card.
Creating and managing customized content in the Automic Automation Help comprises the following steps:
Requesting Access to the Lattice Admin tool
You configure the content that displays within the Automic Web Interface in the Lattice Admin tool.
Before you begin, be sure you have the URL and subscription ID - the Custom Content Enabler ID - for each Automic Automation subscription for which you want to create Custom Help.
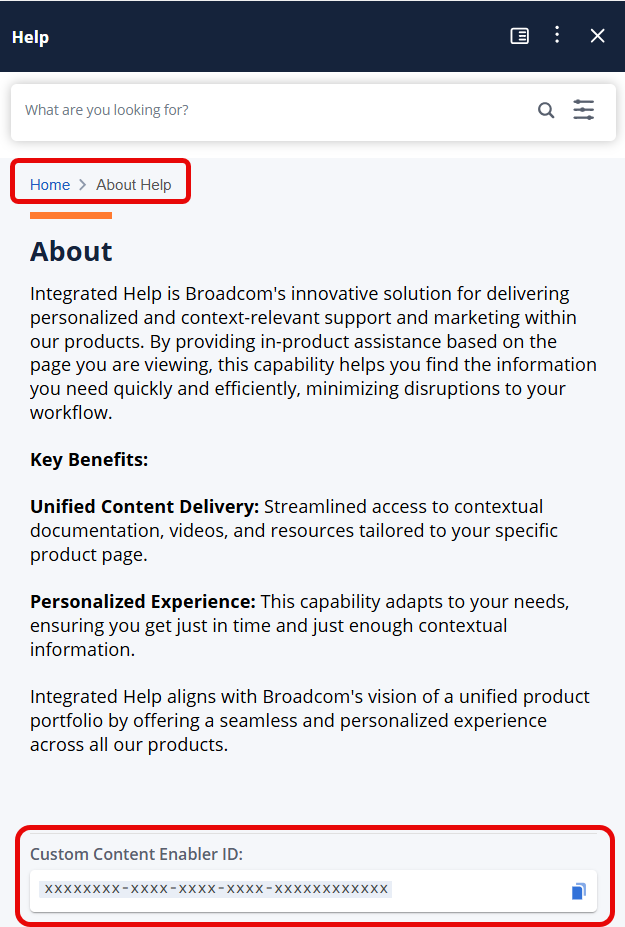
You can find your Custom Content Enabler ID directly within the Automic Web Interface:
-
Click the Help (?) button on the top right corner of the menu bar.
-
Select the Home tab in the Help panel.
-
Scroll to the very bottom to the About section.
-
Locate the string of numbers and letters labeled Custom Content Enabler ID at the bottom of the page. This is the identifier you need for your request:
Click the image to expand it.
Note: The identifier appears after the Product Registration, or is pre-registered for Automic SaaS customers. If you recently registered and do not see it, you may need to refresh your browser.
Once you have your information, submit your request:
-
Go to https://support.broadcom.com/ and log in. For more information about creating an account, see this Knowledge Base article.
-
Select My Cases in the navigation pane on the left.
-
Click the menu icon in the upper left of the page, next to the Broadcom logo, and select Create Case.
-
Complete the following fields:
-
Product: Select Automic Automation
-
Subject: Enter "Request tool access for Custom Content for In-Product Help"
-
Description: Provide two kinds of information to describe the kind of access that you need:
-
Environments/installations
Enter the URL and Subscription ID (your Custom Content Enabler ID) for each Automic Automation environment for which you want to create custom content. Each environment requires its own configuration.
If you have multiple subscriptions, please include a parenthetical description of the environment (such as Production, QA, or Test) so the administrator can tag them properly.
-
Users
The email addresses of the content creators — the people in your company who will create custom cards and sections.
Important: Every person requesting access to create content must have a registered Broadcom ID.
Example
Please provide access to the Lattice Admin tool for the following:
-
To our Automic Automation environments/instances:
-
19b0d3a0-9060-4000-83da-b78a42ac0001 (Production)
-
19b0d3a0-9060-4000-83da-b78a42ac0002 (QA)
-
19b0d3a0-9060-4000-83da-b78a42ac0003 (Test)
-
-
For these users
-
Person1@MyCompany.com
-
Person2@MyCompany.com
-
-
-
Important! The ticket you create is routed to the internal approver in your organization. Once approved, the ticket is then routed to Broadcom Support.
Accessing Your Custom Content Configuration
After you submit your Broadcom Support case, you will receive an onboarding email that contains access credentials that let you log into the Lattice Admin tool where you can add and manage your custom content.
When you log into the Lattice Admin tool, you will see a list of configurations that have been created for you based on the subscriptions that you included in your Support request.
To access a configuration, do the following:
-
After you receive an on-boarding email from Broadcom, go to https://admin.ipce.broadcom.com/ to access the Lattice Admin tool.
-
Login using the credentials that you used to access Broadcom Support.
-
On the home page, under Products, select Automic Automation to open the configurations that are assigned to you.
Click the image to expand it.

-
In the Configurations pane, select the configuration that you want to view.
Click the image to expand it.

Creating Custom Help (Cards and Sections)
Custom content contains information specific to your organization that appears in the Automic Automation Help panel for a specific page in AWI. When building this content, you can choose to create fully editable Sections or Cards.
For example, the help for the Agents (HOST) page contains a brief description followed by many different cards providing all the information relevant for creating, configuring and working with Agents. You can add additional, customized sections or cards for this page with information tailored to your specific needs and/or user roles. The title of the section or card and the content that displays is completely up to you.
Click the image to expand it.

Follow the instructions below to create custom content.
-
Access the Custom Content tab in the Lattice Admin tool:
-
Log into the Lattice Admin tool at https://admin.ipce.broadcom.com/.
-
On the home page, under Products, select Automic Automation to open the configurations that are assigned to you.
-
In the Configurations pane, select the configuration that you want to update.
-
Select the Custom Content tab.
A view with two main panes opens:
-
The Product Area(s) pane displays a list of pages where you can view, update, or create custom content. If custom content has already been defined for other pages in AWI, their URLs appear in this list. You can select any of these entries to modify existing content or define new content directly from this pane.
-
The Custom Content pane, where you configure the layout and build your actual content.
-
-
-
Get the context URL from AWI to attach your custom help to a specific page.
-
Switch to your AWI browser and navigate to the relevant view.
-
Open the Automic Automation Help by clicking the Help (?) button on the top right corner of the menu bar.
-
Once the help is displayed, click the Copy button to the right of the page title. This grabs the context URL corresponding to that exact view.
Click the image to expand it.

Important! You do not require a fully-qualified URL, only the unique portion of the URL that identifies the AWI view, for example, /*.*/awa/administration_agents.
-
-
Now that you have the URL, define the product area and layout in the admin tool and choose how your content displays alongside the default help.
-
Switch back to the Lattice Admin tool.
-
In the Product Area panel on the left, click the Add New button.
-
Paste the context URL you copied from AWI into the new field.
-
Define how your custom content should appear in relation to the default Automic Automation Help using the layout controls in the Custom Content panel on the right:
-
Show Default Content (Toggle): Leave this toggled ON if you want to keep the standard Broadcom help content. Toggle it OFF if you want to hide all standard content and only display your custom creations.
-
Show Custom Content (Top / Bottom buttons): If you kept the default content enabled, choose Top to make your custom sections and cards appear above the standard cards, or choose Bottom to place your custom content below the standard cards.
Click the image to expand it.

-
-
-
Build your Sections and Cards to choose the type of content you want to create and actually build out your text and links.
-
In the Custom Content pane on the right, click the Add Content button.
-
At the top of the window that opens, use the Show as: toggle to choose your format:
-
Section: Choose this to create a free-form information area that displays fully at the top of your custom content area.
-
Card: Choose this to create an action-oriented item. In this case you also need to select an icon for your card from the Icons list and enter a Title and a Description (the description displays below the title).
-
-
Build your content using the Display Information rich text editor. You can type directly into the box and use the toolbar to customize your layout:
-
Formatting: Change fonts, styles, text colors, background colors, and create bulleted or numbered lists.
-
Insert Link: Add hyperlinks to external resources (like your company's SharePoint or IT portal) by defining a Title and the URL.
-
Insert Image: Upload custom images directly into your content. Supported formats are JPEG, JPG, and PNG (maximum file size 5MB).
-
Insert Video: Paste a link to embed a video directly into your help pane.
Important! When linking to a YouTube video, make sure you use the embed URL rather than the watch URL, for example https://www.youtube.com/embed/7uV8p9R.
-
Insert HTML: If you have pre-built content or specific styling, you can insert valid raw HTML code.
-
Insert IFrame: Embed external web pages or widgets directly into the panel.
Click the image to expand it.

Tip! Click the Maximize icon (the diagonal arrows) on the toolbar to open the Display Information window in full screen. This gives you much more space to design and review your content before saving.
-
-
-
Finally, you can arrange your content, duplicate items if needed, and save your configuration to push it live.
-
Previewing Content: To see exactly how your custom section or card will appear to users in the Automic Automation Help panel, click the Preview icon (the eye). This allows you to verify your formatting, images, and links before making the content public.
-
Arranging Content: You can easily change the order in which your custom content appears in the Help pane by manually dragging and dropping the cards and sections into the sequence you want in the Custom Content pane.
-
Managing Cards and Sections: Click the three vertical dots on the top right of any Section or Card to access a menu with the following options:
-
Edit: Reopen the rich text editor to make changes.
-
Duplicate: Creates a complete, independent copy of the content right below the current one. Note that because it is a completely separate copy, any future changes must be made manually to each instance.
-
Copy to New Area: Opens a dialog where you can paste a new product area URL/UID to send a copy of this specific content to a new page.
-
Copy to Existing Area: Opens a dialog with a dropdown list allowing you to copy this content to a product area you have already defined.
-
Delete: Removes the section or card.
-
-
Managing Product Areas (URLs): In the Product Area(s) pane on the left, you can click the three vertical dots next to any URL to access a similar management menu:
-
Edit: Allows you to edit the URL inline.
-
Copy to New: Copies the entire product area setup to a new URL.
-
Copy to Existing: Copies the entire product area to another existing area. You will be prompted to either Merge the cards together or Replace the existing area entirely.
-
Delete: Removes the product area and all associated content.
-
Select Update at the bottom right of the screen to save your changes. They will be available in the product within about five to ten minutes of updating the configuration.
-
Importing Custom Content from Another Configuration
If you have access to multiple configurations, you can import your existing custom content from one configuration to another to save time and ensure consistency across configurations.
For example, if you have created Help content for your test environment, you can pull that content into your production environment rather than re-creating it manually.
Follow the instructions below to import custom content:
-
Log into the Lattice Admin tool at https://admin.ipce.broadcom.com/.
-
On the home page, under Products, select Automic Automation to open the configurations that are assigned to you.
-
In the Configurations pane, select the configuration that you want to update.
-
Select the Custom Content tab.
-
In the Product Area(s) pane on the left, click the Import Content button.
-
In the Get Custom Content from Another Configuration dialog that opens, use the Select a Source Configuration dropdown to choose the environment you want to pull content from.
Click the image to expand it.

-
Select one of the following options at the bottom of the dialog:
-
Merge: Click this to combine cards and sections from the current configuration with the source configuration.
-
Replace: Click this to completely replace all cards and sections in your current configuration with the content from the source configuration.
-
-
Review the details and select Confirm.
Deleting Custom Sections and Cards
If you no longer need a specific piece of information, you can remove individual sections or cards.
Follow the instructions below to delete custom content:
-
Log into the Lattice Admin tool at https://admin.ipce.broadcom.com/.
-
On the home page, under Products, select Automic Automation to open the configurations that are assigned to you.
-
In the Configurations pane, select the configuration that you want to update.
-
In the Custom Content tab, select the relevant URL from the Product Area(s) pane.
-
Locate the section or card you want to remove in the right-hand pane.
-
Click the three vertical dots on the item and select Delete.
-
A Confirmation dialog will appear asking if you are sure you want to delete the item.
-
Check the box labeled I definitely want to delete this, and then click Confirm.
-
Click the Update button to save your changes. Your changes will be available in the product within 5 minutes.
Deleting URLs in the Lattice Admin tool
If you no longer need any custom content for a specific AWI page, you can delete the entire product area URL and all associated cards and sections at once.
To do so, follow the instructions below:
-
Log into the Lattice Admin tool at https://admin.ipce.broadcom.com/.
-
On the home page, under Products, select Automic Automation to open the configurations that are assigned to you.
-
In the Configurations pane, select the configuration that you want to update.
-
In the Custom Content tab, locate the URL you want to remove in the Product Area(s) pane on the left.
-
Click the three vertical dots next to the URL and select Delete.
-
A Confirmation dialog will appear indicating the specific URL you are about to delete.
-
Check the box labeled I definitely want to delete this, and then click Confirm.
-
Click the Update button to save your changes. Your changes will be available in the product within 5 minutes.
See also: