Example: SLM Unattempted Start
In this example, it is critical that a job that creates a report is finished from Monday to Friday at 10:15 at the latest. An SLO object monitors whether this job starts on time to meet this deadline. As the job does not start at the expected time, a notification is sent to the user who is responsible for it.
This page includes the following:
What Will You Learn?
- How to create an SLO object.
- How to define a service that requires
- that the executable object included in the SLO object starts executing in time
- that, in case the requirement is not met, a notification is sent to a specific user.
- How to react to a violation
What Does this Use Case Cover?
A job called DAILY_REPORT must be finished every weekday at 10:15. According to its Estimated Runtime (ERT), it takes 15 minutes to execute it. This implies that it must start before 10:00:00.
An SLO object called DAILY_REPORT_10 monitors the behavior of this job. It specifies that in case it does not starts in time a violation be reported and an e-mail sent to the user that is responsible for dealing with such exceptions.
In our example, the job fails to start.
Prerequisites
- The DAILY_REPORT job is in place and has been executed in the past.
- Based on the past executions of the job, we know that its ERT is 15 minutes.
- A Notification object is in place that sends an e-mail to the user who should take care of the exceptions.
Used in this Example
Create the SLO Object
SLO objects can be created either from the Administration or from the Process Assembly perspective. In this example we will create it from the Process Assembly one.
Add the SLO Object and define its general settings:
-
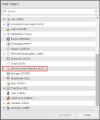
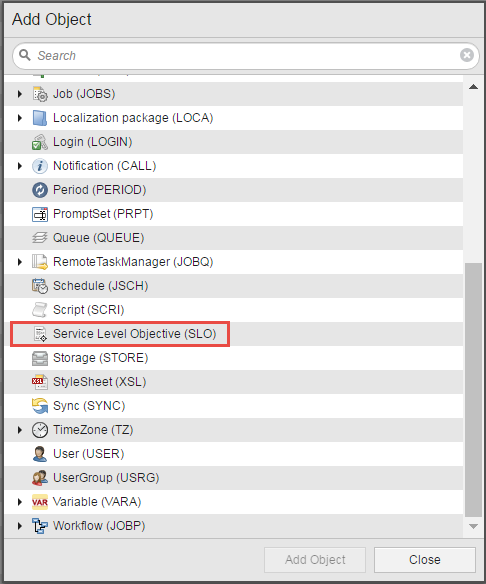
Go to the Process Assembly perspective and the Add Object button in the toolbar or right-click anywhere in the list and select Add > Add Object.
-
The Add Object dialog is displayed. Select Service Level Objective (SLO) and click Add.
-
The Rename Object dialog is displayed. Enter the name of the SLO object, in this case DAILY_REPORT_10.
-
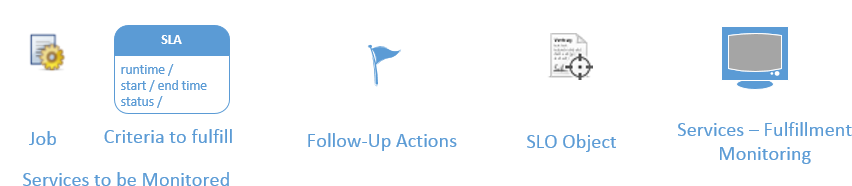
The SLO object definition window opens displaying the main page. Here and on its sub pages, you will specify:
- Objects to monitored
- Criteria that their execution must meet
- What should happen if they do or do not.
However, we are going to start defining the object with the common pages. These are settings that you define once and that you will probably need not revisit.
-
Switch to the General page and do the following:
-
(Optional) Enter a Title that describes in detail what this object does.
-
(Optional) Enter or select Archive keys. They are freely definable keywords you assign to the object. Later on you can perform searches or you can filter objects using them.
If your user profile has been granted with the Deal with authorizations at object level privilege, you will have access to the Object Authorizations page. We will ignore these settings for this example.
-
- Switch to the Version Management page. It is empty now but it will start listing all the versions of the DAILY_REPORT_10 as soon as you make changes in it.
-
Switch to the Documentation page. Depending on your system configuration, you may have additional sub pages here. On these pages you can enter information you consider important for your work with this object. We will also ignore this page for this example.
Specify the Services to be Monitored
Switch to the Service Selection page. Here you define the beneficiary of the service as well as the service itself, that is, the object that will be monitored.
-
Specify the beneficiaries of the service. They are entities such as departments, business units, etc. that require the executable objects to be processed according to the criteria defined in the agreement. There are three possible scenarios when defining the beneficiaries:
-
You add just one beneficiary
All the objects you specify in the Service Selection section that have this particular beneficiary in common will be monitored with this SLO.
-
You add several beneficiaries
All the objects that have at least one of these beneficiaries in common will be monitored by this SLO.
-
You do not specify a beneficiary
All the objects inserted below will be monitored.
We will not specify a particular beneficiary in our example.
-
-
Define the object that must render the results you want to monitor, in this case DAILY_REPORT.
-
Leave the dropdown list at the top as it is.
-
Click Add criterion to insert the object we want to monitor.
-
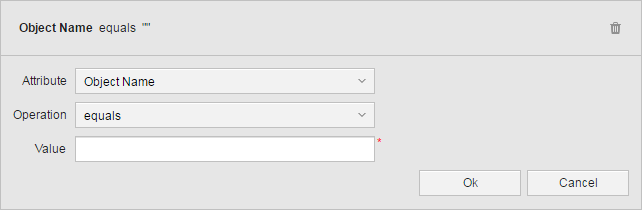
The following filter box opens.
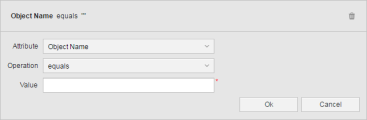
There are several criteria you can select for the SLO to evaluate what should be monitored. We will use the object name. Therefore, select the equals operator and enter DAILY_REPORT in the Value input field.
-
From the Attribute dropdown list select the parameter you want to use to filter the affected objects. If you select Queue here, all the objects processed by that queue will be monitored.
-
In Operation select the operator that will evaluate the value.
-
Enter the Value that identifies the object.
-
Click OK.
-
Define the Requirements that the Job Must Meet
-
Switch to the Fulfillment Criteria page. Here you define the criteria that the DAILY_REPORT job must meet as well as the actions that will be taken in case they are fulfilled/not fulfilled.
-
The job must be finished every weekday at 10:15. According to its Estimated Runtime (ERT), it takes 15 minutes to execute it. This implies that it must start at 09:59:59 at the latest.
We will set the SLO object to check whether the job starts on time to be finished when we need it, that is:

Define Follow-up Actions
Specify the follow-up action in case the monitored services do not meet the requirements. In the Actions section we will specify what should happen if the job does not start before 10:00:
Activate on violation and click the icon in the adjacent filed to select the Notification object that will send the e-mail to the responsible user.
Activate the SLO Object
For the DAILY_REPORT_10 SLO object to actually monitor the behavior of the job, we must activate it.
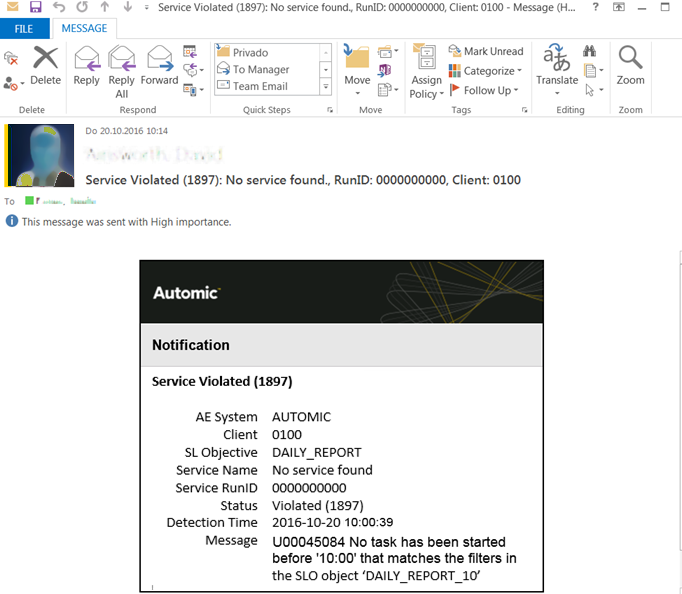
Switch to the Service Level Objective main page and activate the Monitor this Service Level Objective checkbox. From now on, the SLO object will watch over the DAILY_REPORT job and send an e-mail to the assigned user in case it does not start at the specified time at the latest.
When a Violation Occurs
In the Actions section of the Fulfillment Criteria page we had specified that an e-mail be sent to the user that is responsible for monitoring the job.
As soon as the time specified in the SLO object is reached, if the job has not been started, an e-mail is sent to the user indicated in the Notification object informing of the violation.
Example
Reacting to Violations of the Service Agreement
You have various options for reacting to violations of a service agreement:
-
Switch to the Process Monitoring perspective and open the Services > Fulfillments page.
-
Spot the entry that corresponds to the violation of our service agreement.
-
Right-clicking it opens a context-menu providing all the available actions.
- Select Open Report to access the report recorded when processing the job, where all relevant data are available.
- Select Executions to open a list with all past executions of the job; here you can compare and analyze the behavior of the job.
- Select Edit Service if your analysis leads to the conclusion that something in the job definition should be changed. This opens the main page of the job definition in the Process Assembly perspective, where you can edit it.
- Select Edit Objective if you'd rather adapt the definition of the SLO object.
See also: