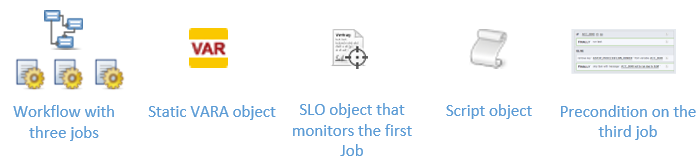
Example: Skipping a Job Due to an SLM Violation
In this example a workflow containing three jobs must be completed as early as possible every day. The third job in the workflow must not necessarily run on a daily basis. If the first job in the workflow runs late or longer than the maximum runtime (MRT) that has been set for it, the third job should be skipped; this should happen only for that particular execution (RunID) of the workflow. This guarantees that the workflow can still end on time.
This page includes the following:
What Will You Learn?
- How to use and solve variables
- How to pull functions, such as retrieving and inserting RunIDs in variables
- How to define a logic in conditions
- How to use variables in conditions
- How to use variables in scripts
What Does this Use Case Cover?
A workflow called JOBP_ACC_203040 contains three jobs: JOBS_ACC_9020, JOBS_ACC_9030 and JOBS_ACC_9040. It is mandatory that the first two jobs run every day but the third one is not essential. What is important, however, is that the workflow is completed as early as possible. The usual runtime of the first job is known and a specific maximum runtime (MRT) is set for it. You know that in some cases it might take longer than that, which means that the workflow would not be completed in time. To make sure that even in such situations the workflow is finished in time, you want the optional job to be skipped if the MRT of the first job is exceeded.
An SLO object monitors the MRT of the first job. You must tell the SLO object what action should be triggered in case of a violation; this will be the execution of a Script object that writes certain values to a VARA object assigned to the third (optional) job. The VARA object allows a precondition, which is also assigned to the third job, to evaluate whether it should be skipped (because of the violation) or not (due to the fulfillment).
Prerequisites
The following objects and dependencies among objects must be defined:
-
The workflow containing the three jobs, the third one being optional
-
A static VARA object assigned to the optional job
The VARA object will contain the RunID of the workflow as long as it runs (the Key) and, if the first job runs longer than its MRT, a value (no) provided by the Script object
-
An SLO Object that monitors the runtime of the first job in the workflow
If the job runs longer than the MRT defined for it, the SLO object executes a Script object.
-
The Script object
If the SLO object detects a violation, this script writes the following into the VARA object:
- the RunID of the workflow as Key.
- a Value, namely no.
-
A Precondition on the optional job that
- Checks if a Value, namely no, is set in the VARA object. This means that the execution of the first job is taking too long. In this case, the third job will not be executed.
- Removes the RunID of the workflow from the VARA object as soon as the current execution is finished.
Used in this Example
Create a Workflow with Three Jobs

Monitor the Maximum Runtime of the First Job
-
Open JOBS_ACC_9020. You can do so directly from the workflow by right-clicking it and selecting Edit from the context menu.
The Job definition pages open up on the agent-specific sheet.
-
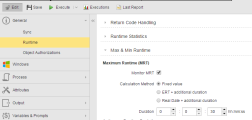
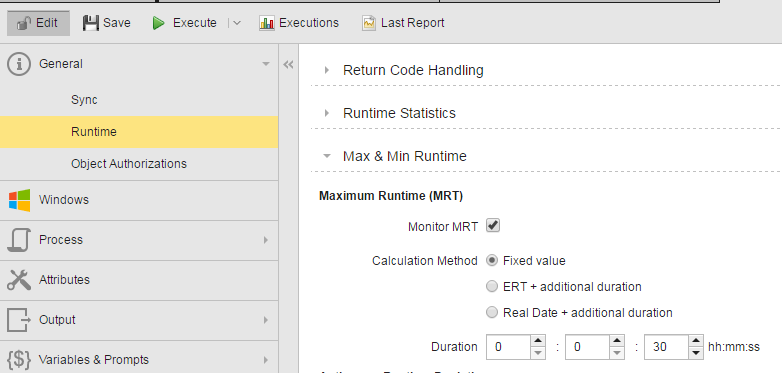
Expand the General tab and select Runtime.
-
In the Max & Min Runtime section activate the Monitor MRT checkbox.
-
In this example we will use the Fixed value calculation method. Activate this option and enter the Duration, for example:
Note: There are other methods to calculate the MRT. The Useful Links section at the bottom of this page provides direct access to the topics that describe them.
-
Save your work.
Create a Static VARA Object
Add a Static VARA object and leave the default variable settings as they are. In our example, this object is called VARA_ACC_9040:
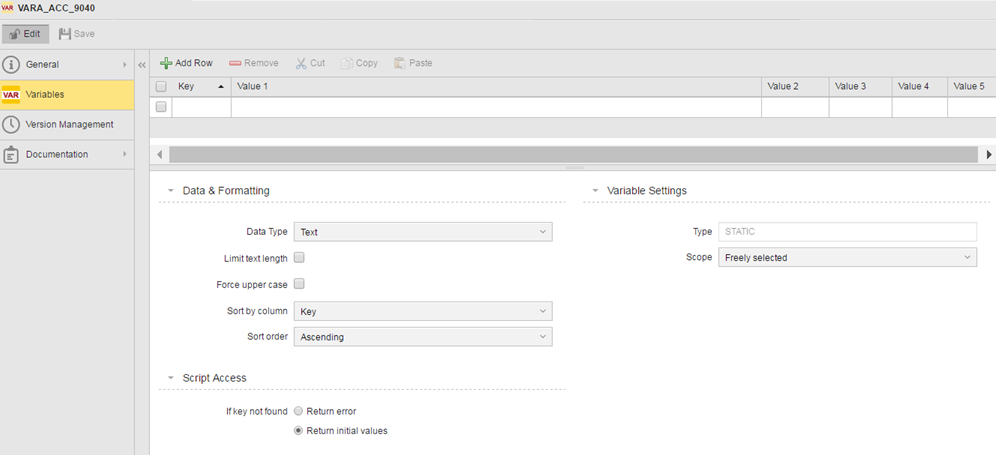
Later on the content of the variable fields will be populated by the Script object as follows:
- The Key will contain the RunID of the workflow during its execution. The entry is removed as soon as the workflow is completed.
- The Value 1 field will contain no if the SLO object detects a violation of the fulfillment criteria, that is, if the execution of the first job exceeds the defined MRT.
-
Open JOBS_ACC_9040.
- Expand the Variables & Prompts tab and select Variables.
- In Name enter the name of the VARA object you have just created, namely VARA_ACC_9040.
-
In Value enter no.
- Save your work.
Create an SLO Object that Monitors the First Job
You can start defining the SLO object in either the Process Assembly or in the Administration perspective, provided you have the necessary rights.
In this example we will not enter into the details of defining the general SLO object pages (General Page, Version Management Page, Documentation Page), but will concentrate on the object-specific settings.
-
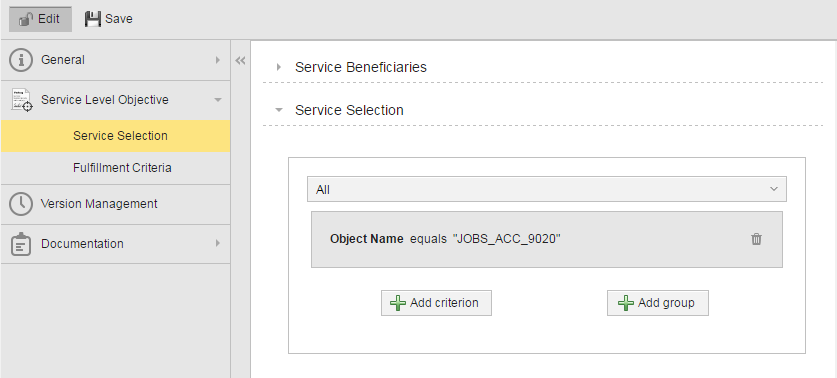
Open the Service Selection page. Here you specify the beneficiaries of the service as well as the service (the job) that will be monitored. We will not specify beneficiaries in our example.
-
Define the object that must render the results you want to monitor, in this case JOBS_ACC_9020.
-
Leave the dropdown list at the top as it is.
- Click Add criterion to insert the object we want to monitor.
-
The following filter box opens.
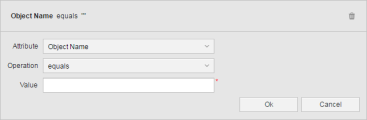
There are several criteria you can select for the SLO to evaluate what should be monitored. We will use the object name.
-
From the Attribute dropdown list select Object Name if it is not selected already.
-
In Operation select equals if it is not selected already.
-
In Value enter the name of the job, in our case JOBS_ACC_9020.
-
Click OK.
Note: The service selection criterion is now defined:

-
-
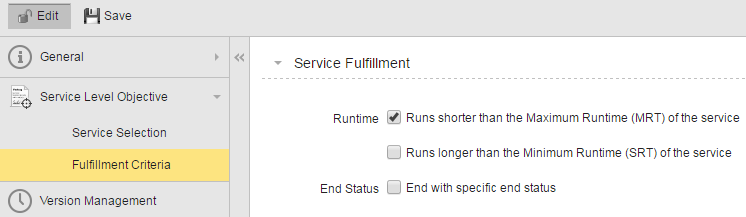
Switch to the Fulfillment Criteria page. Here you define the criteria that the JOBS_ACC_9020 job must meet as well as the actions that will be taken in case they are fulfilled/not fulfilled. In the Service Fulfillment section activate Runtime: Runs shorter than the Maximum Runtime (MRT) of the service:
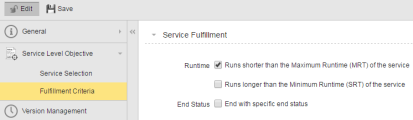
Later you will define which Action will be taken in case of a violation of this service.
-
Save your work.
Create a Script Object that Executes in Case of Violation
Add a Script object that is executed if the SLO object detects a violation of the services.
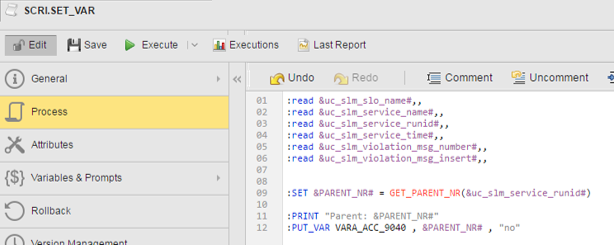
In our example the Script is called SCRI.SET_VAR. This script will do the following:
- Retrieve the data of the SLO object that monitors the first job: its name, the name of the service (the job) and its RunID as well as data on the message that will be displayed in case of violation of the service.
- Get the RunID of the job and write it to the VARA object (VARA_ACC_9040)
- The first six variables are script variables that can be used in the objects executed by an SLO object due to a violation. They retrieve the following information from the monitored services:
&uc_slm_slo_name#
Name of the SLO object monitoring the services (in this case
&uc_slm_service_name#
Name of the monitored services (objects, in this case JOBS_ACC_9020)
&uc_slm_service_runid#
RunID of the monitored service that did not fulfilled the criteria. In this case, the RunID of JOBS_ACC_9020
&uc_slm_service_time#
Time at which the violation was registered
&uc_slm_violation_msg_number#
Message ID
&uc_slm_violation_msg_insert#
Message that will be provided as reason for the violation. In this case, the message specified in the Precondition defined on the optional job.
- :SET &PARENT_NR# = GET_PARENT_NR(&uc_slm_service_runid#) retrieves the RunID of the parent task of the object that caused the violation. In this case, this is the RunID of the workflow in which JOBS_ACC_9020 runs.
- :PUT_VAR VARA_ACC_9040 , &PARENT_NR# , "no" writes the values to the VARA object, that is, the workflow RunID and the value no that triggers the follow-up action defined in the Precondition defined on the optional job.
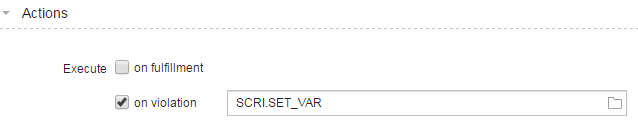
Select the Script as the Action To Take in Case of Violation
Go back to the SLO object and define the script as action to be taken if the monitored job runs longer than its MRT.
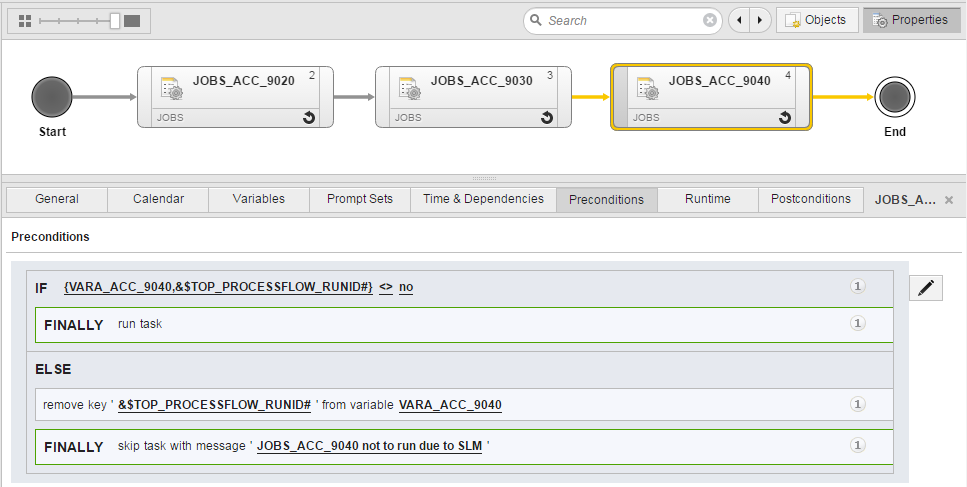
Define a Precondition on the Optional Job
Switch to the workflow to define a precondition on the optional job . The precondition should check the data rendered by VARA_ACC_9040 and trigger a particular action (skip the job) if it contains a certain value:
- If the value written to the VARA object for the current RunID is NOT equal to no, the job should run as usual.
- If the value written to the VARA object for the current RunID is equal to no, then
- Remove the entry from the VARA object for this RunID.
- Do not execute the job.
Carry out the following steps:
-
Select the JOBS_ACC_9040 job and click the Properties button on the workflow toolbar to open the properties pane on the bottom half of the workflow editor.
-
Open the Preconditions tab.
-
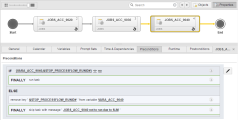
Click Add Preconditions to open the Conditions Editor:
The left pane contains three tabs where you can select conditions, actions and final actions. The right pane is where you build your conditions.
- Click
 to extend the dialog to the complete window size. Click
  to reduce it.
 - Later on, if you want to edit the conditions you have inserted, click
 in the upper right corner of the dialog.
- Click
-
Open the Conditions tab and select User defined.
-
Drag and drop the condition in the left pane. The condition is ready to define:

-
Define the condition settings. See below for instructions and options.
-
The Precondition is now finished. Click OK on the dialog to return to the workflow editor and save your work. The Precondition is displayed beneath the Workflow:

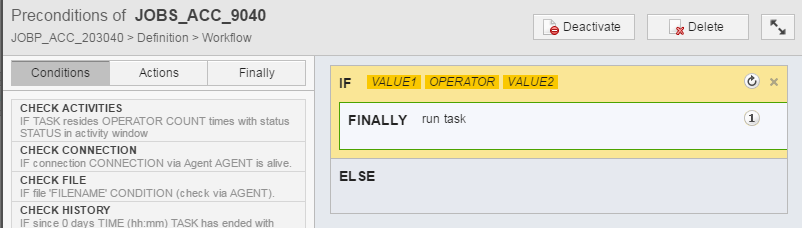
Defining Conditions
IF Conditions
To specify the IF part of the condition, click on the terms (VALUE1, OPERATOR or VALUE2). The corresponding input fields are displayed:
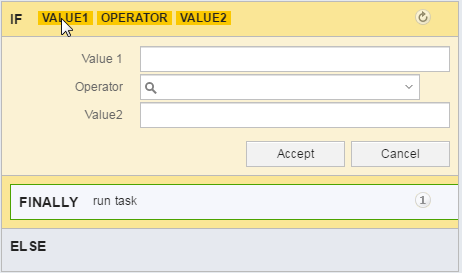
-
To insert data in Value 1 click on the label; this activates the Variables picker:

-
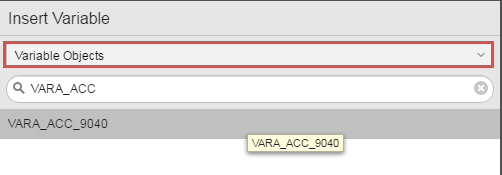
Click it to open the Insert Variable dialog.
Note: Make sure you select Variable Objects from the dropdown list.
Search for VARA_ACC_9040 and click Select to insert it.
-
Since you want to workflow RunID to be written to the VARA object not only in case of a violation but also if the job complies with the MRT defined, you must enter an additional script variable, namely &$TOP_PROCESSFLOW_RUNID#. In both cases, the RunID will be removed from the variable as soon as the workflow is finished.
-
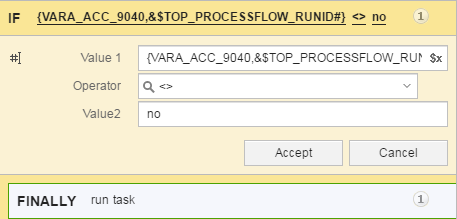
Select <> in the Operator dropdown list.
-
Enter no in Value 2.
-
Click Accept.
The
 symbol within the blocks indicates that the condition/action is processed several times. In case of Preconditions, they are repeated until a final action has been reached. Click it; the symbol changes to
  . This means that the condition is processed only once.
ELSE Conditions
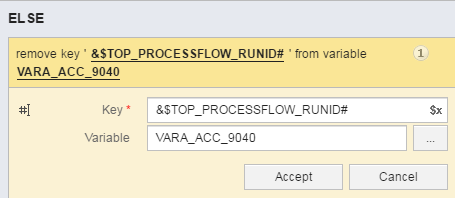
To specify the ELSE part of the condition, open the Actions tab and select DELETE ENTRY FROM VARIABLE.
-
Drag and drop the action right below ELSE.
-
Click on KEY or VARIABLE NAME to display the input fields and enter the relevant data.
-
Click Accept.
-
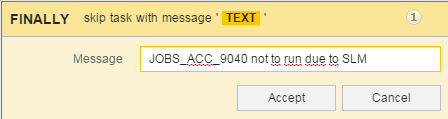
To finish the condition, open the Finally tab and select SKIP TASK.
-
Drag and drop it at the bottom of the ELSE section.
-
Click on TEXT and enter the message to be displayed as explanation for the action, for example:
-
Click Accept.
Note: You have now carried out all the necessary steps.
When the workflow is activated and gets a RunID, the VARA object will contain an entry for this RunID for the duration of the execution:
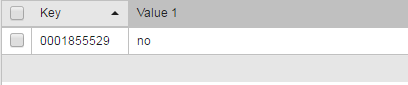
This entry is removed by the precondition step once it has been checked.
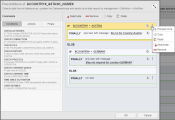
The Services - Fulfillments page in the Process Monitoring perspective will display the violation that set the VARA value:

Useful Links
This example contains references to a number of functions that you might want to know a bit more about.
- Defining Objects - Settings on the Runtime Page
- Variable objects
- Variable (VARA)
- Variables for System and Object Values
- Object Properties in Workflows
- Conditions, Preconditions, Postconditions
- Service Level Objective (SLO)