Preparing the AE Database - Oracle
This topic guides you through the steps necessary to set up an Oracle database for the Automation Engine.
Notes:
-
Database administration rights are necessary to perform this step.
-
Refer to the reference section of the AE database in order to optimize performance. For more information, see Recommendations for Oracle.
-
Modifications in database contents result in an inconsistent database.
-
You can maintain the AE database by using partitioning with ILM (Information Lifecycle Management). For more information, see Automation Engine Database before you set up the database.
-
When preparing the database for a container-based installation, make sure you also adapt the values.yaml file as required. For more information, see Preparing the AE and Analytics Databases for the Container Installation.
-
When you use cloud-hosted databases, you might not have the permissions required to create or rename tablespaces. In this case, you can state the default tablespaces provided as alternative ones in Automic Automation and Automic Automation Kubernetes Edition.
More information:
- Compatibility Information
- Recommendations for Oracle
- Oracle Parameters
- Automation Engine Database
- ILM - Information Lifecycle Management
- UC_SYSTEM_SETTINGS - Systemwide Settings
This page includes the following:
Disk Space Required
The initial database space required for an Automation Engine installation depends on the type and size of the system:
-
Test systems: 1 GB
-
Production systems
-
Small systems: 5 - 20 GB
-
Medium systems: 20 - 50 GB
-
Large systems: > 50 GB
-
For more information, see Automic Automation System Requirements and Sizing.
Code-Page Setting
Important! The code-page setting of the DB client must comply with the database settings. The three code pages from which you can choose are WE8ISO8859P1, WE8ISO8859P15 and WE8MSWIN1252. Which one you choose depends on the character set you need to store in the database. Therefore, ensure that the character set defined in XML_ENCODING in the UC_SYSTEM_SETTINGS variable corresponds to the character set of the database. For more information, see XML_ENCODING.
For example, WE8ISO8859P15 seems the better choice as WE8ISO8859P1 does not support the Euro sign (€). WE8MSWIN1252 supports the Euro sign plus several additional characters. Use this code page if you are newly setting up your database.
Note: It is not necessary to convert your database to a new character set if it uses WE8ISO8859P1 and you do not need any of the additional characters.
When using 8-bit character sets you can use the same code set for the database and the database client. In this case there is no data conversion. However, the user interface, the server and the utilities also need to be compatible with the 8-bit character set.
You can query your database settings with the following command:
SELECT * FROM NLS_DATABASE_PARAMETERS
You can also specify your code-page setting:
-
Windows
Set HKEY_LOCAL_MACHINE\SOFTWARE\ORACLE\...\NLS_LANG in the registry according to your database setting.
-
UNIX
You can set the environment variable NLS_LANG as shown below:
NLS_LANG =<NLS_LANGUAGE>_<NLS_TERRITORY>.<CHARACTER SET>;export NLS_LANG
Example
NLS_LANG=AMERICAN_AMERICA.WE8ISO8859P15;export NLS_LANG
You can also define the code-page settings in the INI files of the relevant components ( [ODBC] section).
Oracle UTF-8 and the Automation Engine
To connect to the Oracle UTF-8 database, the Automation Engine must use a single-byte code page on the connection string such as WE8MSWIN1252 or WE8ISO8859P15 and you need to define NLS_LENGTH_SEMANTICS = CHAR.
The XML_ENCODING within the UC_SYSTEM_SETTINGS variable must match the used code page for the database connection.
Other Requirements
Database Computer
A 64-bit client must be installed.
-
Install the Oracle client software on the Automation Engine computer in order to enable access to the database.
Important! The Oracle Instant Client is not enough to work with the AE database. The Oracle client version must correspond to the Oracle version in use.
-
Enter the database name in the TNSNAMES.ORA file.
-
Change the block size to 8192 bytes when you install the database, and use your preferred character set as described above.
-
Install the package DBMS_LOB.
Prerequisites for ILM
You can partition your database with ILM to guarantee the optimum performance of your Automation Engine system. Oracle requires the permission on USER_OBJECTS to work with ILM.
Oracle RAC
-
In the INIT.ORA file, set the _lm_dd_interval parameter to <= 10 seconds. You can also use the value "0" to identify deadlocks earlier.
-
You require a database User ID for the Automation Engine with sufficient rights.
-
All Automation Engine processes must only connect to one node. Use Oracle services to make sure only one node is taken and service is only available on one node at a time.
-
Automation Engine supports Oracle RAC in an Automation Engine active/active configuration, but will only work with one node. Oracle services must be used and setup so that only one node is used.
-
The Automation Engine has a built in software cluster; therefore putting the Automation Engine on multiple boxes for high availability (HA) requires no additional manual steps.
-
DATA GUARD is not HA, so it does require manual steps. Depending on the mode that is used, you may experience a performance decrease (SYNC commit,…).
Setting Up an Oracle Database
In the database computer:
-
Define the tablespaces.
-
Facilitate unlimited extents (MAXEXTENTS) instead of limiting them.
-
Tablespace sizes can be adjusted individually (minimum 1 GB UC4_DATA, 500 MB UC4_INDEX for a test environment).
-
Tablespace administration by ASSM (Automatic Segment Space Management): SEGEMENT_SPACE_MANAGEMENT=AUTO.
-
Log on to the Oracle database using a user ID that has DBA rights, and define the tablespaces:
CREATE TABLESPACE UC4_DATA
DATAFILE 'Path to uc4_data.ora'
SIZE 1024M
AUTOEXTEND ON NEXT 1024M MAXSIZE 2048M
DEFAULT STORAGE (INITIAL 512K NEXT 2048K MAXEXTENTS UNLIMITED);
CREATE TABLESPACE UC4_INDEX
DATAFILE 'Path to uc4_index.ora'
SIZE 512M
AUTOEXTEND ON NEXT 512M MAXSIZE 1024M
DEFAULT STORAGE (INITIAL 512K NEXT 512K MAXEXTENTS UNLIMITED);
Note:
If you are using cloud-hosted databases and do not have rights to create or rename tablespaces, use the default values for the tablespace definition.
In Automic Automation you can do so in the DB Load utility user interface while loading the database or using the command line interface, see AE DB Load (UCYBDBLD.EXE).
In Automic Automation Kubernetes Edition you do it in the values.yaml file:
databases: automationEngine: ... dataTablespaceName: <AE data tablespace name> indexTablespaceName: <AE index tablespace name> ... analytics: ... dataTablespaceName: <Analytics data tablespace name> indexTablespaceName: <Analytics index tablespace name> ... -
-
Create a database user. It is recommended to create an additional database user for AE. This user must have the required privileges.
-
Change the storage parameters for large tables:
-
Increase the initial values as required for productive environments and large tables. This applies to the following tables:
-
To increase the values, you need to change the installation file UC_DDL.SQL for the following tables:
INI, MELD, ODOC, OT, AH, AJPP, AJPPA, RH and RT.
CREATE TABLE MELD (
MELD_Idnr INTEGER NOT NULL,
MELD_USR_Idnr INTEGER NOT NULL,
MELD_Seen SMALLINT NULL,
MELD_TimeStamp DATE NULL,
MELD_MsgNr INTEGER NULL,
MELD_MsgInsert VARCHAR2 (255) NULL,
MELD_DeleteFlag SMALLINT NULL,
MELD_Client SMALLINT NULL,
MELD_Source INTEGER NULL,
MELD_Category INTEGER NULL,
MELD_Type INTEGER NULL,
MELD_Host VARCHAR2 (200) NULL,
MELD_ArchiveFlag SMALLINT NULL,
CONSTRAINT PK_MELD PRIMARY KEY
(
MELD_Idnr
) USING INDEX TABLESPACE UC4_INDEX
) TABLESPACE UC4_DATA
STORAGE (INITIAL 51200K NEXT 7168K MAXEXTENTS UNLIMITED);
-
-
Define a large roll-back segment for the Automation Engine. The size should be 10-25% of the Automation Engine data.
Securing Oracle Database Connections
You can use TLS/SSL to secure the connection between the Oracle database and your Automic Automationinstallation.
Notes:
-
Make sure that you are working with Oracle DB Server 12 or higher.
-
Be aware that you are responsible for the certificate setup. If you use TLS/SSL to connect your database with the Automation Engine, make sure that the corresponding certificate is set up correctly. Otherwise the connection might fail.
For more information and an example on how to secure your database connection using TLS/SSL, see Securing Automic Automation Database Connections.
Scenarios
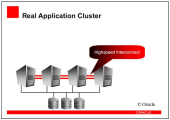
Scenario 1: RAC
The Automation Engine is not fully RAC enabled, as it only benefits from the increased availability of an RAC system. Its performance, however, does not improve by using RAC technology. On the contrary, you need to make sure that your system only communicates with one node of the RAC system in order to minimize data traffic through the Cluster Interconnect and administrative workload. In doing so, you also reduce the likelihood of deadlocks that might occur in the database because of database nodes that try to access the database concurrently.
Note: Within an RAC node, Oracle generally uses row-level locking. However, block-level transfer and resource locking is used between the RAC nodes. To make sure that the AE is always only connected to one node, using Cluster Managed Services is recommended. You need to configure them in a way that the service only runs on one node and that the cluster software moves it to the second node if required.
Example for setting up a cluster service:
srvctl add service –d <DB NAME> -s <SERVICE NAME> -r <Node 1> -a <Node 2>
srvctl start service –d <DB NAME> -s <SERVICE NAME>
Similarly, in TNSNAMES.ORA under CONNECT_DATA=(SERVICE-NAME=<SERVICENAME<) the service name created with srvctl must be used.
Make sure that the following database parameters are set when you are using an RAC system with the AE:
INIT.ORA
-
active_instance_count = 1
This parameter is only relevant if an RAC system with exactly two nodes is used and ensures that all database sessions are always only connected at one node. It is not required if Cluster Managed Services are being used.
-
_lm_dd_interval <= 10
This parameter determines the interval for the recognition or removal of deadlocks in the database.
-
Filesystemio_options = SETALL
This parameter ensures that the database instance uses both ASYNC I/O and DIRECTION. This enables you to achieve the optimal level of performance at a sensible buffer cache size.
-
local_listener
This parameter ensures that the database instance registers with the local listener.
-
remote_listener – only in RAC
This parameter ensures that the database instance registers with the other listener in the RAC.
TNSNAMES.ORA
-
LOAD_BALANCE=ON (valid for the database client)
The effect is that the CONNECT load is equally distributed across all listeners in the RAC.
-
FAILOVER=ON (valid for the database client)
This parameter ensures that a failover of the database sessions takes place when the primary RAC node is no longer available.
Example of a corresponding tnsnames.ora for RAC entry:
UC4P =
(DESCRIPTION =
(ENABLE=BROKEN)
(ADDRESS = (PROTOCOL = TCP)(HOST = knoten1-VIP)(PORT = 1521))
(ADDRESS = (PROTOCOL = TCP)(HOST = knoten2-VIP)(PORT = 1521))
(LOAD_BALANCE = on
(FAILOVER = on)
(CONNECT_DATA =
(SERVER = DEDICATED)
(SERVICE_NAME = UC4P) ### Cluster Managed Service Name
)
)

Scenario 2: Data Guard
The characteristics of Oracle Data Guard configuration that are relevant for use with the AE are described below. The configuration that you will use depends on the available infrastructure and your requirements.
Configuration 1 (Maximum Protection - Guaranteed Protection Mode)
The primary database will only register a transaction as committed when this transaction was also committed to at least one standby database. If the transaction could not be committed to a standby database, the primary database stops.
The advantage of this configuration is that production can continue immediately after a short manual intervention when the primary database has failed. Check whether the standby database was synchronized with the primary database at the time it failed. If so, you can activate the standby database and continue.
Maximum Protection - Stops the primary database when the last standby database is no longer available:

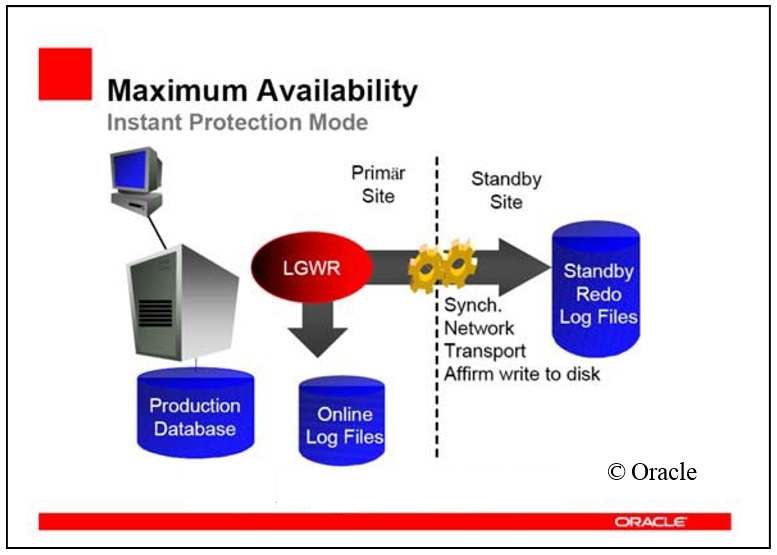
Configuration 2 (Maximum Availability - Instant/Rapid Protection Mode)
This configuration ensures that the standby database(s) is/are synchronized in a timely manner. However, the primary database starts processing the next transaction even it has not yet been confirmed that the previous transaction was also committed to at least one standby database. Therefore, the primary database does not stop when no standby database is available anymore. Changes made in the primary database are automatically updated in the standby database as soon as it is available again. In this configuration, you must always check manually whether the standby database was synchronized with the primary database at the time of failure.
Maximum Availability - Switching to delayed mode is possible when the standby database is not available:
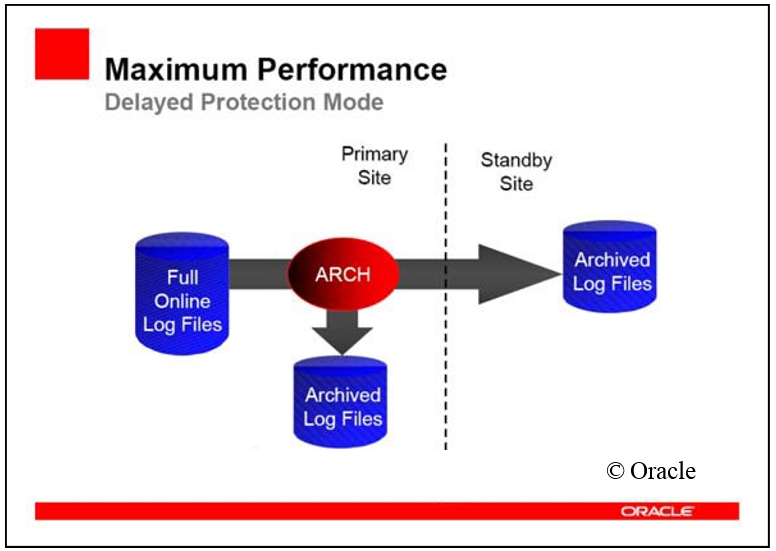
Configuration 3 (Maximum Performance)
In this configuration, changes will only be transferred to the standby database when the online redo log is changed. Therefore, you cannot expect that the standby database includes up-to-date data when the primary database fails. You always need to manually check all the AE activities that have taken place since the log has been changed the last time.
Maximum Performance - Changes are propagated when the online log is filled:
Comparison of Data Guard Configurations
As a general rule, all the configurations require the same quantity of user data to be transferred between primary and standby databases. The required workload when the primary database fails is always different. The lower the workload during a failure, the higher the load in the form of longer response times during day-to-day operation.
For the reasons mentioned above, it must be calculated for each case how the demand on availability can be realized with the infrastructure that is currently available.
Maximum Protection
-
Failover Effort: Medium
Start: COLD (under certain circumstances)
-
Demands on Infrastructure: High
-
Performance: Behaves similarly towards the AE as in a single instance but the demands on database hardware and infrastructure (network) are considerably higher.
Maximum Availability
-
Failover Effort: Low
Start: NORMAL
-
Demands on Infrastructure: Very high
-
Performance: Only suitable for systems with low throughput
Maximum Performance
-
Failover Effort: Low
Start: NORMAL
-
Demands on Infrastructure: Very high
-
Performance: Only suitable for systems with low throughput
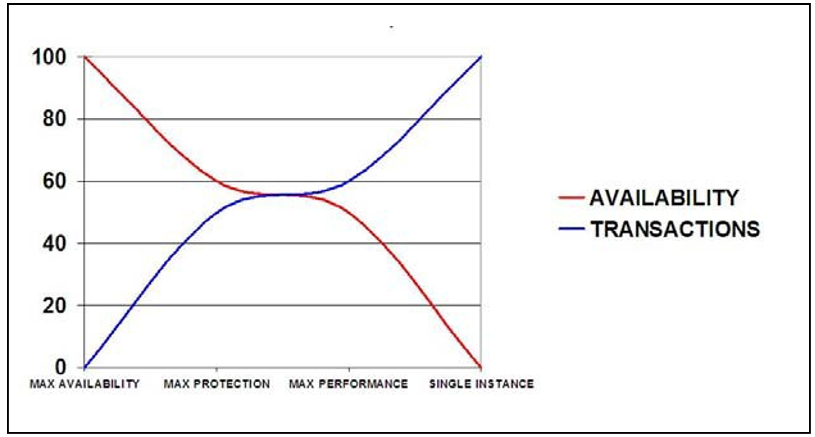
The illustration shown below demonstrates the connection between performance and availability of the Data Guard configurations compared to a single instance (without hardware cluster). For a single instance, the availability is always minimal compared to a Data Guard solution. However, performance is almost not affected. On the contrary, for Data Guard in maximum availability mode, the availability is very high but the negative effect on performance is also at the maximum level. When you intend to install AE Data Guard focus on the infrastructure available to ensure that you won't have to deal with performance bottlenecks.
See also: