Keyboard Navigation
Broadcom's teams are continuously working to make AWI user-friendly and accessible to all its users. These efforts span over multiple releases and will continue in the future too. This topic describes how to navigate through AWI's interactive elements without using your keyboard. By interactive elements we mean links, expandable elements, input fields, check boxes, radio buttons, and so forth.
Exception: The Workflow Editor is not fully navigable through keys yet.
AWI 's keyboard navigation uses the common standard keys/key combinations to move backward, forward, up and down, to select an item and to trigger a function. This topic explains AWI's navigation pattern:
Jump to Content Link
To help keyboard and screen reader users quickly and easily reach the main content of a page, AWI's first focusable element on almost every page is a Jump to Content link. By clicking it, you bypass the links in the top and left navigation areas and jump directly to the first item in the main content area.
To Use the Jump to Content Link
-
To activate the Jump to Content, do one of the following:
-
If you are on the root element of a page, that is, no element on the page is focused, click Tab.
-
If an element on the pages is already focused, refresh the page and then click Tab.
The Jump to Content link is displayed and active now.
-
-
Press Enter or Space to skip all navigation elements and set the focus on the first content element of the page.
-
For tables, this is the first row
-
For object definition pages, this is either the expander in the first section's header, the script editor, or the first input field.
-
Common Key Combinations
This table provides a list of the common key combinations that apply to all interactive elements that are enabled:
| Action | Windows |
|---|---|
| Move to the next element* | Tab |
| Move back to the previous element | Shift + Tab |
| Expand a node in a tree view, a sub-menu, a section on the object definition pages | Arrow right |
| Move up in a tree view, a list | Arrow up |
| Move down in a tree view, a list | Arrow down |
| Collapse a node in a tree view, a section on the object definition pages | Arrow left |
| Move up and down within a list, a tree view, items in a context menu | Arrow up, Arrow down |
| Select/Deselect an item in a list | Space |
| Confirm the selection | Enter |
| Bulk-select adjacent items in a list |
Hold Shift + arrow down / arrow up |
| Bulk-select non-adjacent items in a list | Hold Ctrl + arrow down / arrow up + space |
| Open a context menu |
Shift + F10 If available, menu key on your keyboard |
| Open a sub-menu within a context menu | Arrow right |
| Close a sub-menu within a context menu | Arrow left |
| Close a context menu | Esc |
| Close a dialog | Esc |
| Confirm selection of an item in a menu (this triggers the associated function) | Enter |
| Confirm selection of a button | Enter |
|
Expand a menu in a button** |
Enter or Arrow down |
| Collapse a menu in a button |
Esc or Arrow left |
| Expand a combo box | Arrow down or Alt + Arrow down or Enter or Space or |
| Confirm an action | Enter |
| Select/Deselect a checkbox | Space |
| Script editor: Leave the editor | Press Esc to leave the editor, then press Shift + Tab |
* Moving to the next element means moving to the next ENABLED element. For example, if you navigate pressing Tab/Shift + Tab through a toolbar and one of the buttons is disabled, pressing Tab will ignore that button and jump to the next enabled one.
** Examples of buttons with expandable menus:

Example: Adding a User Group with the Keyboard
In this example we will create a new User Group with two Users. This example illustrates how to do the following:
-
Move back and forth between navigation areas
-
Navigate left to right and right to left in toolbars and dialogs
-
Navigate up and down in tree views and lists
-
Select multiple items in a list
-
Open, populate and close dialogs
The starting point is the Home button in the main menu.
-
Press Tab until you reach the Administration button.
-
Press Enter.
The Administration perspective is displayed and your focus is still on the Administration button in the main menu.
-
Press Tab to move forward until you reach the Users menu item in the left navigation pane. You are now in a different navigation area, where you move up and down using the arrow keys in your keyboard.
-
Use the Arrow down key to reach the User Groups menu item.
-
Press Enter or Space. The list of User Groups is displayed.
-
Press Tab to leave the left navigation pane and jump to the first element of the User Groups tool bar. In this case, it is Add User Group.
-
Press Enter or Space. The Add User Group dialog is displayed.
-
The focus is already in the Name input field. Enter the name of the new User Group.
-
Press Tab to reach the OK button
-
Press Enter or Space to confirm your input and close the dialog. The Assigned Users page is displayed and the focus is on the Assigned Users menu item on the left navigation pane.
-
Press Tab to move to the toolbar. Your focus is now on the first button, which is Assigned Users.
-
Press Enter or Space to open the Assign Users dialog. Your focus is on the dialog tool bar now.
-
Press Tab until you reach the first User in the list. Once you are in the list, you can navigate it using the Arrow down/Arrow up keys.
-
To select the two users, do one of the following:
-
If the Users are immediately one after the other in the list, press Tab until you reach the first User and hold the Shift key while you press Arrow down. Both users are now selected.
-
If the Users are apart in the list, press Tab until you reach the first User and hold the Ctrl key until you reach the second user, then press Space. Both users are now selected.
-
-
Press Tab to reach the Assign Users button at the bottom of the dialog and press Enter or Space.
-
Press Ctrl + S to save your changes.
-
To return to the list of User Groups, press Shift + Tab until you reach the Administration button in the main menu and press Enter.
Example: Configuring a Period Object with the Keyboard
In this example we will create and configure a Period object in an existing folder in the Process Assembly perspective. This example illustrates how to do the following:
-
Navigate back and forth between sections on object definition pages
-
Select dates in date pickers
-
Select configuration options (checkboxes and radio buttons)
-
Select values in spinners
The starting point is the Home button in the main menu.
-
Press Tab until you reach the Process Assembly button.
-
Press Enter.
The Process Assembly perspective is displayed.
-
Press Tab until you reach the Explorer.
-
Once in the Explorer, press Arrow down until you reach the folder where you want to create the Period object.
-
Press Enter to open the folder and see its content in the list of objects.
-
Press Tab to switch to the toolbar.
-
Add Object is the first element in the toolbar. Press Space or Enter to select it. The Add Object dialog is displayed and your focus is in the Search field.
-
Start typing Period. The list shows only the Period option, which is also already selected.
-
Press Enter to open the Object Name dialog. You focus is in the Name input field.
-
Enter the name of the object. Optionally, press Tab to enter a Title.
-
Press Tab until you reach OK and press Space or Enter. The Period object definition page opens to the Period page. The focus is on the Period menu item on the left navigation pane.
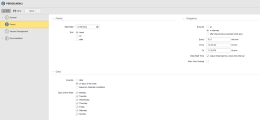
(Click to expand)
-
Press Tab to reach the Period section in the main definition area.
Note: By default, the sections in the main definition area are expanded. To collapse a section, press Arrow left. To expand it, press Arrow right.
-
Press Tab to move to the first field in the Period section.
-
The first field is a date field. Such fields consist of two areas, an input field where you can write the date and a button that lets you open a date picker. We will use the date picker.
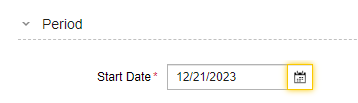
Your focus is on the input field. Press Tab again to reach the date picker button. This is how you use it:
-
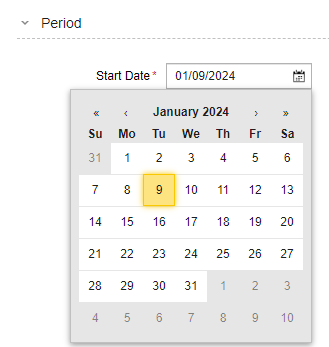
Press Enter or Space to open the date picker. It opens to the current month and date and the focus is on the current day of the week.
-
To specify a date, do the following:
-
To change the month press Shift + Tab to move to the date picker toolbar, where you can select the month and the year.
-
Press Shift + Tab until you reach the > button, which lets you move to future months.
-
Press Enter to move forward by one month until you reach the desired one.
-
-
To specify the day, do the following:
-
Press Arrow down to return to the body of the date picker and use the arrow keys to navigate through the days.
-
Press Enter on the desired day.
-
-
The date is specified now.
-
-
To move to the next element (End, see the screenshot above), press Tab. The focus is now on the first option. To select a different option, press Arrow down. Let's select after.
-
The Number of Executions field is displayed, which is a spinner. Use Arrow up and Arrow down to specify the desired number.
-
Press Tab to move to Frequency, the next section. We define Execute: at and press Tab to specify the Time.
-
Press Tab to move to Allow One Overlap and Space to select the checkbox.
-
Press Tab to move to the Days section. Press it again to start configuring the days. We will configure them using based on Calendar conditions. This is how you do it:
-
Press Arrow down until you reach based on Calendar conditions.
-
Press Tab to move to Execute if and select any of the options.
-
Press Tab again to move to the Calendar Events combobox.
-
Press Enter or Space to open it. Your focus is on the Search field.
-
Use Arrow down/Arrow up to search for the desired Calendar.
-
When you find it, press Space to select it.
-
Press Enter or Esc to close the combobox.
-
-
Press Shift + Tab until you reach the Save button and press Enter to save your changes.

Example: Adding Tasks to a Schedule Object with the Keyboard
In this example we will add tasks to a Schedule object. This example illustrates how to populate editable tables.
The starting point is the Schedule definition page.
(Click to expand)

-
After adding and naming a new Schedule, the object definition pages open to its definition pages and the focus is on the Schedule item on the left navigation pane. To move to the toolbar of the main definition area, press Tab. The focus is on the Add Row button.
-
To add a task, press Enter. A row is added to the list and the focus is on Name.
-
To expand the Name combobox, press Enter, Space or Arrow down. The focus is on the Search field.
-
To add an object to the list, either start typing its name or press Arrow down until you find it.
-
To select the object, press Enter or Space.
-
To move to the Active column, press Tab. By default the checkbox is selected. To deselect it, press Space.
-
To move to Start Time, press Tab. Write the start time for the task.
-
To move to Start Offset (days), press Tab. Press Arrow up/Arrow down to specify a number.
This is the last input field in the table. The rest of the columns are populated through the task Properties. This is why the focus goes to the browser controls if you press Tab again.
-
Press Shift + Tab until you reach the Save button and press Enter to save your changes.
See also: