Getting a List of Users via REST and Storing the List in a VARA Object
An external system contains a complex list that you need in the Automation Engine because you want to use it in various objects. Instead of manually entering the data in a VARA Static object, you want to automatically retrieve and parse it and have the VARA object populated so that you can then use it in other objects.
This page includes the following:
What Will You Learn?
- How to link an external solution to the Automation Engine via a REST Web Service.
- How to retrieve data from that solution and parse it to meet your needs.
- How to write that data to a VARA object for further reuse.
What Does this Use Case Cover?
In this use case, the external system is a Team City server. You want to retrieve the list of Team City users via REST and store it together with key user data for further use in various Automation Engine objects.
For this purpose, you create a WEBSERVICE job of type REST where you define the request you send to the Team City server, that is, the resource you want to retrieve; you also define the response you expect, in this case a structured XML file that is parsed according to your needs. Finally, the job contains the script that extracts the data (in this case username, name and user ID) and writes it to a static VARA object you have previously created. This way you can use the list of Team City users in any other object in your Automation Engine system.
In addition to the WebServices REST job and the VARA object, you need a Connection object (CONN) that defines the connection to the REST service and a WebService REST agent.
Prerequisites
You must define the following:
-
A Connection object that provides the endpoint, the authentication and the resources
Connection objects provide the parameters that establish the connection between certain solutions and the Automation Engine and thus allow VARA objects to retrieve values from external systems.
- The REST job
- A VARA object
- Some scripting
Use Case Actors

Create the Connection Object
-
Create a Connection object of type WEBSERVICE - REST. In our case, it is called CONN.REST.TC.
Define the object in the Process Assembly perspective. In this example, we will not cover the details of defining the general object settings (General Page, Version Management Page, Documentation Page), but will concentrate on the object-specific settings. -
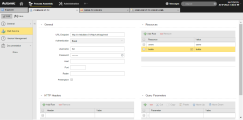
Define the following settings in the General section:
- Enter the URL Endpoint, in our case this is http://vviebuildsrv01/httpAuth/app/rest/.
- Enter the Username and Password as defined in the external system, in our case the Team City server.
-
Define the resource in the Resources section. The resource is an object with a type, associated data, relationships to other resources, and a set of methods that operate on it. In our case, we will use a GET request to the /users resource of the REST API offered by Team City to retrieve the list of Team City users. In this Connection object, two resources are specified although for this use case we will only use users:

Create a VARA Object
Create a Static VARA object where you want to store the list extracted from Team City. In our case, it is called VARA.TC.USERS:

Create a WebServices Job
-
Create a WebServices Job of type REST. In our case it is called JOBS.REST.TC.USERS.XML.
-
In the Execution Settings section on the Attributes page of the Job, assign the Agent in which the services will run.
Note: Since you have activated the Response: write to Job Log checkbox and Create Response Report checkboxes, if you now execute the job, the list of users will be available both as online report or as XML file that you can download and save locally. Click Last Report on the toolbar; In the Reports window that is displayed you can do the following:
- Select Report (REP) in the dropdown list to see the report online
- Select Directory and download the XML file.
-
On the Web Service main page, specify general connection settings and determine whether the log and report are accessible directly from the user interface:

- Select the Connection object you just created.
-
(Optional) Activate the Response: write to Job Log checkbox.
This option writes the details of the data transfer to the Report (REP) that you can access from within the Automic Web Interface by clicking the Last Report button on the Process Assembly toolbar and selecting Report (REP) in the resulting dialog.
-
(Optional) Activate the Create Response Report checkbox.
This option makes the structured XML retrieved from Team City accessible from within the Automic Web Interface also by clicking the Last Report button, selecting Directory in the resulting dialog and downloading the file.
-
On the Request sub-page of the Web Service page, specify the service that you require:
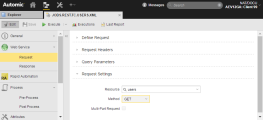
- In the Request Settings section, select the Resource you want to use. In this case, this is users.
- Leave the default Method, which is GET.
-
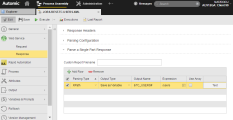
The list of users provided by the request you just defined in the VARA object must be parsed accordingly. The goal is to write the received XML to a script variable that will be processed later during post-processing. To this end, specify the service that you require on the Response sub-page of the Web Service page. In the Parse a Single Part Response section add the expression to the response and specify the following:
- In Parsing Type select XPath, as you want to extract an XML file.
- In Output Type select Save as Variable.
- In Output Name enter &TC_USER#.
- Enter the Expression, in our case /users.
-
Leave Use Array unchecked.
- Execute the job now to check if you get the expected response. Furthermore, doing so allows you to use the Replace button on the Response Expression Tester to read the last response to the test input and start creating the expression.
-
Click the Test button to get the last response:
Here you can start configuring and testing the parsing options until you get the results you need.
-
Enter the following script on the Post-Process page of the Job to write the user data to of the VARA object you created previously:
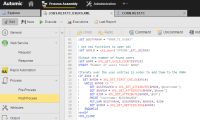
:SET&OUTVARA# = "VARA.TC.USERS"
! Use xml functions to open xml
:SET&XML# = xml_open('STRING',&TC_USERS#)
!Output the number of found users
:SET&NR# = XML_GET_CHILD_COUNT(&XML#)
:PRINT"Number of users found: &NR#"
!Iterate over the user entries in order to add them to the VARA
:if&NR# > 0
: SET &HND# = XML_GET_FIRST_CHILD(&XML#)
: WHILE &HND# <> ""
: SET &USERNAME# = XML_GET_ATTRIBUTE(&HND#,'@username')
: SET &NAME# = XML_GET_ATTRIBUTE(&HND#,'@name')
: SET &ID# = XML_GET_ATTRIBUTE(&HND#,'@id')
: PRINT "Username: &USERNAME#"
: PUT_VAR&OUTVARA#, &USERNAME#, &NAME#, &ID#
: SET &HND# = XML_GET_NEXTSIBLING(&HND#)
: ENDWHILE
:endif
:XML_CLOSE


Note: You have now completed all the necessary steps.
When you execute the Job now, in addition to the contents of the job log and downloadable report, the VARA object you created (VARA_TC_USERS) is populated with the following data and ready for reuse in any other Automation Engine object:
- Key: username
- Value 1: full name of the user
- Value 2: user ID
Example

Useful Links
This use case contains references to a number of functions that you might want to know a bit more about.