Kerberos Domain (Single Sign-On Support)
This page includes the following:
Overview

For organizations that wish to use Single Sign On (SSO); a Kerberos domain must be created in Automic Automation Intelligence. Once the Kerberos domain is created, users will be automatically logged into Automic Automation Intelligence upon launching the Automic Automation Intelligence client without being prompted for authentication credentials. If the login fails for any reason the Automic Automation Intelligence login dialog will be displayed.
Note: This domain does not show up in the Automic Automation Intelligence Login dialog because it is used to support single sign-on. This domain of users is an extension of the LDAP domain to provide support for single sign-on. If this type of domain is defined and set as the default, Automic Automation Intelligence will attempt to authenticate the user using the Kerberos ticket cache and, if the user can be authenticated, the login box is bypassed entirely and the user is authenticated directly into . These users also use the basic Admin/Application role based security model. By default, the first time any Kerberos user logs in to AAI, they will be granted access as an Application user and will have read-only access to all Automic Automation Intelligence data.
Configuring Kerberos
This section is intended for personnel well versed in the Kerberos authentication protocol. The scope of this text does not cover information about Kerberos itself. For detailed information about Kerberos, please visit http://web.mit.edu/Kerberos.
Authentication using Kerberos is a three step process in Automic Automation Intelligence.
Client Authentication Using the Cached Ticket
When a user logs on to their workstation a Kerberos ticket is assigned to that identity. This ticket stores information about the person's identity, time of validity, and so on. For example, when you log on to a Windows domain, the ticket is stored in the cache. The ticket had to have a session key enabled. By default, a Windows login does not have a session key enabled. If you are using Kerberos in the environment, then the session key should be in the Kerberos ticket. As a first step, Automic Automation Intelligence verifies the validity of this ticket. To enable a session key on Windows 2003 and Windows 2000 servers, follow the steps provided by Microsoft at the following URL: http://support.microsoft.com/kb/308339
For Windows XP, the registry key is at a different location:
HKEY_LOCAL_MACHINE\SYSTEM\CurrentControlSet\Control\Lsa\KerberosAdd the following under Kerberos:
-
Value Name: allowtgtsessionkey
-
Value Type: REG_SZ
-
Value: 1
-
Server authentication using the server principal and keytab
-
Mutual authentication between server and client
-
Server Side Principal
You must create a server principal for Automic Automation Intelligence on the server on which it is running. After you create the principal, export the keytab to a file and copy it to some location on the Automic Automation Intelligence server.
The following steps are generic steps. In your environment Kerberos might be configured differently. The following operating systems are for the Kerberos server and not the Automic Automation Intelligence server.
Creating a Server Principal in Windows Kerberos Server
-
Create a user called DEVAAI and give it some password. We will use password for this example. You can also use Automic Automation Intelligence server hostname instead of DEVAAI .
-
Run the ktpass utility to map AAI to DEVAAI and extract the keytab.
ktpass -princ AAI/DEVAAI -pass password -mapuser DEVAAI -out C:\temp\keytabDevaai.out-
The file
keytabDevaai.outwill be created for AAI/DEVAAI .
-
Copy the file
keytabDevaai.outto the Automic Automation Intelligence server into some folder C:\Automic_Automation_Intelligence\keytabJaws.out . This information will be used in the next section.
Note: If you do not find the ktpass utility, download the Windows resource toolkit.
Creating a Server Principal on Unix Based Kerberos Server
Example creating AAI/devaai:
-
On your Kerberos server enter:
kadmin.local -
At the kadmin.local prompt enter:
addprinc -pw passwordAAI/devaai -
Create a new keytab:
ktadd -k /tmp/keytabJawsdev.out' AAI/devaai. -
Copy the keytab to the Automic Automation Intelligence server:
/opt/Automic_Automation_Intelligence/keytabJawsdev.out.
Adding a Kerberos Domain
To add a Kerberos domain, follow these steps:
- In the User Management Panel select New Kerberos.
- Enter the values for your environment. Make sure the Realm matches your Kerberos realm exactly.
- Select Test configuration to check the configuration. You should see results similar to the figure below
Test Results
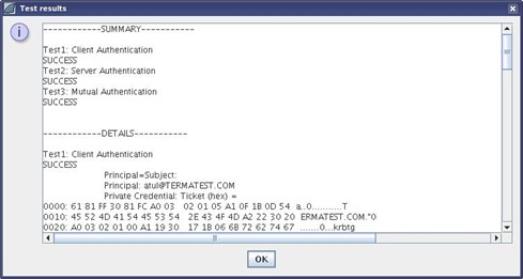
Note: Depending on the setup one or more tests might fail.
Troubleshooting
-
Test 1 fails:
-
The client machine you are adding this from does not have a valid Kerberos ticket. Please contact the Kerberos admin for more help.
-
The realm name is not correct.
-
The Kerberos server and port are not correct.
-
- Test 2 fails:
-
The keytab for the server principal in not in the proper place on the server machine.
-
The server principal name is not correct. On UNIX this is case-sensitive.
-
-
Test 3 fails: Test 3 will fail if either of the Test1 or Test2 fails.
After you add the Kerberos environment, next time you login from the Kerberos client, Automic Automation Intelligence will automatically try to authenticate against it. If it fails, then Automic Automation Intelligence will present you with the login dialog.
Using Custom Kerberos Config Files
This is especially important for Windows-based Automic Automation Intelligence server. By default the Kerberos configuration files are searched at the default locations, such as on Linux at /etc/krb5.conf, on Unix at /etc/krb5/ krb5.conf, on Windows at c:\winnt\krb5.ini. If the files are not available there, or if you want to use a different Kerberos configuration, then you will have to create and copy the Kerberos configuration file to the Automic Automation Intelligence server. For example, on Linux create a file called /opt/Automic_Automation_Intelligence/krb/krb5.conf, or on Windows create C:\Automic_Automation_Intelligence\krb\krb5.conf.
Next, communicate the changes to the Automic Automation Intelligence server. To do this, modify the vmoptions file in the directory from where you are starting the Automic Automation Intelligence application. Add the following line to the vmoptions file:
-
For Linux:
Djava.security.krb5.conf=/opt/Automic_Automation_Intelligence/krb/krb5.conf
-
For Windows:
-Djava.security.krb5.conf=C:\Automic_Automation_Intelligence\krb\krb5.conf
Restart Automic Automation Intelligence for this parameter to take effect.
Troubleshooting
-
If Mutual Authentication fails, the server login starts failing. If the client and server tests pass, and only the mutual authentication fails, then the server login keeps on failing. This happens when the Windows clients do not have the session key enabled. Please follow the directions given earlier to enable the session key. Then restart the client and try again.
-
Sometimes the login dialog comes up. If Automic Automation Intelligence is not able to do the single sign on with Kerberos, then it brings up the login dialog. The Kerberos authentication can fail sometimes if the login process takes too much time because of network delays. Please try to login again.