Quick Guide: Visualizing AutoSys Predefined Jobs and SLAs
This quick guide describes how to create a jobstream that clearly shows the external dependencies between tasks in AutoSys Workflows. It also gives you the possibility to reproduce this use case in your own environment. For this purpose, this topic provides links that download pre-configured AutoSys objects and perl scripts. You can import them into an AutoSys test environment. Then, you can create the jobstream in AAI as described here.
The Challenge in AutoSys
In AutoSys it is possible to create external dependencies between tasks that are part of different workflows. In complex environments it can be challenging to track these external dependencies. In addition, the critical path display of the AutoSys workflow contains local tasks (tasks within than workflow) only.
The Solution in AAI
When you create a jobstream in AAI, the system selects all the tasks that might impact the execution of the specified target job. This includes all the external dependencies. The result is a jobstream that clearly visualizes the critical path of the entire business process/application in a single pane.
The critical path is the specific sequence of jobs within a jobstream that directly affect or are predicted to affect the completion time of a jobstream. It singles out every job in the jobstream that comprises the longest path required for a particular jobstream run to be successful. This means that if any of the jobs on the critical path is delayed, the jobstream is also delayed. If a job is not on the critical path, any delay associated with this job does not necessarily affect the completion time of the jobstream. However, if a job that is not on the critical path is delayed enough to affect the completion of the jobstream, AAI adds it dynamically to the critical path in real-time. Therefore, the critical path can change from run to run.
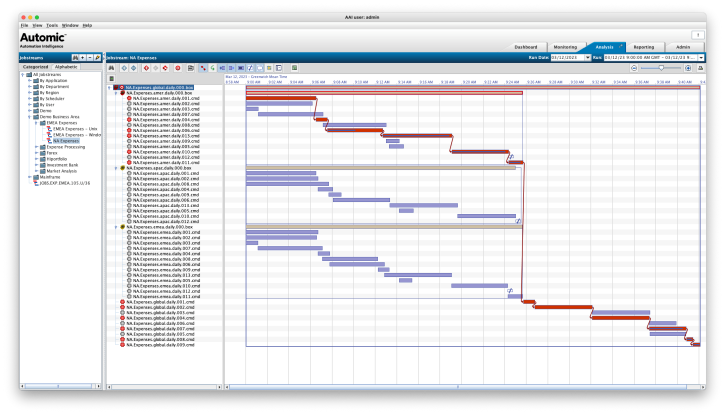
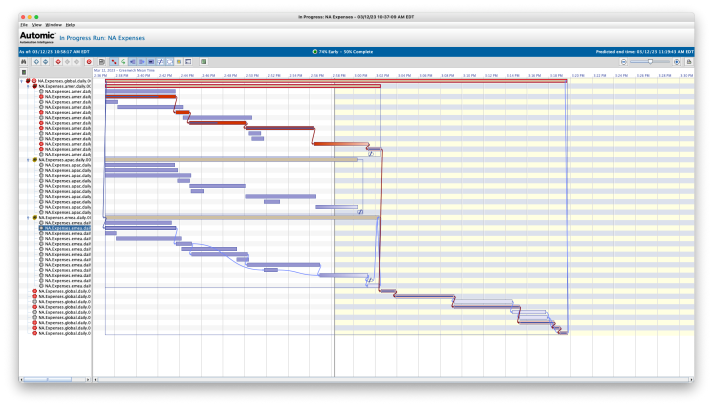
This image shows the jobstream that results from the use case described in this topic. The red lines that go from one jobstream to the other represent the external dependencies in the AutoSys workflows:
Assumptions
This quick start guide makes the following assumptions:
-
AAI is already installed and running.
-
The AutoSys scheduler is defined within AAI.
-
The jobs and included Perl scripts run on the localhost.
Quick Start Content
To reproduce this use case in your environment, we provide everything you need: Basic objects and Perl scripts to help you quickly create a jobstream that contains multiple boxes and cross box dependencies. Right-click the links below and select Save link as to download them.
-
AutoSys job definitions
-
File 1: AAIQuickStartAutoSysUnix.jil.txt
Created for running on a *nix environment.
-
File 2: AAIQuickStartAutoSysWindows.jil.txt
Created for running on a Windows environment.
-
-
Perl script: sleep_autosys.pl
Click the link to download the file with the script.
Note:You may need to install Perl on the agent computer for these scripts to be executed.
-
Windows:
-
Place sleep_autosys.pl on the Windows image where the agent is installed. The location of the script within the provided Windows jobs is %AUTOSYS%\Scripts. If the script is placed elsewhere then the job definitions will need to be updated accordingly.
-
If not using localhost to run the jobs, Check if Perl is already installed on the system. If not consider visiting https://strawberryperl.com/.
-
Update the PATH setting for the agent to include the Perl bin directory. Otherwise you will get an exit code 1 for an “incorrect function”.
-
-
Unix:
-
Place sleep_autosys.pl on the UNIX image where the agent is installed. The location of the script within the provided UNIX jobs is $AUTOSYS/scripts. If the script is placed elsewhere then the job definitions will need to be updated accordingly.
-
If Perl is not already installed on the system, check the specific yum repositories (Linux).
-
-
Overview of the Procedure
-
Create the AutoSys objects.
-
Review/amend the AutoSys objects.
Defining the AutoSys Objects
Create and adjust the AutoSys objects as follows:
Loading the Supplied JIL File
You can load the JIL file using either the CLI or the Web UI (WCC).
Using the CLI
-
Logon to the AutoSys server as a user that can insert jobs.
-
Upload the jil file for the operating system you are using.
-
Open the file for edit and make any changes needed to the following attributes:
-
Machine
-
Owner
-
Path in the command
-
Date/time conditions
-
-
Use JIL to import the file.
Using the Web UI
-
Login to the Web UI.
-
Click the Enterprise Command Line tab.
-
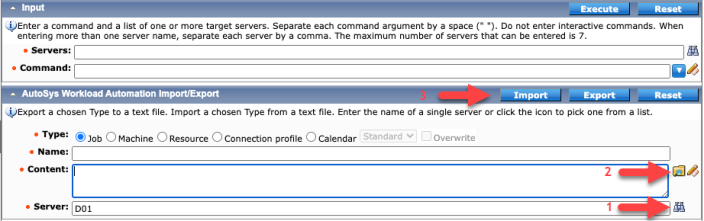
In the AutoSys Workload Automation Import/Export section.
-
Select the server that you want to jobs to be loaded to.
-
Select the file location of the jil file
-
Click the import button.
-
Amending the AutoSys Jobs
-
Force start job NA.Expenses.global.daily.000.box.
-
Check for any errors and make any corrections.
-
Rerun the stream to verify any corrections if required.
The AutoSys jobs have now been created and are scheduled to run twice a day.
Create the AAI Jobstream
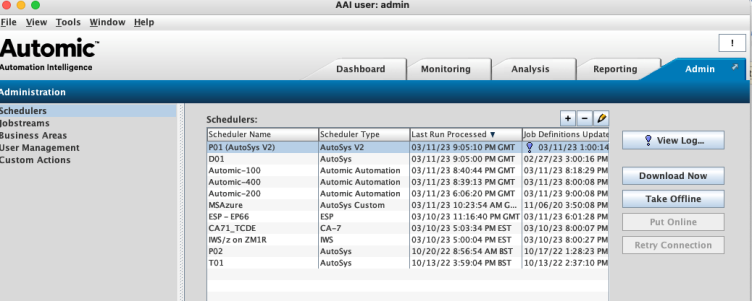
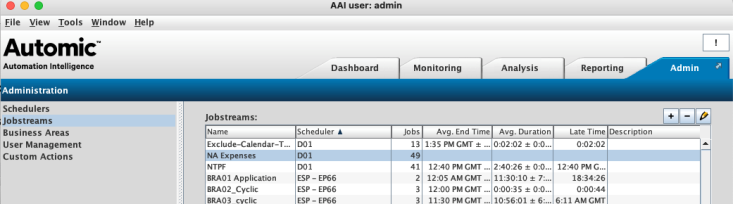
Once the AutoSys jobs have been created their definitions must be ‘collected’ by AAI before a jobstream (SLA) can be created. The retrieval cadence for the definitions is held within AAI and forms part of the AutoSys scheduler definition. This setting can be found within the Admin tab of the AAI thick client as illustrated below:
Add an AAI Jobstream
-
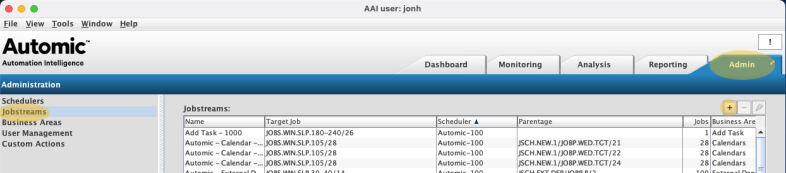
In AAI's thick client, go to the Admin tab.
-
Select Jobstreams.
-
Click the + icon to create a new jobstream.
-
Select the scheduler that the jobs were loaded into and click the Download Now button. When it completes, continue to the next step.
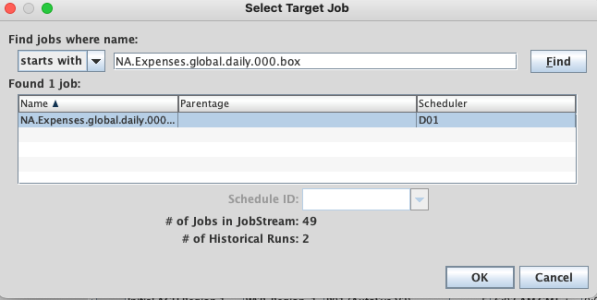
Select the Target Job
We are going to create an Expenses application/business process.
-
Select the starts with criterion from the dropdown list.
-
Type the following in the search window: NA.Expenses.global.daily.000.box
-
Click Find.
-
Select the job.
-
Click OK’.
Create the Jobstream
Now define the high-level jobstream detail:
-
Enter a meaningful name for the jobstream, for example NA Expenses.
-
Enable Make this jobstream available for forecasting.
-
Click OK to close the dialog and return to the Admin tab of the UI. Once AAI has completed building the jobstream, it will be displayed on the screen.
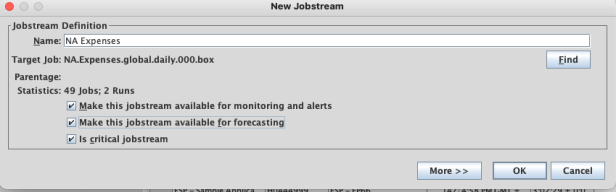
Do not be concerned with the More>> button for now. This will present further jobstream definition options that you will review and updated later in this exercise.
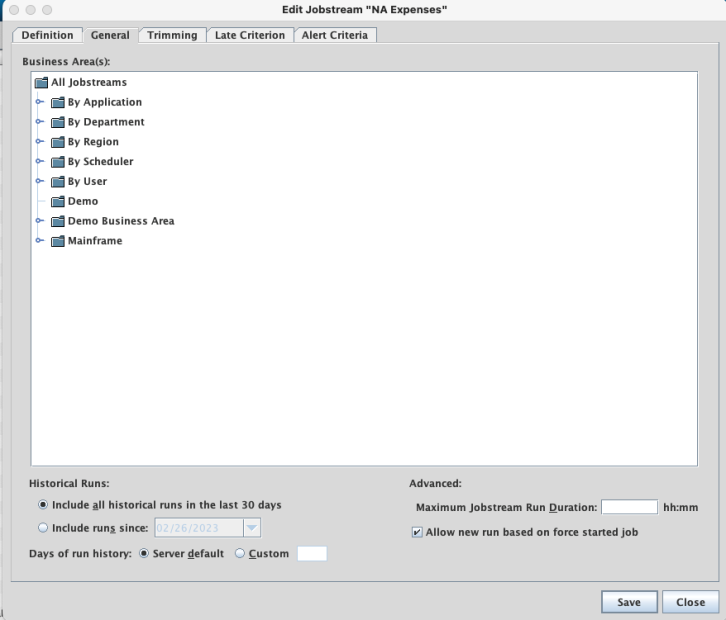
Edit the Jobstream
With the Jobstream now created, the next step is to complete its definition.
-
Select the jobstream in the list, for example NA Expenses.
-
Click on the pencil icon to access the jobstream definition in edit mode.
-
In the General tab, do the following:
-
Under the Advanced section, check the box for Allow new run based on force started job.
-
[Optional] Adjust the Business Area that the jobstream is assigned to. You can do this by selecting / deselecting the folder names.
-
-
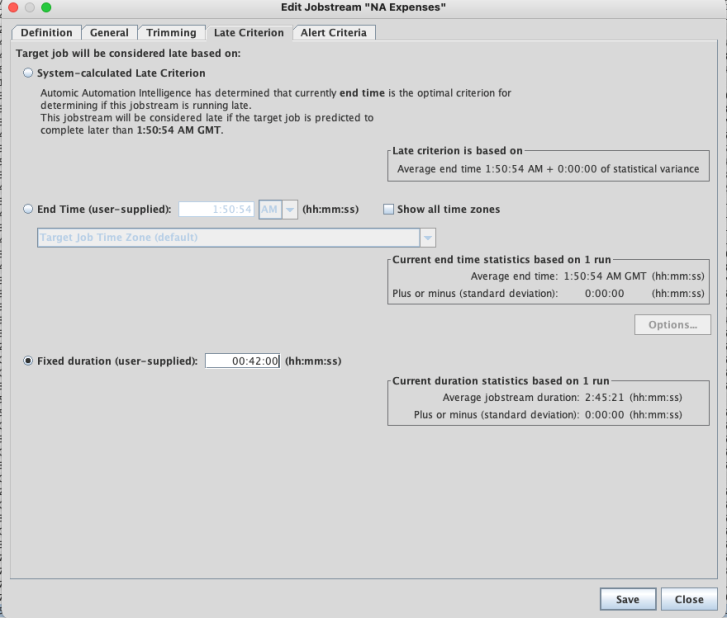
Review the Late Criterion parameters:
Set a Fixed duration (user supplied) value to 0:42:00 (42 minutes). If you wish, this setting can be adjusted (reduced) later to have AAI predict the jobstream as late.
-
Review the Alert Criteria parameters.
Selecting each Alert Type displays the alert properties/description and some further selections that can be made.
-
Enable the alerts that you wish to have AAI generate for this jobstream. The initial recommendations are:
-
Late
-
Exceeded SLA
-
-
Once the selections are complete, click Save to complete the changes.
-
Click Close to exit the jobstream editor.

-
Review the jobstream
The Monitoring tab within the UI will now show the jobstream.
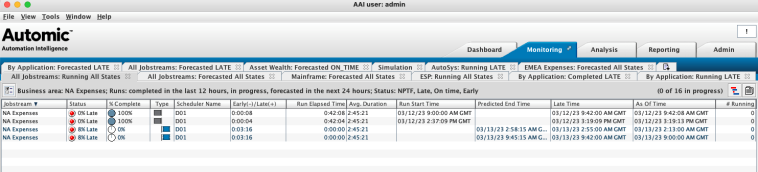
-
If the AutoSys Jobs have not yet run, then AAI will forecast based on the default settings. The Status will likely reflect an excessively early value as no historic run data has yet been gathered for AAI to make accurate predictions.
-
If the AutoSys Jobs have been executed in the last 24 hours or within the threshold of the applied Monitoring filter, then AAI will present a 100% complete jobstream. In this case, the historical executions of the jobstream can also be reviewed via the Analysis tab of the UI
From this point forward AAI will forecast, monitor, and alert on the jobstream that has been created.