Configuration Tool - Other Tab
The Others tab allows you to configure a number of components such as Java VM options, defined schedulers, and email settings.
This is a tab on the AAI Configuration Tool. For information about how to access it, see Using the AAI Configuration Tool.
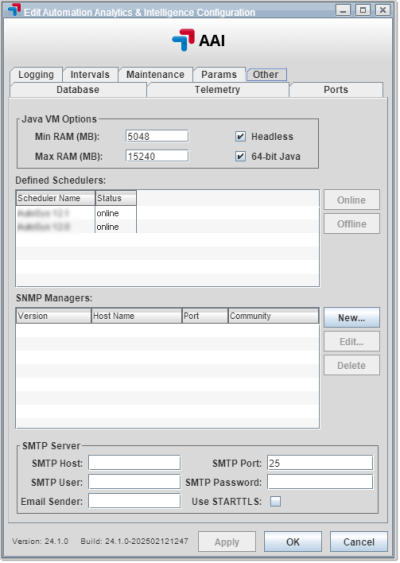
In the Other tab you can manage Java VM Options, Defined Schedulers, and SNMP Managers and SMTP email settings. You can also use it to submit logs to technical support at Broadcom .
-
Java VM Options: Define the relevant values such as minimum and maximum RAM values.
-
Defined Schedulers: Put schedulers online or take them offline.
-
SNMP Managers: Additional SMNP Managers can be added to AAI by selecting the New button and complete the fields in the SNMP Manager Settings dialog. Select the SNMP type you want to use:
-
SNMPv1 Trap
-
Host Name: Name of the SNMP Manager (destination)
-
Port: Port for the SNMP host
-
Community: The community string for the SNMP host
-
-
SNMPv3 Trap / Inform
With V3 you can send encrypted traps to the SNMP manager and use a password. Inform messages let the SNMP manager know that the information is coming. Upon receiving the information, the manager sends an acknowledgment back to the server. If the server does not get an acknowledgment in a certain amount of time, the server knows it has to retry. Therefore, SNMPv3 is more reliable and more secure.
-
Host Name: Name of the SNMP Manager (destination)
-
Port: Default port is 162 but can be changed as needed
-
Engine ID: (Only for SNMPv3 Inform) MAC or IP address that uniquely identifies the SNMP entity to the SNMP Manager
-
Security Level:
-
noAuthNoPriv: No password authentication and no encryption
-
authNoPriv: Password authentication but no encryption
-
authPriv: Password authentication and encryption
-
-
Auth. Protocol: Authentication protocol you want to use
-
Security Name: User name
-
Auth. Password: User password
-
Privacy Protocol: Encryption parameters you want to use
-
Privacy Password: Encryption password
-
-
SMTP Server: Configure your mail server here. This mail server will be used to send jobstream alerts that are configured to use email and to send reports that are defined to be sent by email.
- SMTP Host (required): This is the DNS hostname of your mail server.
- SMTP Port (required): This is the port your mail server has open for connections (default: 25).
- SMTP User (optional): Enter a mail user name if your mail server requires a user and password in order to send mail.
- SMTP Password (optional): Enter the user's password if your mail server requires a user and password in order to send mail.
- Email Sender (optional): Enter the email address used to send emails from AAI. Some SMTP servers may require that this is the same as the SMTP User above, but others may not. Some may not require this parameter at all, but it is recommended that a distinct and recognizable email address be used that can be recognized and possibly filtered by the recipient.
- Use STARTTLS: Check this to enable TLS encrypted communication between AAI and the SMTP server. For more information, see Configuring the AAI Server for TLS Authentication.
Note:Optionally enable links within notification emails:
To enable a link to the Gantt view for the jobstream run that triggers the alert notification email, you must provide the AAI hostname in the system configurations. To do this, go to the Params tab, and under less commonly configured parameters, enter the hostname of the AAI instance as the value for the alertURL parameter. For information, see Configuration Tool - Params Tab.
-
Once you are done, click Apply to save your changes.
Alternatively, you can also create and update SMTP and SNMP configurations from the command line or a script. For information, see Configuration Tool Command Line Interface, and SMTP Configuration Commands and SNMP Configuration Commands, respectively
You can adjust the width of the columns of the table by clicking and dragging on the column border.
For more options for changing the table layout, right-click the any of the column headers to access the context menu where you have the following choices:
-
Auto-size Column
Automatically adjust the column width based on the content of the column.
-
Remove Column
Hide the column from the table.
-
<List of columns available for the corresponding tab>
Select or de-select column names to show or hide the columns on the table.