Steps for Creating Reports
The required steps for creating a report are listed below.
Applications Manager reports are based on SQL statements. When creating a report, you select tables and views, and select columns from them. To create a report, you either start with an existing SQL statement and customize it, or create a report from scratch. A sample report object is shown below.
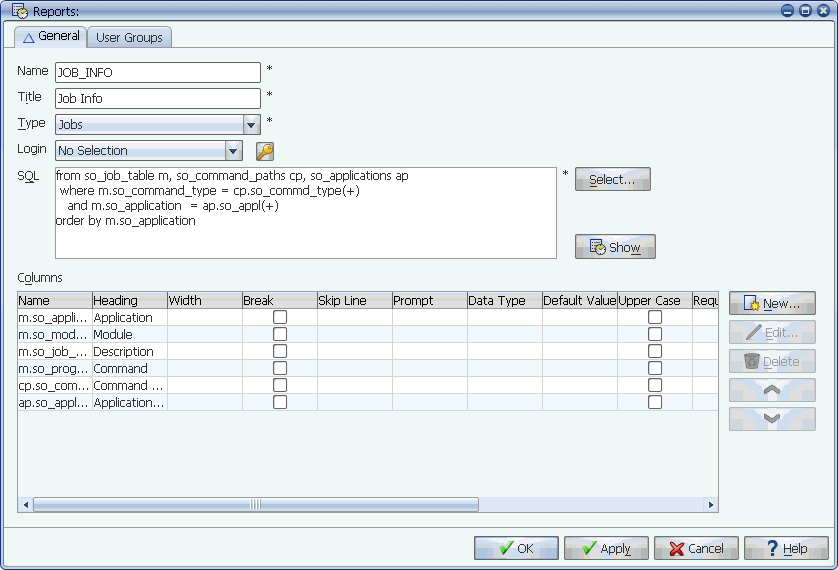
A completed report
To create a report:
- From the Reports Selector window, click New.
Applications Manager opens the Reports window.
- Enter a name and title for the report.
The title will be displayed in the title bar of the report's window when it is run.
You can enter &<column number> in the title to display the current value from that column when viewing the report.
- Select a report type to determine the window where the report can be viewed from by default. For example, if the report you are defining makes the most sense to be opened while defining jobs, you would select the Jobs type.
- Specify the database for the report by doing one of the following:
- If the report will be run against the Applications Manager database, leave 'No Selection' as the value of the Login field. This will use the Oracle database login used to connect to the Applications Manager database.
- If the report will not be run against the Applications Manager database, select the login for the database you wish to run the SQL statement against.
To evaluate dynamic substitution variables, data types, or reports on a database other than the Applications Manager database, the login object must be defined for JDBC use. For more information, see Specifying JDBC Requirements for Logins.
- Specify the SQL for the report by doing one of the following:
- If you are starting with an existing SQL statement, cut and paste or type the SQL statement in the SQL box. Even if you are creating a report with existing SQL, you will need to add the columns using the Select Columns window as described in the next step. For an example, see Example: Creating a Report from Existing SQL.
- If you are creating the report from scratch, select tables/views for the report. For more information, see Selecting Tables and Views.
- Click New to open the Select Columns window (not shown in this topic). From the Select Columns window, do one or both of the following and click OK:
- Assign columns by moving them from the Unassigned to the Assigned boxes.
- Add any columns specified in the SQL box on the Report window to the report.
For more information on the Select Columns window, see Adding Report Columns.
- Customize the reports by editing the report columns. This includes adding prompts to reports. For more information, see Editing Report Columns.
- Join/order columns as necessary by entering the appropriate code in the SSQL statement. Note you cannot order the columns from the GUI. If the report was created by entering a SQL statement, this step may have already been done. This requires a knowledge of SQL.