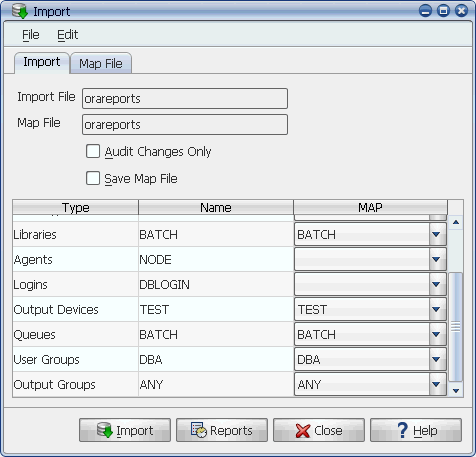
The Import window
To import objects, go to the Activities menu and select Import. To open an import file, go to the File menu and choose Open Import File. You can map objects from the source system to objects on the target system. When you import objects, all mapped objects (for example: queues, output devices) must exist on the target machine.
You cannot import between versions of Applications Manager (such as from 7.1 to 9.1). Doing so is wholly unsupported by Applications Manager and can lead to serious version conflicts.
After creating the export file on the source instance and moving it to the target instance, you are ready to import the file. When you import, Applications Manager displays the objects referenced in the import that were not included in the export.
The Import window is shown below.
The Import window
The referenced objects must be handled in one of the following ways:
The Import feature may not be available to you. If you need to use it, see your Applications Manager administrator.
If an imported object does not exist on the target instance, it is added to the target instance's database. Objects that already exist are overwritten. You do not get a warning message.
Procedure
To select an import file and assign a map:
Applications Manager opens the Files window shown below.
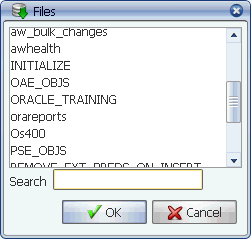
Files window
In the Export utility, you created an .exp file in the export directory. When you move the file to the import directory on the target machine, it is referred to as an import file. They are the same file.
When you open an import file, Applications Manager looks for matching resources in the target database. If it finds a matching resource, it displays an entry in the map column for the object. If it doesn't find a matching resource, it leaves the entry blank. In the first image in this topic, TASK_TITLE is not mapped.
All objects must be mapped before you can import. If a support object does not exist, you can create it on the target instance. All objects you map are shown on the Map File tab, and will be saved when you save the map file. For information on the Map File tab, see Adding, Editing, and Deleting Map File Entries.
You may wish to reassign the default mappings between instances. For example, you may have defined queue TEST1 on the source machine. On the target machine, you may want queue TEST1 reassigned to queue PROD1. You can use a map to specify the change. Jobs and process flows cannot be reassigned, by default they have the same name on the source and target machines. All objects you map are shown on the Map File tab, and will be saved when you save the map file. For information on the Map File tab, see Adding, Editing, and Deleting Map File Entries.
Map files are located in the map directory and have a .dat extension.
The Import utility runs the IMPEXP job under the alias IMPORT. You can check the status of the job from the Explorer window. The job creates a log called IMPORT.log. You can view the log with the File Viewer window.
The newly imported objects will show up approximately five minutes after the IMPORT job runs. If you want to see them sooner, go to the View menu and select Refresh Assigned Objects or click the Refresh button on any object's selector window.