With the Execute Once option you can start processing the task immediately or at a predetermined point in time. It helps you test and adjust the object settings and adapt its execution time to meet your needs.
You will find the following information in this topic:
There are many scenarios in which you can execute an object once and take advantage of the ad-hoc editing possibilities. Here we mention but a few:
![]() Testing and Editing Parameters before Executing
Testing and Editing Parameters before Executing
![]() Checking Execution when Switching Agents at Runtime
Checking Execution when Switching Agents at Runtime
![]() Avoiding Conflicts during Maintenance Activities
Avoiding Conflicts during Maintenance Activities
In the Process Assembly perspective do one of the following:
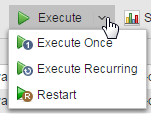
The Execute Once dialog is displayed, where you can define the execution settings:
| Setting |
Description |
|---|---|
|
Execute: Immediately |
Select this option if you want the task to be executed right away using the activation time for any calendar considerations. |
|
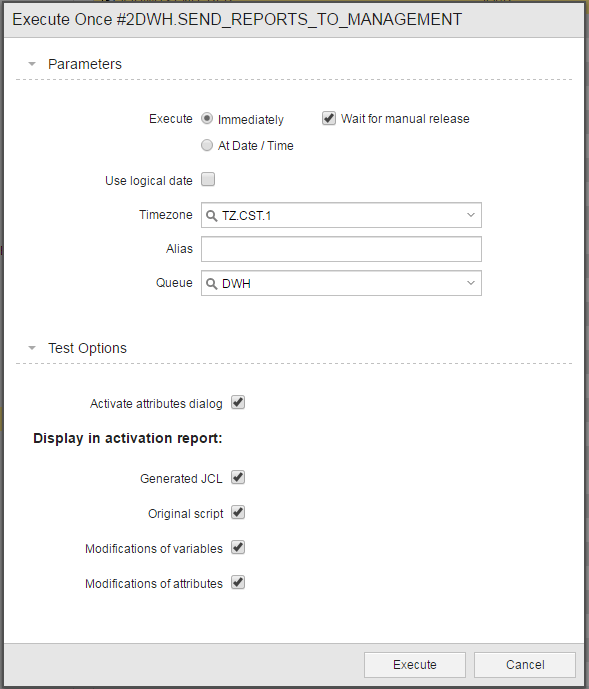
Execute: Wait for manual release |
This option is available for immediate executions only. Before being actually executed, tasks go through the following phases: Activation, Generation and Transfer. Activate this checkbox if you want the task to go through them but stop after transferring because you want to control when to execute it. For details see Executing Once with the Manual Release Option below. |
|
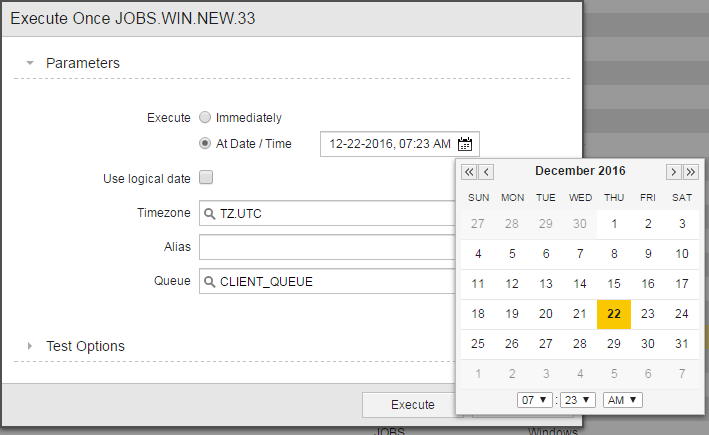
At Date/Time |
You can schedule the task to be executed at a particular time that you define here. Click this checkbox to open the date/time picker and select the desired date and time.
The task is then available in the Tasks list of the Process Monitoring perspective with the "Waiting for start time" status. You can edit it as long as it is in this status You can also decide to execute the task at a predetermined time in the future considering the calendar conditions defined in your company. The task has the "Waiting for start time" status |
| Use logical date |
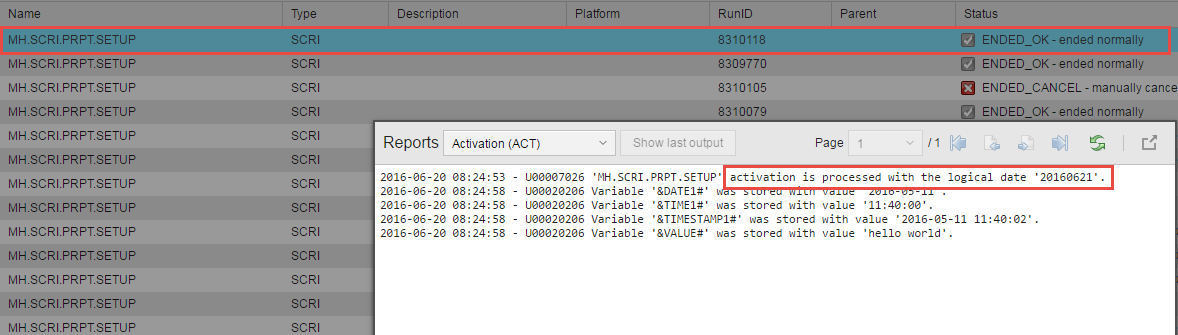
In some situations you may need to start a task knowing that it should be processed at a time in the future. For example, a task that should run on the weekend due to calendar conditions but you must start on Friday. Activate this checkbox and pick the date/time you need as logical date. The task will be activated immediately, that is, its activation time corresponds to the current OS time. However, for Automation Engine internal purposes, the logical date will be used. On the screenshot below the Execute Once option was selected on the 20th of June 2016 at 08:24 AM, so this is also its activation time. However, the logical date time has been set to the 21st of June, when the task is actually executed. The details of the process display the start and activation times. The logical date of tasks is displayed in the activation report.
|
| Time Zone | If you have defined Time Zone objects and you want this execution to consider one of them, select it here. |
| Alias |
If you specify an alias here, this is displayed on the Tasks window in the Process Monitoring perspective. This makes it easier for you to identify this execution later on, in case you want to edit its parameters. You can use the same characters as for names, that is, it can contain up to 200 characters. It is not possible to use variables here. |
| Queue |
You can assign a particular queue for this execution, which can be different to the one in the object's definition. If you leave this field empty, the object queue is used. |
| Test Options | |
| Activate attributes dialog |
When you define an object type, you specify the general attributes that will always apply to objects with this type. In some cases, however, it might be necessary to change specific settings for a particular run of an object without modifying its general definitions. If you activate this checkbox, before the task is executed a dialog pops up displaying the attributes that can be changed for this particular run. These values apply only to this execution. |
|
Display in activation report Activating option in this section causes the script to be processed and overrules the Generat at Runtime settings defined for the object in the General - Runtime page. The activation report includes both the script statements and the content of all involved Include objects. In the case of jobs, also the job includes such as Header and Trailer. |
|
| Generated JCL | Activate it to display the JCL in the report. After clicking the Execute button, the task is activated and the report opens. This allows you to check and, if necessary, modify it. You can use this in combination with the Wait for manual release option. When you are happy with the results you can release the task for execution. |
| Original script |
Activate it to display the script in the report. After clicking the Execute button, the task is activated and the report opens. This allows you to check and, if necessary, modify it. You can use this in combination with the Wait for manual release option. When you are happy with the results you can release the task for execution. |
| Modifications of variables |
When testing your object definitions, you may want to modify your variables and check the results before actually executing them. Activate this option if you want those changes to be displayed in the activation report. |
| Modifications of attributes | When testing your object definitions, you may want to modify their attributes and check the results before actually executing them. Activate this option if you want those changes to be displayed in the activation report. |
Click Execute.
If the Activate attributes dialog checkbox is activated, a dialog pops up where you can enter specific attribute settings for this run.
If any of the other test options is activated, a message opens prompting you to confirm that you want to execute the task after the script has been generated.
Executing Once with the Manual Release Option
Before being actually executed, tasks go through the following phases: Activation, Generation and Transfer. Use this option with jobs, to test them and have the possibility to modify the generated JCL before executing them (see Stages of Job Processing). The task is activated, the script is generated and, if applicable, transfers are carried out. The task, however, is not executed. It is available in the Process Monitoring perspective displaying the Waiting for manual release status.
To Release the Task Manually
There are several ways of releasing the task:
For Workflows, from the Explorer in the Process Assembly perspective:
Right-click the object and select Last Monitor. The task is opened in the Process Monitoring perspective.

Open the Workflow button on the upper left corner of the window and select Release manually.
Before releasing the task you can modify its parameters. These changes apply to the current execution only.

For other executable objects, from the Tasks table in the Process Monitoring perspective:
The task is already available in the list. Search for it as follows:
See also: