Working with Requests
The notifications area on the menu bar contains two buttons that point out to you the messages and requests you should take care of.
Requests prompt you to take action on tasks. The Requests button on the Navigation bar indicates the number of active requests that are waiting for your response:
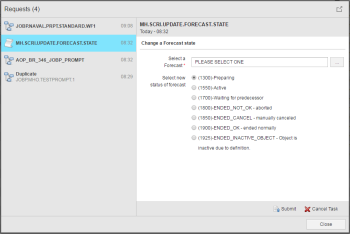
Click it to open the Requests dialog:
The caption indicates the number of active requests in brackets. The left panel provides the list of tasks that triggered the requests. The right panel contains information on the triggering task and on the request and provides the necessary functions to react to them. The appearance of the panel depends on the type of request; it varies from short descriptions to complex forms created by :READ statements or PromptSets.
Automatic List Refresh
The tasks that triggered the requests are sorted in chronological order with the most recent item at the top. This list is always up-to-date; if you submit a request, the associated task is removed from the list and the number in the dialog caption decreases accordingly. If a new request arrives while this dialog is opened, it is inserted at the top of the list and the number increases.
However, the focus does not change. Let's suppose that you select the first task in the list to display the information on this request and that you then start investigating the reason and its solution. While you are looking into it, a new request arrives and is inserted at the top of the list. The task you are investigating is now second in the list but it remains selected and you can continue your work with it.
Notification of Requests
In some cases, quickly reacting to requests can be critical. It is for this reason that PromptSets and Reads that are generated upon object execution are displayed immediately.
In the case of PromptSets and Reads that are generated later (upon task generation) for which immediate data input is not required, a message is a blue background is displayed at the top of your screen. For example:
You can choose to open it to attend to the request and fill in the required fields or to continue working with what you were doing and take care of the request later on.
Detaching the Requests Pane
By default the Requests dialog is displayed in the middle of your screen blocking the main page. You can detach it by clicking the ![]() button on the top right corner of the dialog; this opens a dedicated browser window with the list of requests. This way you can arrange this and any other windows side by side, which can be especially helpful when comparing values, investigating the reason for a problem, etc.
button on the top right corner of the dialog; this opens a dedicated browser window with the list of requests. This way you can arrange this and any other windows side by side, which can be especially helpful when comparing values, investigating the reason for a problem, etc.

