Documentation Page

In this page and its sub-pages you enter the information that you deem important for the object. You can enter both structured and unstructured information.

By default when you open the Documentation tab, the main page opens, where you enter unstructured documentation. Additional sub pages to enter structured documentation can also be available. How many and which sub-pages are available for documenting the object depends on your system configuration, as the system administrator defines this in the UC_OBJECT_DOCU variable in client 0 (unstructured pages are defined in the form of simple comma separated values; structured pages are defined by comma separated values with an "@" prefix).

Unstructured Documentation

Basically, you will write unstructured documentation to enter maintenance and emergency information on the object in free text, to provide How-tos within the Automation Engine, etc.

Structured Documentation

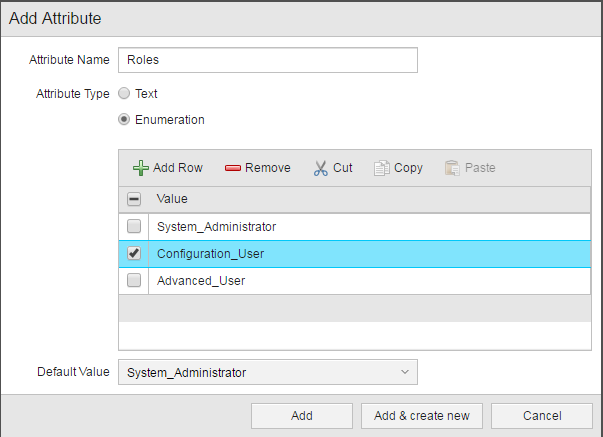
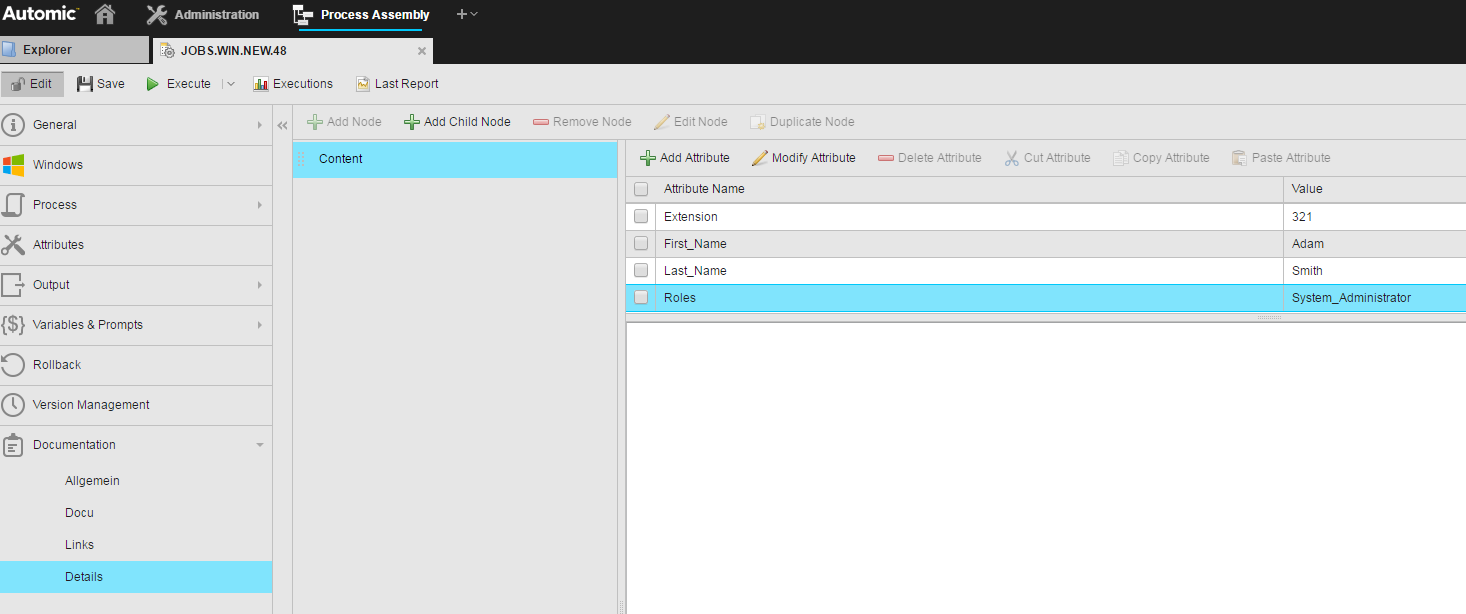
Structured documentation can be used to split complex object information in well-arranged parts. In the structured documentation pages you can use the Automation Engine script language to read values using a Script Object (SCRI). The parameters contained in this page can then be queried by other executable objects.

Apart from attributes and text, you can also enter links to files, folders, documents, Intranet or Internet. The linked files and documents open in the associated programs and the URLs call the standard browser, depending on the programs that are installed and on the PC configuration.

Rules and Conventions

The names of nodes and attributes must comply with the XML naming conventions, that is, you can use alphanumerical characters as well as "-", ".", "_".

Keep the following rules in mind:

Structured documentation can be read with specific script elements (XML_*)

ClosedTo Create Structured Documentation

You create structured documentation building the structure in nodes and sub nodes and adding attributes with values to those nodes.

  1. Open the sub page in which you want to enter the structured information. How many documentation sub pages are available for this purpose and how they are called depend on your system configuration.

    The documentation toolbar provides the functions you need to create node and child node structures.

  2. Create as many nodes and child nodes as you need:
    1. Click the Add Node button on the toolbar and enter the node name on the dialog that opens up. Keep the naming rules and conventions described above in mind. Create as many nodes as you need.
    2. There are two ways of creating child nodes:
      • Select the parent node, click the Add Child Node button on the toolbar and enter the child node name on the dialog that opens up. It is added below the parent node.
      • Select an existing node, grab it on the selection area (marked in red on the screenshot below) and drag and drop it below the parent node.

    3. To sort the order of the nodes in the tree structure, drag and drop them to their new position.
    4. Click the Remove Node button to delete an existing node.
    5. Click the Edit Node button to rename it.
    6. Click the Duplicate Node button to create the same node again at exactly the same position.
  3. Add attributes to the nodes:
    1. Select a node and click the Add Attribute button.
    2. On the Add Attribute dialog enter the name of the attribute and define its type:
      • Select Text and enter a value in the input field below.
      • Select Enumeration to create a dropdown list with the values you enter in the table:

        To add/edit a row you must first click its checkbox to activate it. You have then the following options:

        Option

        Description

        Inserts a new row at the bottom of the table

        Deletes the row

        Removes the entry from the list and pastes it to the clipboard. Click Paste to add it to the bottom of the table.

        Duplicates the entry. Click Paste to add it to the bottom of the table.
        Activates all rows in the table.

    3. Click Add to insert the new attribute in the Attributes list or Add & create new to continue defining attributes.
  4. Save your changes.