The script editor provides a number of functions that help you create and format your scripts, reuse code, find and replace strings, etc.
This topic provides information on the following:
- Color-Coding
- Using Shortcuts
- Syntax Tooltips
- Autocompleting Automation Engine Script Function Names
- Using Include Objects in Scripts
- Searching/Replacing Strings
- Opening and Editing an Object from the Script Editor
- Opening the List of Executions of an Object
- Opening the Last Report of an object
- Undoing/Redoing
- Converting to Uppercase/Lowercase
- Commenting
- Indenting/Outdenting
- Importing/Exporting Code Chunks
- Reformatting
- Automatic Uppercase Conversion for OS/390 and AS/400 Jobs
- Getting Context-Sensitive Help for Script Keywords
Script elements are displayed in different colors depending on their category to help you easily recognize them:
| Color | Example | Meaning |
|---|---|---|
| Green |

|
Comment lines |
| Blue |

|
Script statements |
| Red |

|
Script functions |
| Gray |

|
Strings |
| Purple |

|
Script variables |
| Yellow highlighting |

|
Selected script element. To select an element, simply right-click on it. The element is highlighted and a context-menu opens providing all functions that are available for it. Clicking, double-clicking or dragging your cursor over one or more elements DOES NOT select them. It opens a tooltip providing the details on the syntax of those elements. |
You can use shortcut keys as an alternative to the mouse. The following key combinations are available:
| Press | To |
|---|---|
| CTRL+A |
Select All |
| CTRL+C | Copy the selected text |
| CTRL+V | Paste the copied text. |
| CTRL+S | Saves your changes. |
| CTRL+Y |
Redo the last undone modification. |
| CTRL+Z |
Undo the last action. |
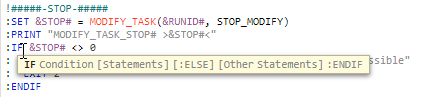
The Script editor assists you when creating your scripts displaying tooltips as you type. These tooltips suggest the correct syntax for the script statement, function and function argument that you are writing. They display the successor arguments for statements as well (for example, IF condition ELSE). Also, if you simply click or double-click an element, the tooltip pops up showing you the syntax.
Examples
When clicking or double-clicking a statement, any possible argument is displayed:
If you start writing or if you point to the adjacent script function, the tooltip shows the possible script variable syntax:

Note that the focus is on the selected element. In this case, this is IF, which is bold.
Likewise, if you start typing a script function, the tooltip displays it in bold:

In case of script functions with multiple potential syntaxes, as soon as you start typing them, the tooltip displays them all:

Autocompleting Automation Engine Script Function Names
With the autocomplete function the Script Editor inserts the correct function name in your scripts as you type.
Start writing the function name and press [Ctrl+Space]. A pop up is displayed providing a list with all the function names that match your input. Select and double-click the one you need to insert it. For example:

Using Include Objects in Scripts
Include objects (JOBI) store common code. You can then insert Include objects in the scripts of other objects; this avoids repetitions, minimizes maintenance and facilitates consistency across scripts.
Simply write :INCLUDE or :INC and the name of the Include object in the particular script section in which you want to integrate it. A plus icon is displayed at the beginning of the line. For example:

Click it to open the dialog with the content of the Include object. For example:
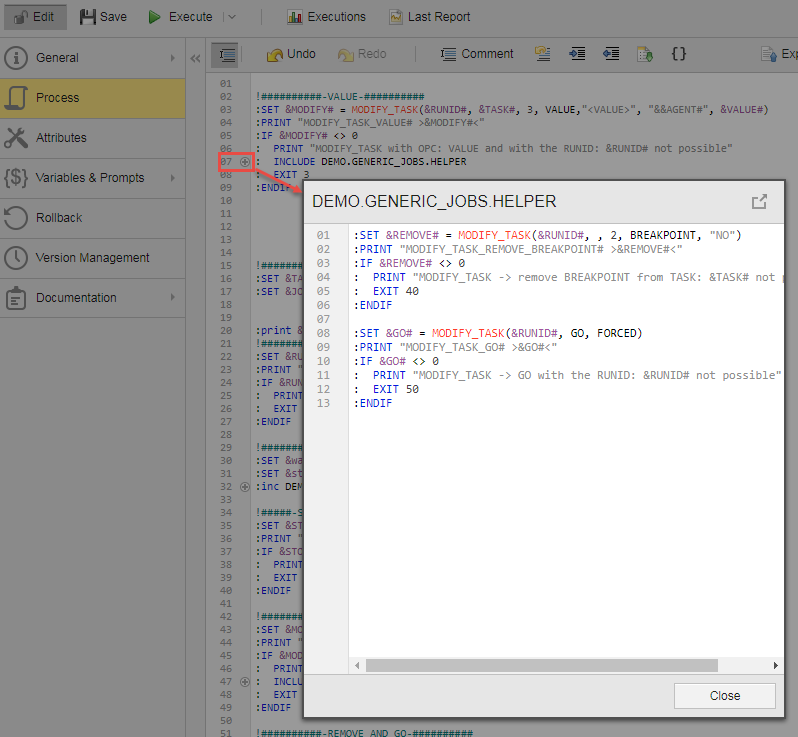
The script functions contained in the Include refer to the object in which it has been integrated and not to the Include object itself. For example, the SYS_ACT_ME_NAME script function provides the name of the object where the Include object has been inserted and not the name of the Include object itself.
The code of the Include object cannot be modified here. To edit it, place the cursor anywhere in the name of the Include object and right-click to select Open. This opens its definition pages.
Detaching the Script Editor Dialog
Scripts can be long and complex, containing as many nested Include objects as you need. To keep an overview when writing or modifying them you can open multiple instances of the Script editor dialog and detach them by clicking the  button. You can then arrange them on your screen at your convenience.
See also Include Object (JOBI).
You can search and replace strings in a script if the object has been opened in edit mode; otherwise, this function is disabled.
To Open the Search toolbar
Do one of the following:
- Click the Search button on the script editor toolbar.
- Press Ctrl+F on your keyboard.
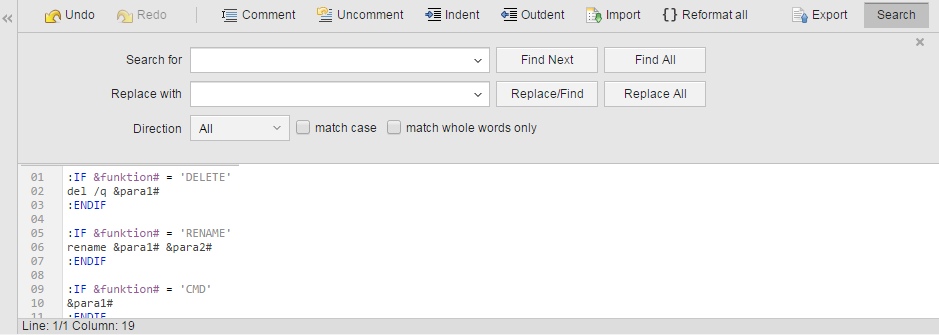
The search options are applicable only to the script that is currently displayed in the editor. The Search for list remembers and suggests the last 30 strings you searched for. Expand it to display them.
To Search for a String in the Script
-
Do one of the following:
- Open the Search toolbar and enter the string you are searching for in the Search for dropdown list.
- Select a string in the editor and click the Search button on the script editor toolbar or press Ctrl+F on your keyboard. The Search for field is populated with the selected string.
- Set the search Direction.
- Optionally, activate the match case option. This makes the search case-sensitive.
-
Optionally, activate the match whole words only option. This means that only strings separated from the rest of the text by the characters listed below will be highlighted:
- Blanks ( )
- Tabs (\t)
- New lines (\r\n or \n)
- Punctuation marks (, . ; : ? !)
- Special characters (\ ^ $ | ( ) [ ] { } EOF)
"Separated" here means that the entered string begins and ends with one of the mentioned characters.
The match whole words only option is disabled if your search string contains any of the characters listed above.
- Do one of the following:
- Hit [Enter] or click Find Next to highlight the first occurrence of the string.
Click Find All to highlight all occurrences.
A message is displayed at the bottom of the search bar indicating the number of matches.
To Replace a String in the Script
- Enter the string you want to replace in the Search for dropdown list.
- Enter the new string in the Replace/Find dropdown. This list also remembers and suggests the last 30 strings you searched for.
- Specify the search options (Direction, match case, match whole words only).
- Do one of the following:
- To replace one specific occurrence, click Find Next until the desired match is highlighted and then click Replace/Find.
To replace all occurrences, click Replace All.
A messages is displayed at the bottom of the search bar indicating the number of replacements.
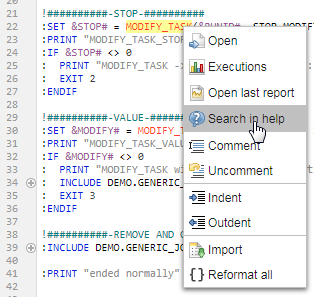
Opening and Editing an Object from the Script Editor
In your scripts you refer to objects available in the system. If you need to change the settings of the object you are referring to, you can do so directly from the Script Editor.
Hover your cursor over the object name and right-click; the Script Editor recognizes the name and highlights it while opening the context-menu where you can select Open. The object definition pages are opened; you can modify its parameters provided your user definition has the necessary rights.
For the Script Editor, a potential object name is any string that meets these requirements:
- it contains alphanumeric characters without umlauts
- it can contain the following: . _ # @ - $
- it starts/ends with any of the following:
- spaces, tabs, new lines
- umlauts or any other special characters
- punctuation marks other than dots
Opening the List of Executions of an Object
If you want to access the Executions list of an object included in a script, you can do without having to leave the script. Simply right-click the object name and select Executions from the context-menu.
See Opening and Editing an Object from the Script Editor above for details on how the script editor recognizes the beginning/end of the object name.
Likewise, you can check the details of the object's last report without leaving the script editor. Right-click the object name and select Open last report from the context-menu.
See Opening and Editing an Object from the Script Editor above for details on how the script editor recognizes the beginning/end of the object name.
See also Reports Overview.
Pressing CTRL+Z or clicking the Undo button reverts you last change. Pressing CTRL+Y or clicking the Redo restores the last undone action.
Converting to Uppercase/Lowercase
Select one or more words, right-click and select Uppercase or Lowercase. If the selected text contains special characters or numbers, these are not affected by the case conversion.
Select one or more lines and click the Comment button on the toolbar or right-click to select Comment. This adds an exclamation mark (!) at the beginning of the selected lines. Commented Automation Engine script lines are ignored at execution.
Click the Uncomment button on the toolbar or right-click to select Uncomment to remove the exclamation mark. The lines are no longer commented and, therefore, they will be processed at execution.
If a line contains multiple exclamation marks, one of them being at the beginning of the line, when you uncomment it only the first exclamation mark is removed.
Select one or more lines and click the Indent/Outdent button or right-click to select Indent/Outdent.
Exclamation marks that identify comment lines and colons that identify Automation Engine Scripting lines remain at the beginning of the line, only the rest of the line is indented or outdented.
Importing/Exporting Code Chunks
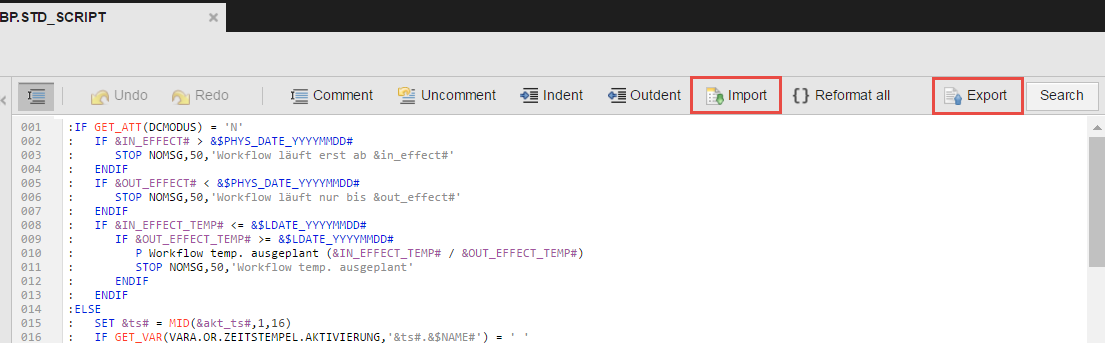
The importing/exporting function in the script editor allows you to reuse code across installations. This function is available on all Process pages as well as in the Script object.
You can import the content of a file available in your machine to your script. You can also export the entire script to a file that you can then import on a different system.
Please be aware that this import/export function is limited to the content of the script editor that is currently displayed. If you want to import/export entire objects, you have to use the Import/Export function available in the Process Assembly perspective. See Importing/Exporting Objects.
Exporting script contents always applies to the entire script; it ignores the current text selection. Please use the Copy/Paste function of your browser if you only want to export portions of your script.
To Import Code from a File
- Put your cursor in the position where you want to insert the imported code.
- Right-click and select Import from the context-menu.
- On the Import dialog click the
 button.
 - In the resulting dialog, locate the file in your local file system and click Open.
- The selected file is uploaded and its contents are inserted at the current cursor position.
The maximum filesize for uploads is defined by the MAX_IMPORT_SIZE key (see UC_CLIENT_SETTINGS - Various Client Settings). The hard limit is at max. 30720 KB. We do not recommend importing scripts larger than 500kb as this might impair the script editor performance.
To Export Code to a File
- Open the script and click the Export button on the script editor toolbar.
- The entire script is available for download in a text file with the name of the object followed by "_sheet.script" that is saved to the Downloads folder.
The Reformat All button on the toolbar allows you to apply a consistent format to the entire script in one go. This will indent nested blocks and remove unnecessary indent spacing as well as add a space after a comment character (!).
For example, the line
: .......... PRINT"Start of processing"
would be formatted as follows:
:PRINT"Start of processing"
Automatic Uppercase Conversion for OS/390 and AS/400 Jobs
The Script Editor is designed to recognize if you are writing scripts for OS/390 or AS/400 jobs and, if so, to automatically write your text in UPPERCASE. Numbers and other non-alphabetical characters are not affected. This means that you can write, for example, WAIT100 without pressing the shift key.
Of course, you can write in lowercase, if you need to. Press shift and enter your text for this purpose.
Imported scripts and copy/pasted texts are not affected by this function either.
Getting Context-Sensitive Help for Script Keywords
The Automation Engine script language helps you automate your processes. The Automic Scripting Guide helps you with the syntax, functions, parameters, etc.
Although the Search in help option is always available, it opens the help only if you select either a keyword that is specific to the Automic scripting language or a configuration variable.
To Get Help on a Particular Script Keyword
- Right-click the script keyword for which you want to find information in the online help.
-
Select Search in help from the context-menu. For example:
-
Automic's online help opens up and the selected element is automatically inserted in its Search field. The search is also automatically started and the list with its results is displayed.
In our previous example, you might be interested in the first topic, as it matches the search term and it is described in the Scripting Guide:

- Click the link to open the topic.
See also:
Introduction to Automic Scripting Guide