Upgrading the CDA Component from Version 5 to 9
This page includes the following:
Stop the Components
Stop AE, CDA (IIS server), and AWI (for example, Tomcat server).
Update the Database
- Copy your existing Continuous Delivery Automation database to a new database.
-
Start
DataMigrator.exe.The Data Migrator utility is located in the DataMigrator folder of the web application (for example,
C:\Automic\Release.Manager\Utilities\DataMigrator) of the Installation package. See: Configuration Web Application - Customer.ConfigImportant! Ensure that you use the latest version of
DataMigrator.exeavailable for your Continuous Delivery Automation version.Note: Data Migrator requires the same .NET version as the web application. See also:General Requirements for Upgrading CDA
-
Specify the connection string to your CDA database and the database provider you use.
You may take the connection string from the
customer.configfile (Automic\Release.Manager\WebUI\customer.config).-
SQL Server Database:
connectionString=
"Data Source=##DB SERVER##;Initial Catalog=##DB NAME##;User ID=##DB USER##;Password=##DB PASSWORD##"Data Source=tcp:localhost,1433;Initial Catalog=ARA;User ID=AUTOMIC;Password=P@ssw0rd" name="MainDatabase"
-
Oracle Database:
connectionString=
user id=##DB USER##;password=##PASSWORD##;data source=(DESCRIPTION=(ADDRESS=(PROTOCOL=tcp)(HOST= ##DB SERVER##)(PORT=##PORT OF LISTENER##))(CONNECT_DATA=(SERVICE_NAME=##DB NAME##)))User Id=ARA_DEV_8_0;password=ara;data source=(DESCRIPTION=(ADDRESS=(PROTOCOL=tcp)(HOST=192.168.40.58)(PORT=1521))(CONNECT_DATA=(SERVICE_NAME=vviedb02.sbb01.spoc.global))) name="MainDatabase"
Note: If an Oracle database is used, the Oracle client must be installed on the same host where the migrator tool is executed. The Oracle client requirements are the same as for the Continuous Delivery Automation server; therefore we recommend executing the migrator directly on the Continuous Delivery Automation server. See Preparing for the Installation for further details on the Oracle client.
Important! The data migrator might not work with a standard configuration of the Oracle client. If an Oracle client is installed, but you still get an error like "Could not load file or assembly Oracle.DataAccess, ...", add the following configuration to the
DataMigrator.exe.config:<runtime>
<assemblyBinding xmlns="urn:schemas-microsoft-com:asm.v1">
<dependentAssembly>
<assemblyIdentity name="Oracle.DataAccess" culture="neutral" publicKeyToken="89b483f429c47342"/>
<codeBase version="4.112.4.0"/>
<bindingRedirect oldVersion="2.112.2.0" newVersion="4.112.4.0" />
</dependentAssembly>
<publisherPolicy apply="no"/>
</assemblyBinding>
</runtime>Replace codeBase version and bindingRedirect newVersion with the correct version for your oracle client. To find out your version, search for "Oracle.DataAccess.dll" in your oracle client directory. The product version is shown in the file details.
-
- Click Test to see if the tool can connect to the database.
- (Optional) You can also specify a different CDA database version than the latest one by explicitly selecting a version from the drop-down list.
Note: CDA9 requires version 9 of the database schema.
-
If the connection works, click Migrate to start the Migration, or Simulate to dry run the migration. When the migration is complete, the output window shows the new version:
Command-Line Interface
You can also call the migration utility via the command line.
datamigrator.exe -con connectionstring [-provider provider] [-version migrationversion]
Parameter
Description
-con connectionstringMandatory. The connection string to the database.
[-provider provider]The database provider to use.
Choices are MSSQL or ORACLE (Defaults to MSSQL)
[-version migrationversion]The exact migration version to which you want to migrate to.
Default value is set to the latest version
-
Check the CDA database version with the following SQL statement:
SELECT * FROM SchemaInfo ORDER BY Version DESC;
Data migration was successful when the top value in the version field starts with 900
Replace the Content of the WebUI Folder
- Remove the WebUI folder (
Automic\Release.Manager\WebUI) and copy the new version to the same location. - Configure the
customer.configfile. See: Configuring the Web Application - Customer.Config - Ensure that the Release Automation perspective is displayed and the Release Manager is up and running before proceeding with the next step.
Migrate the Existing Applications to the ARA.Applications Folder
To support the new features that are provided with version 9, all existing Applications must be migrated from the UC4.Applications folder to the new ARA.Applications folder.
- Close all Automation Engine objects related to the Applications to be migrated (if any).
- Execute the ApplicationContentMigrator tool (Automic\Release.Manager\Utilities\ApplicationContentMigrator)
- Enter the following commands:
MIGRATE -constr "araconnection" [-dbtype aradbtype] -H aehost -p port -c client -u username -pw password [-apps application names]
Where:
- - constr: Connection string to the Release Manager Database. The connection string must be enclosed in quotation marks "connection".
- - dbtype: Release Manager database type: MSSQL, ORACLE, POSTGRESQL. Default value: MSSQL.
- - H: AE host or IP
- - p: AE port
- - c: client
- - u: AE Admin user/department. For example: U1/QA
- - pw: AE Admin password
- - apps: list of application names to be migrated, separated by a comma. Leave it blank to migrate all Applications in bulk.
Important! Alternatively, you can define the input parameters in the ApplicationContentMigrator.exe.config file (Automic\Release.Manager\Utilities\ApplicationContentMigrator) and simply run the MIGRATE command.
The following options can be also used with the MIGRATE command:
- - help: displays a list of available commands.
- - force: If you want to migrate all existing Applications (the -apps option is left blank), it may happen that one or more of them are not compliant with the new structure. You can use the -force option to migrate non-compliant Applications to the new folder and AE objects stored in the Application folder.
The AE objects are moved to the new structure as follows:
Current location New location UC4.APPLICATION ARA.APPLICATION UC4.APPLICATION/folder ARA.APPLICATION/folder UC4.APPLICATION/folder/ Component folder ARA.APPLICATION/folder/Application/Workflow folder Important! The migration process cannot be run again once the force option has been executed. For more information, see ApplicationContentMigrator. Some Applications cannot be migrated. in the troubleshooting section.
- - dryrun: this command can be used to dry run the migration process and see the errors that may occur during an actual migration.
After running the command, a log file is generated in the logs folder of the tool.
Important! If you have migrated Applications contained in two different CDA instances to the latest version of CDA and some of the Applications were available in both instances, you can use two REST API endpoints to map the GUIDs and identify them as a single Application:
GET api/data/v1/applications/{id}: Retrieves the name, GUID of the Application and of all related entities from one of the instances.POST api/data/v1/applications/{id}/identity_mapping: Maps the GUID of the Application to the same Application in the other Instance (only the name is used for the mapping)
Notes:
- If the IDs or the names of the application do not match, the mapping fails.
- If some components or workflows are missing, the applications are mapped, but a message with a list of missing components is displayed.
Synchronize User Permissions
After migrating the Applications to the ARA.APPLICATIONS folder, you must synchronize the user/user group permissions so that users can access the new folder structure.
To Synchronize User Permissions
- Launch Windows PowerShell and navigate to the directory where the script is located:
SyncPermissions.ps1(Automic\Release.Manager\Utilities\ApplicationContentMigrator) -
Execute the script with the following command:
C:\Automic\Release.Manager\Utilities\
ApplicationContentMigrator\
.\SyncPermission.ps1 [[-con] <String>] [[-usr] <String>] [[-pw] <String>] [[-users] <String>]
Example:
C:\Automic\Release.Manager\Utilities\
ApplicationContentMigrator\
.\SyncPermission.ps1 -con http://localhost/ara -usr CLIENT/USER/DEPARTMENT -pw ***** -users CLIENT/USER/DEPARTMENT
Where:
- -con: connection
- -usr: username. Contains (system name), client, department, and name to log into the CDA system.
- -pw: password
- -users: list of users whose permissions will be synchronized. The users must exist both in CDA and in the AE. Otherwise the permissions synchronization will fail.
- -timeoutsec: time (in seconds) to wait for the request to complete the synchronization of user permissions.
Notes:
- You can update the user permissions of all users in bulk by removing the user definition from the command:
[[-users] <String>] - If the
usersparameter is not specified in the command, the default value of the timeout parameter (7200 seconds) is applied. - If your are using a multi-tenant CDA system, the system name must be included in the command. Admin rights are required.
Example:
SYSTEMNAME/CLIENT/USER/DEPARTMENT
- After executing the script, a log file is generated in the logs folder of the tool.
Install Utilities
Unpack and copy the utilities to your utilities folder (for example, c:\Automic\Utilities\).
(Optional) Install the Web Server Application
Important! When you update the customer.config file and potentially the web.config file, do not copy over your backed-up configuration files. Instead, go through each parameter individually and set it according to your environment.
To Install the CDA Server
-
Ensure that the following roles and features are installed:
Features
- .NET Framework 3.5 Features
- .NET Framework 3.5 (includes .NET 2.0 and 3.0)
- HTTP Activation
- Non-HTTP Activation
- .NET Framework 4.5 Features (4 of 7)
- .NET Framework 4.5
- ASP.NET 4.5
- WCF Services (2 of 5)
- HTTP Activation
- TCP Port
- Windows PowerShell (3 of 5)
- Windows PowerShell 4.0
- Windows PowerShell 2.0 Engine
- Windows PowerShell ISE
- Windows Process Activation Service
- Process Model
- .NET Environment
- Configuration APIs
- WoW64 Support
Roles
- Web Server (IIS) (16 of 43)
- Web Server (15 of 34)
- Common HTTP Features (5 of 6)
- Default Document
- Directory Browsing
- HTTP Errors
- Static Content
- HTTP Redirection
- Health and Diagnostics (1 of 6)
- HTTP Logging
- Performance (1 of 2)
- Static Content Compression
- Security (1 of 9 installed)
- Request Filtering
- Application Development (7 of 11)
- .NET Extensibility 3.5
- .NET Extensibility 4.5
- ASP.NET 3.5
- ASP.NET 4.5
- ISAPI Extensions
- ISAPI Filters
- WebSocket Protocol
- Common HTTP Features (5 of 6)
- Management Tools (1 of 7)
- IIS Management Console
- Web Server (15 of 34)
- .NET Framework 3.5 Features
-
Copy the /WebUI folder to IIS.
Note: Default location: C:\Inetpub\wwwroot\
-
Allow the
IIS_IUSRSuser for full control of the\logsand\StateFilesfolders as follows:- Right-click the logs folder, then select the Security tab. Click Edit, click the IIS_IUSRS group and allow full control.
- Right-click the StateFiles folder, then select the Security tab. Click Edit, click the IIS_IUSRS group and allow full control.
-
Check the configuration of IIS for CDA or configure it including HTTPS and the recommended IIS Application Initialization settings.
To Set the Application Pool to use ASP.NET
-
Inside the IIS Manager, add a new application.
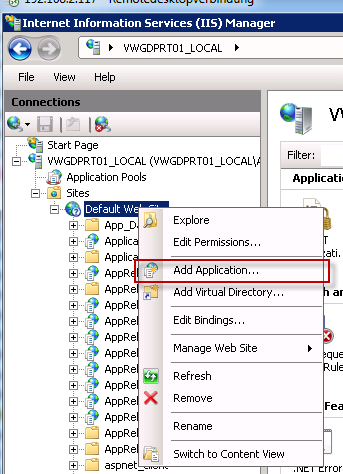
- Choose an alias (for example, "CDA"). This is used to determine the URL you use to open the application.
- Set the application pool to use ASP.NET in a previously installed version. This must comply with the General Requirements for Installing the CDA Server.
-
Select the physical path where you have copied the web application:
Parameter Example Value Alias
CDA Application pool ASP.NET v4.5Physical path C:\inetpub\wwwroot\WebUI
To Configure HTTPS
To ensure that the communication from and to CDA is encrypted, an HTTPS binding has to be established in the IIS Manager.
Note: If you want to roll out the application without HTTPS bindings, change the system.serviceModel element in the web.config file (see Configuring the Web Application - Web.Config).
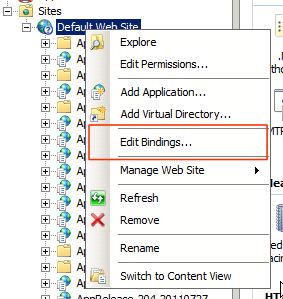
-
Inside the IIS Manager, right-click the Default Web Site and select Edit Bindings....
-
Click Add to add a new binding.
- Select the https type and your SSL certificate from the corresponding drop-down lists.
Notes:
- If you do not have one, refer to http://technet.microsoft.com/en-us/library/cc732230%28WS.10%29.aspx for further instructions on how to create and install an SSL certificate.
- For more information, see Securing Access with HTTPS.
Recommended IIS Application Initialization Settings
The
AlwaysRunningoption of the IIS Application Initialization Module keeps the instance active at every time.Note: All workflow executions require an active instance. Especially for planned workflow executions it is vital to have the instance active during the scheduled time window, otherwise the workflow execution will fail.
IIS 8
Add the Application Initialization as Windows feature as described in www.iis.net/learn/get-started/whats-new-in-iis-8/iis-80-application-initialization.
-
- If you do not want to use HTTPS, change the service model settings in web.config file.
To do this, replace the <system.serviceModel>-tag and all of its content with the following snippet:
<system.serviceModel> <bindings> <basicHttpBinding> <binding name="DeploymentServiceBindingNoSec" maxReceivedMessageSize="20000000" maxBufferPoolSize="20000000" maxBufferSize="20000000" messageEncoding="Text" sendTimeout="00:05:00" receiveTimeout="00:05:00"> <security mode="None"/> <readerQuotas maxDepth="200" maxStringContentLength="20000000" maxArrayLength="16384" maxBytesPerRead="20000000" maxNameTableCharCount="16384"/> </binding> </basicHttpBinding> </bindings> <behaviors> <serviceBehaviors> <behavior name="Ventum.Bond2.Web.Service.DeploymentServiceBehavior"> <serviceMetadata httpGetEnabled="true"/> <serviceDebug includeExceptionDetailInFaults="true"/> </behavior> </serviceBehaviors> </behaviors> <services> <service behaviorConfiguration="Ventum.Bond2.Web.Service.DeploymentServiceBehavior" name="Ventum.Bond2.Web.Service.DeploymentService"> <endpoint address="" binding="basicHttpBinding" contract="Ventum.Bond2.Services.Deployments.IDeploymentService" bindingConfiguration="DeploymentServiceBindingNoSec"> <identity> <dns value="localhost"/> </identity> </endpoint> <endpoint address="mex" binding="mexHttpBinding" contract="IMetadataExchange"/> </service> </services> </system.serviceModel> - Make sure the two values AutomationEngine.QueueObjectFolder and AutomationEngine.LoginFolderName in the integration.config file in the config folder still point to the folders from the previous versions (or, alternatively, move the objects to the new folders in the AE).
-
If the installation is done by overwriting old files with a newer version, clean the sub-folder of the directory
C:\Windows\Microsoft.NET\Framework64\vX.X.XXXXX\Temporary ASP.NET Files.Note: The sub-directory name depends on the .Net-Framework version installed (for example:
v4.0.30319). - Clear also the directory
inetpub\wwwroot\WebUI\StateFilesto rebuild the search index.Note: Building up the search index takes a considerable amount of time.
-
Restart IIS.
To Add More Clients
- Configure the new client in the
customer.configfile. See Upgrading the CDA Component from Version 5 to 9 - Add a CDA database for the new client.
- Import the user to the new Automation Engine client and register it in CDA.
Update the Index Data
Execute the following commands in the CLI:
-
admin-cli clearallindex -con (connection string) -usr (user credentials) -pwd (password)
Example:
admin-cli clearallindex -con http://vviedev01/ara -usr 120/ARA/AUTOMIC -pwd ara123 -
admin-cli index -con (connection string) -usr (user credentials) -pwd (password)
Example:
admin-cli index -con http://vviedev01/ara -usr 120/ARA/AUTOMIC -pwd ara123
Install the CDA Plug-in and Update the connection.properties in the Tomcat Config Folder
- Clear the cache by deleting the files and sub-folders of the folder named felixcache (Example path:
C:\Program Files\Apache Software Foundation\Tomcat 7.0\webapps\AWI\WEB-INF\felixcach). -
Copy the following files to the AWI autoinstall Tomcat folder:
webui-plugin-bond-*.jarwebui-plugin-pluginmanager-*.jar-
webui-plugin-actionbuilder-*.jar
(Example path:
C:\Program Files\Apache Software Foundation\Tomcat 7.0\webapps\AWI\WEB-INF\autoinstall\webui-plugin-bond-*.jar).Notes:
- Further updates can be performed by simply replacing the existing
.jarfile in theautoinstallfolder within thewebapps/directory of the Tomcat server running AWI with the new version. The configuration file will not be overwritten. - PCK.AUTOMIC_BOND 1.2.x is the minimum compatible version for the Release Manager v12.2.8. Higher versions of the BOND package are also supported. However, when installing them, you may get an error message informing about invalid custom types. These messages can be safely ignored.
- Start Tomcat.
-
Check and configure the CDA plug-in configuration file (for example
C:\Program Files\Apache Software Foundation\Tomcat 7.0\webapps\awi\config\webui-plugin-bond\connection.properties).Open the configuration file
connection.properties.Important! Ensure that the URL matches the CDA URL defined in IIS while installing the CDA Web Server Application
Example content in
connection.properties:url=http://localhost/rm_main (URL of BOND on IIS)
timeout=60000 (BOND session timeout)
package_folder=/PACKAGES (folder containing Continuous Delivery Automation packages)
use_dedicated_api=true
rest_connect_timeout=60000
rest_read_timeout=60000
use_dedicated_api=true (allows to use dedicated API for Deployment Pipeline)
(Optional) Install the CDA Dashboard
The CDA start page has been replaced with the CDA dashboard, which contains widgets that provide an overview of the CDA system state.
To install the CDA Dashboard
The CDA dashboard can be manually installed by importing the ARA.DASH.DEFAULT.xml file (located in the \Release.Manager\AE folder) into the correct AE-client. To import the xml, you can use the Automation Engine import function. For more information, see Importing/Exporting Objects and Working with Dashboards.
Note: The Access to Dashboard privilege must be assigned to the users to whom you want to grant access to dashboards. For more information, see Setting Up Dashboards.
Clear your Browser Cache Before Opening the Upgraded AWI/CDA
Microsoft Internet Explorer
- Navigate to Internet Options > General > Browsing history.
- Select Delete.
- Deactivate the Preserve Favorites website data option.
- Activate the Temporary Internet files and website files option.
- Select Delete.
Firefox
- Navigate to Options > Advanced.
- Select the Network tab.
- In the Cached Web Content section, select the Clear Now option.
Google Chrome
- Select the Menu button in the upper-right corner.
- Go to More Tools > Clear browsing data.
- From the Obliterate the following items from drop-down list, select the beginning of time.
- Select Clear browsing data.
- Activate Browsing history, Cookies and other site & plug-in data, and Cached images and files.
- Select Clear browsing data.
Next step: