Incident Remediation Using Webhook Events
As an administrator, responsible for hardware infrastructure, you can use Webhook Event objects with your ticketing system for incident remediation. This object works with the Event Engine feature and helps you solve routine incidents quickly, saving you time to solve more challenging problems.
More Information:
This Event Engine feature can be used to react to internal and external events. The following use case is based on an external event that uses a Webhook Event object to listen and receive incoming external event payloads.
This page includes the following:
What Will You Learn?
- How to create an IA Event Definition
- How to create a Webhook Event object based on an Event Definition
- How to map external event payloads using JSONPath
- How to filter received event payloads using conditional operators
Prerequisites
To use the Webhook Event feature, the following components and knowledge are required:
- An installation of Analytics with the Rule Engine. See: Installing Analytics and the Event Engine
- Prior implementation knowledge of Event and Variable (VARA) objects
- A good understanding of webhooks and how they are implemented
- Access to an external system that enables the use of webhooks
- Knowledge of the JSONPath syntax
- Knowledge of your external system's JSON schema
Note: If they are not listed in the Explorer sidebar, then you need to download them from our marketplace on https://marketplace.automic.com/ and install them. For instructions about installing an action pack, see Installing Packs in Working with Packs and Plug-ins.
More information:
Use Case Description
This example is based on the following scenario:
- A monitoring tool observes a company's hardware infrastructure events.
- A server disk capacity incident occurs.
- The monitoring tool reports the incident to JIRA and an incident ticket is created. A webhook is setup in JIRA and a Webhook Event object is created in AWI to listen for JIRA events.
- The JIRA event payload matches Event Engine Rules for the incoming JIRA incident.
- The Event Engine reacts in real-time and either executes an Automated Task to fix this issue or enrich the incident data if a solution can not be found.
The following diagram shows the incident remediation process:
Create a Scoped API Key
Webhook endpoints require a scoped API key. The scoped key must be generated for the client on which the Webhook object is running. If the external webhook API (for example, JIRA) is unable to send the authorization key in the HTTP header, it can also be provided as an URL parameter.
Example:
http://host:port/analytics/api/v1/100/12345?authorization=1cb812db-6616-49da-af97-3719aeaddc24
For further information, see Analytics REST API - General Info
Create an IA Event Definition
The first stage is to create an IA Event Definition for the incoming JIRA event payload. It contains the event structure required for the Event Engine to trigger Rules and execute processes (Jobs for example).
In this example, we are going to create an Event Definition with Attribute Keys based on a JIRA issue created event.
- Login into an Automation Engine Client where an IA Agent is assigned. See: Assigning Clients to Agents
-
Create an IA Event Definition. Click Process Assembly in AWI. Then:
- Click Add Object from the toolbar
- Select and expand Variable tree
- Select and expand XMLvariables, then select IA > EVENT_DEFINITION Variableto create the definition sheet
- Name the IA Event Definition sheet JIRA.ISSUE.EVENT
-
Add the Attribute Keys to the newly created JIRA.ISSUE.EVENT Event Definition. To do this, you need to know the content and structure of the received JIRA event payload.
There are several ways to get this information:- Use JIRA webhook web pages to provide us with resources
- Create or use an existing endpoint to make a test event payload
Important! The JIRA event payload is based on the JSONPath structured schema. When populating the Event Definition Key Attributes column, the schema needs to be transformed into a flat structure.
The following example shows how to translate the transform JSONPath structured data into a flat structure.
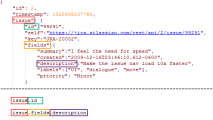
Note: Although there is no rule for naming Key Attributes, they have been named as they appear in the JSON. This enables you to map them easily when you create a Webhook Event.
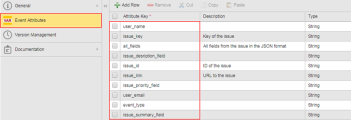
The following columns are populated:
- Attribute Key
- Description
- Type
The information used to create the Event Definition is largely based on JIRA issue related fields, however you have also include user and event related fields.
Here is the full list created in the Event Definition Attribute Key column:
Create and Map the Webhook Event
You have now created and populated JIRA.ISSUE.EVENT Event Definition. It's now possible to create a Webhook Event object in AWI.
At this point you are creating an endpoint for JIRA to send event payloads to the Event Engine to be processed.-
In AWI, click Process Assembly.
- Click Add Object from the toolbar
- Select and expand Event (EVNT) tree
- Select and expand IA variables, then select WEBHOOK Event
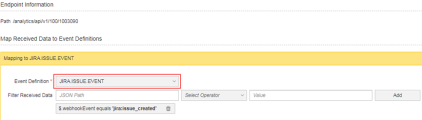
- In the Webhook Event we select JIRA.ISSUE.EVENT Event Definition from the drop-down list.
- You now need to map all the Attribute Keys in the Event Definition sheet to the JSON path. The content and structure is already known in the JIRA event payload, as it helped you previously build the JIRA.ISSUE.EVENT Event Definition.
Important! Always test your JSONPath expressions against the Event Engine before putting them into production. JSONPath Expressions created in external tools might not work as expected as there is no common JSONPath query syntax standard.
Finally each Attribute Key is mapped to its corresponding JSONPath.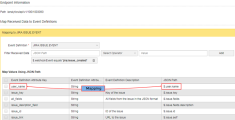
- To trigger a Rule in the Event Engine, create a conditional filter that is applied when an issue_created event is received.
Using JIRA online information for the syntax, we create the following filter:
$webhookEvent is equal to jira:issue_created.
Note: The filter operator table has the same operators as outlined in the Simple Rule.


