Login (LOGIN)
As a developer and object designer you define executable objects (for example Jobs and File Transfers) that need access to third-party applications and operating systems (target systems). Login objects store the login information that Agents need to execute the objects on the target systems. You do not have to remember the passwords, but simply assign the executable objects the Login object that contains them.
As a system administrator, you can enter and manage all the passwords centrally and safely in Login objects. For more information, see Login Objects in the Security chapters.
Object class: Passive object
Object type/Short name: LOGIN
This page includes the following:
Overview
Agents pass the login information defined in the Login object to the operating system or application in which Jobs or File Transfers are processed. This information is validated and the following happens:
- If it is correct, the task is processed using the operation system ID that is stored with the Login object.
- If it is not correct, the operating system or application rejects processing the task.
Notes:
- Some operating systems allow deactivating the login validation. You can do so in the Agent INI file .
-
You can also use the following script elements to handle Login objects:
Platform-Specific Features
Some platforms have special features:
-
Usually, you need to specify one password. However, if you use WebSphere version 6 with activated administrative security, you must specify three passwords, namely User password, Keystore password and Truststore password. This also applies when defining a Login object for JMX objects.
-
Oracle applications
In Login objects, you need to specify an internal OA user that is used for processing jobs. In addition, you must specify an OA database user in the
ERP_LOGINobject. -
Windows
You can specify "*OWN" as domain when logging in to Windows. The Windows job is then processed with a local login authorization.
Windows Agents require particular rights to process jobs that must be assigned to the user who starts the Agent.
-
UNIX
The length of the username is limited to 32 characters.
Defining Login Objects
A Login object definition is made up of the following pages:
- Standard pages common to all objects:
- The object-specific settings described here.
To Define the Login Information
-
On the Login page, apply the Login object to one of the following:
-
A specific Agent
In Agent/Name enter or select an Agent. You can use a variable here. The Type of the object is then automatically selected.
For more information, see:
-
All Agents of a type:
In Agent/Name enter *. The Agent Type can be either an OS or an application.
Example
A Login object has been defined for AGENT.JMX with type JMX. A second Login object has been defined for type JMX, but this time using the "*" wildcard character as type.
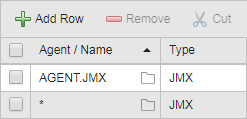
This means that the second one (with the wildcard) is applied in all logins of JMX Agents EXCEPT in those for which you enter a specific Agent name. In our example, the AGENT.JMX login is always applied to this Agent. For all other JMX Agents, the definitions in * are applied.
-
Server processes for a password protected Service Manager: Enter * in the Agent/Name and in the Type field.
-
-
If you have selected a specific Agent, the Type is already populated, otherwise, click the arrow icon to open the dropdown list and select the type of Agent to which definition will apply. The following special types are available here:
- ILM (only in Client 0)
- MAIL - used for e-mail connections via SMTP
- DB - for partitioning with Rapid Automation Agents. In this case, you must select the name of the solution
The administrator can define additional types for Login objects in the UC_LOGIN_TYPES variable (see UC_LOGIN_TYPES - Defining Additional Platform and System Types for Login Objects). These types can be selected in the column when you either define * or any value for the name.
-
Enter a Username/ID that complies with the format requirements of the target system. The platforms that are available for selection by default and some the most common ones are:
-
BS200
Format: User ID, account
Conversion to capital letters: Entire field
-
Database
Format: User name
Conversion to capital letters: None
-
JMX
Format: User name
Conversion to capital letters: None
-
LDAP
Format: Domain/User ID
Conversion to capital letters:
-
Windows: Domains only
-
Oracle Active Directory: None
-
-
MAIL
Format: SMTP user ID
Conversion to capital letters: None
-
NSK
Format: Group name, user ID
Conversion to capital letters: None
-
Oracle Applications
Format: User name
Conversion to capital letters: None
-
OS/390
Format: User ID
Conversion to capital letters: Entire field
-
OS/400
Format: User ID
Conversion to capital letters: Entire field
-
PeopleSoft
Format: Operator ID
Conversion to capital letters: None
-
SAP (ABAP Engine/Business Intelligence)
Format: Client, user ID
Conversion to capital letters: None
-
SAP (Exchange Infrastructure)
Format: XI user ID
Conversion to capital letters: None
-
UNIX
Format: User ID
Conversion to capital letters: None
-
VMS
Format: User ID
Conversion to capital letters: Entire field
-
Windows
Format: Domains\user ID
Conversion to capital letters: Domains only
-
-
Enter a Password.
Passwords can be stored in the database or in a Password Vaults. In this case, the password is sent directly to the Agent.
In the Password Vault column, select one of the following options:
-
Automation Engine to store your password in the AE database.
Passwords stored in the database are unlimited in length, allow all characters (including commas) and are displayed as bullets.
-
The external vault that is configured to use a vault password
If the password come from an external password storage, the password field is disabled and indicates that a vault password is being used.
Note: JMX Agents require you to specify three passwords: User password, Keystore password and Truststore password. When you store your passwords in the database, the Password button opens up a dialog where you can set them. When using an external password storage, you need to set up three accounts for the same Agent. For more information, seeCA PAM Accounts or CyberArk Accounts respectively.
-

See also: