Upgrade Process
The Zero Downtime Upgrade allows you to upgrade your AE system with
You can also use the Zero Downtime Upgrade when the alternative MS SQL Server schema is already in use. However, you cannot use it to switch to this schema. For more information, see Integrating an Alternative MS SQL Server Schema.
Note: Using Zero Downtime Upgrade from v11.2 to v12 requires using the classic UserInterface. In your client, open the System menu and open the Upgrade Wizard. You can download the classic UserInterface from the https://downloads.automic.com/ and use the Automation Engine v11.2 documentation. We recommend that you switch to the AWI as soon as the first new CP is turned on because users and agents disconnect automatically in the new AWI. In the classic UserInterface, you would do this in the System Overview where you can manually disconnect active users and agents.
Important! It is not possible to carry out a Centralized Agent Upgrade parallel to a Zero Downtime Upgrade.
If you need help, contact our support team. Our consultants are experts in upgrading AE systems and will be pleased to assist you whenever it is necessary. For more information, see Support.
This page includes the following:
Overview
It is recommended to start an upgrade only if the necessary preparation steps for setup and testing have been taken care of.
Two different modes are activated during the upgrade: the compatibility mode and the parallel mode.
-
Compatibility mode
This mode is active during the whole upgrade process, even if you carry out a rollback. Certain system optimization functions are not available when in compatibility mode and the system performance is reduced by about a third.
You cannot switch a work process (WP) to a dialog work process (DWP) while in compatibility mode.
-
Parallel mode
This mode is only active when server processes from the base and target version are active at the same time. Base version work processes (WPs) may slow down until the upgrade is completed.
During the upgrade you will be asked to test (even for a few days) if everything works before finalizing the upgrade. If any issues arise, you can use the Rollback option. It is available only in step four (Connections), if the wizard has been processed successfully. For more information, see Rollback Option.
Note: All database changes persist even if you use the rollback option.
If an Automation Engine process running in the old version stops, it cannot be restarted. If all Automation Engine processes stop (for example, due to power failure), the Zero Downtime Upgrade finishes the upgrade process. In this case, you cannot perform a rollback. After the upgrade process has finished, the old server processes end automatically.
Once you have finished the upgrade process by clicking Next in the final step of the wizard, a rollback is no longer possible.
When the upgrade process finishes, the compatibility mode ends and the system runs normally again.
Important!
-
It is strongly recommended to carry out the following upgrade steps in the order they are listed in the CAPKI documentation. For more information, see CAPKI - Securing the ServiceManager.
-
It is possible to set the privilege for this kind of upgrade for any User object, but it is recommended that only the system administrators coordinate and conduct upgrades.
-
The upgrade must be done in the same client from start to finish.
-
Do not make any changes in Client 0 while using the DB Load Utility during the upgrade process as initial data is inserted/updated. Otherwise, you will have inconsistencies in your system.
-
Utilities cannot be rolled back once the database has been upgraded in step two (Processes) of the wizard. You have to use the utilities in the target version from then on.
-
Automation Engine utilities are external applications. Make sure that no utilities run during the Zero Downtime Upgrade process.
-
The Automation Engine and the Automic Web Interface components should always be on the same release version. To check other compatibility issues, see Compatibility Information.
Prerequisites
Make sure your system meets the system and user prerequisites, otherwise the Zero Downtime Upgrade will not work properly.
Setup the System
To properly carry out the Zero Downtime Upgrade, you have to use a distributed installation. These installations can be located either on two separate hosts or on two separate installations on the same host, but in different bin directories. For more information, see ZDU - Distributed Installation .
The upgrade process makes reference to either the base or the target system, which also represent the base and target version in the upgrade scenario.
If you use a proxy and a firewall in the systems used for the upgrade, you have to configure the ports accordingly. For more information, see Configuring Firewall and Ports.
Information security services, such as the TLS implementation of the ServiceManager, require features provided by the CAPKI package. You need to install CAPKI on all computers in which the AE processes or the ServiceManager and any of its clients will run.
Important! In a UNIX environment, do not overwrite the existing installation. In UNIX this can happen without a warning even if the binaries are currently in use.
More information:
Set User Privileges
Make sure that the respective user or users (usually system administrators) have the necessary permissions. The user conducting the upgrade must have the privilege Execute system upgrades set in the corresponding User object. For more information, see Granting Automation Engine Privileges.
Upgrade the Automic Web Interface
You have to install a new AWI instance every time you upgrade to a major or minor version of the Automation Engine. The Automation Engine and the Automic Web Interface components should always be on the same version.
Upgrading an existing installation to the new release upgrades the AWI framework and all its plug‑ins at the same time. Use the same steps to install hot fix packages between releases.
-
Stop the Apache Tomcat Service.
-
Open your Windows Services manager.
-
Stop the Apache Tomcat service.
-
-
Back up current files.
These steps are optional. You can make a safety copy of your entire AWI installation, or just the configuration files. Although, you can use very little of the previous configurations in the new version, you might find it helpful to have a copy for later reference when you configure the upgrade.
-
To backup your whole AWI installation, go to your Tomcat installation, open the webapps folder and make a backup copy of the entire awi folder.
-
To backup only the configuration files, go to the folder where you have the current AWI version installed, and make a backup copy of the folder webapps/awi/config.
-
-
Upgrade the application server.
Important: AWI runs only on Tomcat. If you want to use another application server for the Automic Web Interface, see Installing the Automic Web Interface.
Before upgrading the application server, check the Automic Compatibility Matrix to see which version is compatible with AWI.
You will find the upgrade instructions and other relevant information on the homepage of your application server provider. For more information, see Compatibility Information.
-
Restart the application server.
You will find the relevant information on the homepage of your application server provider.
-
Deploy the new AWI version (WAR file) on your application server.
If you are using Tomcat, copy the awi.war file to the webapps folder of the Tomcat installation. If the Tomcat is running, the awi.war file will be deployed automatically, creating a folder with the same name.
Important! Deleting the awi.war file removes the corresponding subfolder, which also undeploys the AWI.
If you are using WebSphere or WebLogic, please refer to their official documentation for more information.
If you use WebSphere 8.5.5.x, make sure to delete the following files from the AWI folder before deploying the WAR file:
-
WEB-INF/lib/jaxb-api-2.2.11.jar
-
WEB-INF/lib/jaxb-core-2.2.11.jar
-
WEB-INF/lib/jaxb-impl-2.2.11.jar
-
-
Configure the new AWI version.
For more information on how to configure your upgraded AWI, see Configuring Automic Web Interface.
If you made a backup before you started the upgrade, then you can retrieve the following files and settings from the backup files from the previous webapps/<ECC>/config folder to the new webapps/<AWI>/config folder:
-
You can replace the new file with your backup.
If you have more than one AE system connection defined, you can allow your users to choose their connection at login, or you can specify any of the defined connections as the only valid connection. You defined this in the automationengine.index setting of the configuration.properties file.
Previously, users could not choose a connection and you had to be sure that your one valid connection was defined first in uc4config.xml.
-
Important: Do not replace the file in your new installation with your backup. Instead, define the file as described in this guide. However, you can refer to your backup files for the following two parameters, which may have optionally been defined in your AWI environment:
-
defaultHomeDashboard (This would be the dashboard attribute in the navigation.xml file.)
-
customHomeDashboardsFolder (This would be from the previous configuration.properties file.)
-
-
Do not restore your backed up version.
However, if you changed the default setting for the severity level of event messages (DEBUG) for the root element, then you might want to make the same change for AWI.
-
Theme folder:
If you had customized the color or banner logo in your previous environment, then copy the contents of your backed up webapps/awi/config/theme folder to the folder of the same name in your current AWI version.
For more information, see colors.properties.
-
Upgrade and Rollback
Click the image to expand it.
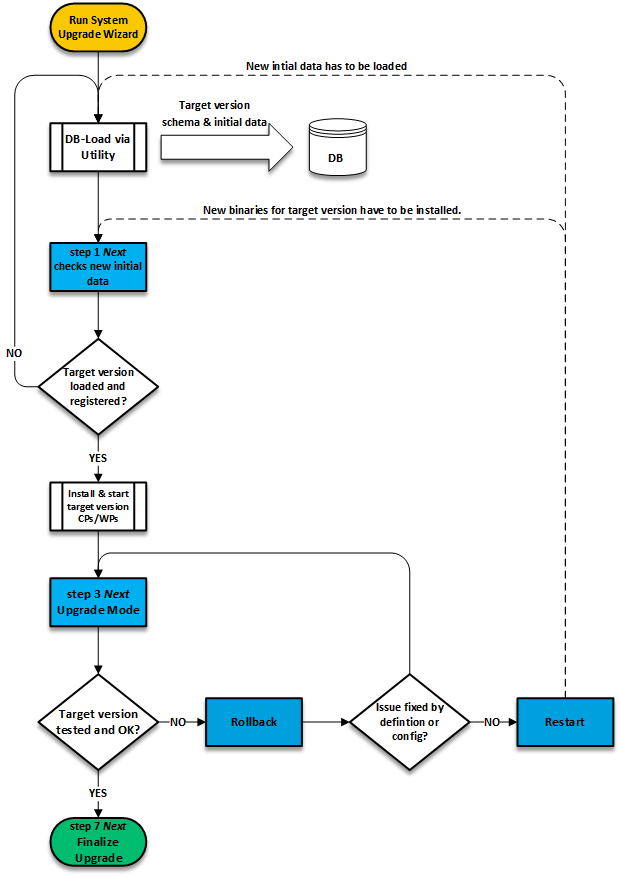
On the Administration perspective, select Automation Engine Management > System Upgrade and click Run System Upgrade Wizard to start the Zero Downtime Upgrade.
While upgrading, you can leave the process at any time and return to it later. The Automation Engine system stores the information of the step where you left off and opens the System Upgrade page at that step automatically as soon as you return.
The rollback function allows you to check tasks or processes that might not run quite as expected while testing the new installation. It is visible in step four of the System Upgrade wizard, as soon as the server processes from the target version have been started and are running. Using this option rolls back the processing to the base version.
Once you have finished the upgrade process by confirming Next in the final (seventh) step of the wizard, a rollback is no longer possible.
Upgrade Steps
-
Log on to Client 0 in the Automic Web Interface.
If a user has been granted the privilege Execute system upgrades for the first time, that user has to log off, restart and then log on again to Client 0 with those credentials.
-
On the Administration perspective, select Automation Engine Management > System Upgrade and click Run System Upgrade Wizard to start the upgrade process.
This starts the compatibility mode and enables upgrading the database with the schema and initial data of the target version.
Note: Leave the page open and use the external DB Load Utility to upgrade the database. For more information, see AE DB Load.
The DB Load Utility carries out the following actions:
-
Running system check
If the ZERO_DOWNTIME_UPGRADE variable is set to N and the system is running, DB Load ends the loading process with a corresponding message.
-
Version Check:
DB Load checks if the correct version for the Zero Downtime Upgrade is installed and used. If the version is not correct, a corresponding message is returned.
-
Check and Load new DB schema and initial data
-
If the ZERO_DOWNTIME_UPGRADE variable is set to N and the system is not running, DB Load loads the new DB schema and initial data. Records are written into the appropriate database table for future reference.
-
If the ZERO_DOWNTIME_UPGRADE variable is set to Y and the system is running, DB Load also loads the new DB schema and initial data. Otherwise DB Load aborts and returns the corresponding message.
-
In addition DB Load checks if the server processes of the target version are already active. If so, DB Load ends and returns the corresponding message.
-
While this step is processed, the AE system loads the target version database schema and initial data. When you have finished upgrading the database with the DB Load Utility, click Next to confirm the step in the wizard. The Automation Engine checks if the initial data for the base and target version are present and the target version data has been loaded correctly.
-
-
Install and start communication and work processes from the target version parallel to the already running ones. The new processes are not yet in use at this point.
-
If you have not upgraded your AWI as stated in the prerequisites, do so now. The wizard provides a short overview of the upgrading procedure for the AWI.
-
In this step, the server processes of the base and target versions are switched.
Note: When the connections are being switched to the new version, the WP log file might display the message "UCMAIN_R: Unexpected KICK with type 'RLASS' occurred." or another type of KICK message. You can ignore this message while ZDU is in mixed mode, as the issue resolves itself once the ZDU process finishes.
The running tasks finish on the base version processes while new tasks start on the target version processes until all base version processes are idle. Therefore, all users still connected to the AWI instances of the base version must be disconnected. Also, you must disconnect all agents connected with base version processes manually so that they reconnect automatically with the target version processes. Make sure that the agents can be disconnected without interrupting running executions.
The wizard offers an interactive page with two panes, where you can disconnect users and agents yourself. The buttons for disconnecting users and restarting agents change the side of the pane and show up over the table for new or old version, depending on the function you are using: Upgrade or Rollback.
-
To disconnect one or more users at once:
Access the Users list in the Connections pane. Select the user or users you want to disconnect and click Disconnect User. To disconnect all users, click the respective button. In this case, no selection is necessary.
The disconnected users disappear from the list.
-
To reconnect on or more agents at once:
Access the Agents list in the Connections pane. Select the agent or agents you want to reconnect and click Reconnect Agent. To reconnect all agents, click the respective button. In this case, no selection is necessary.
The reconnected agents appear either in the current version or the new version list, depending on the version in which you reconnected them.
The system runs now with the initial data and processes from the target version, while the processes of the base version are subsequently phased out.
Important!
-
The Rollback option is available at this point (it is not visible in the previous steps). This is the last opportunity to Rollback before finalizing the upgrade process.
-
This parallel mode should last as long as needed for proper testing. Testing the system allows you check if all processes and tasks run smoothly. Once you have tested your system and you have determined that the upgrade was successful, you can carry out the last step of the process to finish the upgrade. For more information, see FAQ - Zero Downtime Upgrade.
-
-
If testing was successful, click Next. Analytics, CDA, and other plug-ins and additional components can be upgraded here.
-
Check the memory entries in the database and delete the ones referring to the old version.
-
If you want to upgrade your agents, use the Centralized Agent Upgrade. For more information, see CAU - Upgrade Procedure.
Clicking Next finishes the upgrade process. This is only possible, if no base version processes are active anymore. This also ends the parallel and compatibility modes. Once you do this, a rollback is no longer possible.
Note: If the error message ZERO_DOWNTIME_UPGRADE - 'FINALIZE' not possible. Work processes to shut down are not idle yet. Please try again later. is displayed, schedule tasks may be active. Wait for the scheduled tasks to change their execution period (usually the next day), then return to the wizard and try executing the option again.
Rollback Steps
Rolling back is only possible in step four (Connections) of the System Upgrade wizard. You can leave the upgrade process at any time and return to it later. The Automation Engine system stores the information of the step where you left off and opens the System Upgrade page at that step automatically as soon as you return.
-
In step four (Connections) of the wizard, select Rollback and follow the instructions.
-
The system switches back using server processes from the base version, while the new processes are subsequently phased out.
Exception! The primary role (PWP) remains with a new WP until Restart has been executed.
-
Two main scenarios may cause a Rollback:
-
Something in AE object definitions or environment settings must be adapted to work correctly with the target version. In this case, make sure you solve the issue and continue with step one (Initial Data) of the wizard.
To return to step one (Initial Data) from step four (Connections), make sure you are in Rollback Mode and click Next.
-
The initial data or the processes of the target version are not working as expected. In this case contact our support department for assistance. For more information, see Support.
-
If new components have to be installed to solve the issue, execute the option Restart in step four of the wizard (Rollback Mode). This ends the parallel mode, switches back the PWP role to the base version and shuts down running components of the target version so that they can be replaced.
-
Install components you may have received from our support department and continue with the Upgrade procedure step one, clicking Next to start the check for initial data, as described above.
Note: If you click Restart and the error message ZERO_DOWNTIME_UPGRADE - 'Restart' not possible. Work processes to shut down are not idle yet. Please try Restart again later. is displayed, schedule tasks may be active. Wait for the scheduled tasks to change their execution period (usually the next day), then return to the wizard and try executing the option again.
-
-
See also: