Working with CDA Tasks
As a Release Manager, you work with two types of automatic tasks (Workflows) associated with the release: Start General Workflow and Start Application Workflow. You can also define upfront compensation deployments (backup deployment tasks) to be executed if the preceding task fails.
Note: For detailed information about how to design and create releases, refer to the official Automic Continuous Delivery Director documentation.
This page includes the following:
Note: You can only see tasks of releases that you are a member of.
To View CDA Tasks
- Select the Releases tab.
- Select a release. The release design page is displayed, where you can see the phases and tasks that make up the release.
For each task, the following information is displayed:
- Task name
- Task type
- Status (only displayed if the phase the task belongs to has been executed at least once)
-
Hover over the status of a running task to see additional information:
- Status: Execution ID and Execution status in CDA. See "execution status" in Monitoring Application Deployments
- ST: start time
- EET: estimated end time
- Link to the Workflow Monitor in CDA. See: Monitoring Application Deployments
Note: Only supported for CDD v6.9 or higher.
You can create two types of CDA tasks in CDD: one to start general workflows and another one to start application workflows.

To Create a CDA Task
- Click the Releases tab.
- Click Create a task... within the phase of your choice. The CREATE TASK dialog is displayed.
- Enter a task name.
- Optionally, enter a description to better identify the task.
- Assign one or more owners to the task.
- From the Task Type drop-down list, select one of the following CDA task types: Start General Workflows or Start Application Workflow.
Note: Unlike General Workflows, Application Workflows typically contain only one or more Component Workflows at their highest level. Each Component Workflow, however, contains objects and functions like a General Workflow. Component Workflows orchestrate the deployment of an individual component (or parts of it) on one or more Deployment Targets within an Environment.
Start General Workflow
Select the endpoint created to connect to the CDA instance.
Example: Dev Instance
- Enter the General Workflow you want to be executed.
The workflow value can be:
Selected from the list displayed after typing @ in the field
Example: Deploy Tomcat
Entered as a token (reusable placeholders used to create generic Workflows) by typing % in the field and selecting an option from the list
Example: last_successful_build
- Entered as free text (alone or together with tokens)
- (Optional) Enter dynamic properties and values. See Defining Dynamic Properties.
- Enter the Compensation Parameters. See Managing Compensation Workflows
- Enter the Output Parameters. See: Output Parameters
Start Application Workflow
Select the endpoint created to connect to the CDA instance .
Example: Dev Instance
- Enter the Application, Application Workflow, Deployment Package, and Deployment Profile values.
The values can be:
Selected from the list displayed after typing @ in the field.
Example: Deploy Tomcat
Entered as a token (reusable placeholders used to create generic Workflows) by typing % in the field and selecting an option from the list.
Example: last_successful_build
- Entered as free text (alone or together with tokens)
- (Optional) Enter dynamic properties and values. See Defining Dynamic Properties.
- Enter the Compensation Parameters. See Managing Compensation Workflows.
- Select an installation mode:
- Overwrite Existing: to deploy the Package on every target and overwriting existing components
- Skip Existing: to only deploy the Application on targets where the deployment package has not yet been deployed
- Enter the Output Parameters. See: Output Parameters
- Optionally, in the CONTENT panel you can select the Application content you want to tie with the completion of the task to keep track of when and where the content is deployed.
- Click Create to create the task.
To Define Dynamic Properties and Values in Tasks
-
(Optional) Enter or select a dynamic property to be used as input parameters for the workflow execution.
Dynamic properties and values can be:
- Selected from the list displayed after typing @ in the field.
- Entered as a token by typing % in the field and selecting an option from the list .
- Entered as free text (alone or together with tokens).
Important! The full name of a dynamic property must be entered:
- Component/{comp_name}/{dynamic_fullname}
- Workflow/{dynamic_fullname}
- Application/{dynamic_fullname}
- Package/{dynamic_fullname}
Note: Only prompts can be used.
- (Optional) Enter or select a value to be passed to the execution.
Notes:
- Values can be referenced as follows:
- Static value: string
- Reference value: {“name”: “reference_name”}
- Package, component reference value: { “name”: “reference_name”, “application”: {“name”: “app_name”}}
- Values override dynamic properties.
- Values can be referenced as follows:
- (Optional) Enter additional dynamic properties and values in JSON format.
Example:
{ "application": { "/DYNAMIC_PROPERTY_FULL_NAME1": "STATIC_VALUE", "/DYNAMIC_PROPERTY_FULL_NAME2" : { "name":"REFERENCE_OBJECT_NAME", "application":{"name":"APPLICATION_NAME"} }
Note: The dynamic properties entered in this field override the dynamic property values.
Managing Compensation Workflows
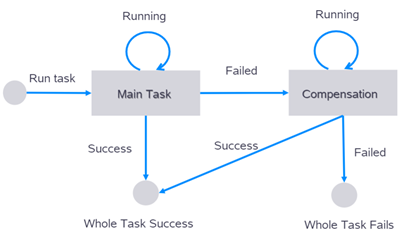
You define compensation workflows to be executed if a main workflow reaches the status rejected, revoked or canceled.
The status of the task is not set to failed if a compensation workflow has been defined.

Note: Compensation workflows can be defined for general and application workflow task types.
To Configure Compensation Workflows
- Follow the steps described in the Creating CDA Tasks section. Do not save your changes and proceed to the next step.
- Select the Compensation Parameters checkbox.
- Select the input parameters for the compensation task:
- General Workflow: Workflow, Dynamic Properties.
- Application Workflow: Application, Workflow, Package, Deployment Profile, Installation Mode, Dynamic Properties.
- Save your changes.
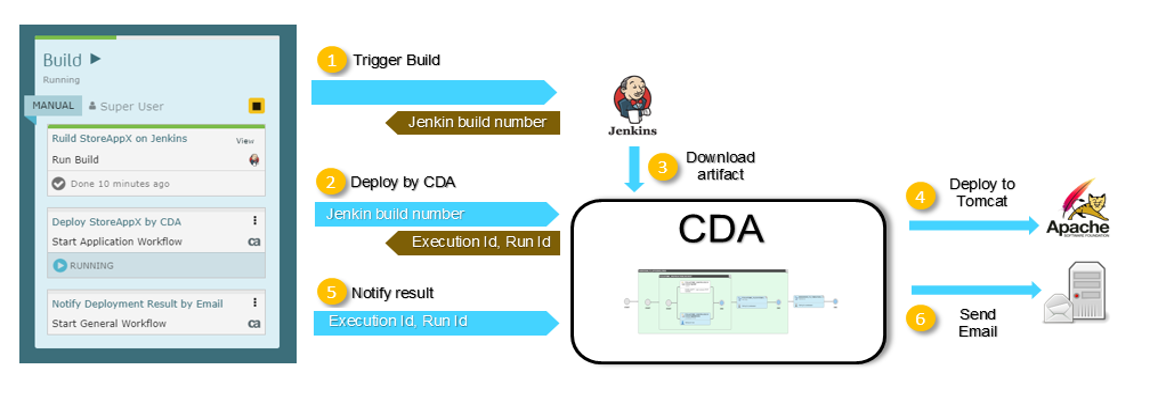
In the Output Parameters section you can specify the Execution ID and Run ID of the Workflow to be returned as a response. These values can be used in later tasks and phases.
Important! Run id and execution id refer to different concepts. The run id is generated by the Automation Engine when the execution starts. The execution id is the key that uniquely identifies a deployment in CDA.
Note: If a compensation task is defined, the output parameters are filled with the values of the task that is successful.
-
Execution ID: ID of the Execution.
Use the % prefix and select a token.
Example: %ExecutionID.
Note: Built-in tokens such as last_successful_build are not supported.
See also: Execution
-
Run ID: ID of the workflow in the Automation Engine.
Use the % prefix and select a token.
Example: %RunID.
Note: Built-in tokens such as last_successful_build are not supported.