Configuring Deployment Workflows
The deployment of an Application is performed by arranging Subworkflows that handle the deployment steps for each component. The wizard helps you create an Application Workflow, which in turn consists of many component Workflows. These Subworkflows may be subsequently defined in the Process Assembly perspective. Let us see how easy it is to modify Application and component Workflows...
To Modify Deployment Workflows
- Go to Workflows > All Workflows.
- Select the Install Workflow, which has been automatically created in the previous step by the wizard, and click Design.
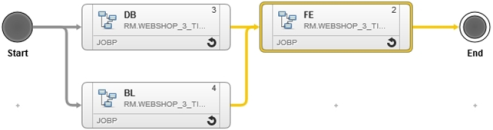
- Rearrange the component Workflows and modify the connection lines, so that the deployment processes of the DB component (scripts that create/update the database) and BL components (files that make up the business logic ) run in parallel and after that the deployment of the FE component (files that build up the front end user interface) is executed.
- Click the Save button to save the Application Workflow.
-
Let us modify now the component Workflows (second-level Workflow). To do so, first double-click the DB component Workflow. We will define the Workflow so that a SQL-Script is copied to a staging directory and afterward executed.
- Make sure the Actions list is displayed on the right side. If not, click Objects to show it.
-
Add the following actions and connect them as shown:
Note: Actions can be used by dragging & dropping them in the area located between the start and end points.
- File Create Directory
- File Copy
-
DB Execute Script (executes a SQL script located on the agent host).

-
Click on one action after another, select the PromptSets tab and switch to the variable mode by hovering over the parameters and clicking
 .
.Note: PromptSet objects are used to create an input dialog which is used to assign user values to started objects. The user values and settings that are provided through these input dialogs are then available in the form of object variables.
-
Set the following variables:
Note: You can type the variables or use the variable picker (
 ) to select them from the list.
- File Create Directory (PCK.AUTOMIC_FILESYSTEM.PRV.PROMPTSET_CREATE_DIR)
Directory Name:
EXT:/staging/working_files_dirs.Note: The directory name which will be used to create the directory.
- File Copy (PCK.AUTOMIC_FILESYSTEM.PRV.PROMPTSET.COPY):
- Source directory/file name (remote file/directory to be downloaded):
EXT:/source/source_files_dirs - Target directory/file name (path to the files/directory on the staging sever after being downloaded from the source):
EXT:/staging/working_files_dirs - Overwrite Existing: yes
- Exclude (leave it empty)
- Source directory/file name (remote file/directory to be downloaded):
- DB Execute Script (PCK.AUTOMIC_JDBC.PRV.PROMPTSETS.EXECUTE_SQL_SCRIPT).
Script URI:
EXT:/DBScriptNote: The other values are already defined and do not need to be changed.
- File Create Directory (PCK.AUTOMIC_FILESYSTEM.PRV.PROMPTSET_CREATE_DIR)
- Save the Workflow.
- Go back to the Application Workflow and double-click the BL Workflow. This Workflow will copy the files that represent the business logic to a dedicated server. Afterward the configuration file will be modified to set the proper database connection.
-
Add the following Actions and connect them as shown:
- File Create Directory
- File Copy
-
INI Set Variable (updates/creates a variable in an INI file)

- Click on one action after another, select the PromptSets tab and switch to the variable mode by hovering over the parameters and clicking :
-
Set the following variables:
Note: You can type the variables or use the variable picker (
) to select them from the list.- File Create Directory (PCK.AUTOMIC_FILESYSTEM.PRV.PROMPTSET_CREATE_DIR):
- Directory Name:
EXT:/target/target_files_dirs
- Directory Name:
- File Copy (PCK.AUTOMIC_FILESYSTEM.PRV.PROMPTSET.COPY):
- Source Directory:
EXT:/source/source_files_dirs - Target Directory:
EXT:/target/target_files_dirs - Overwrite Existing: Yes
- Source Directory:
- INI Set Variable (PCK.AUTOMIC_INI.PRV.PROMPTSET.UPDATE_CREATE_INI_VARIABLE).
- INI File (location of the INI file): EXT:/ConfigFile
- Section (name of the section of the INI file):
EXT:/ConfigSection - Variable Name:
EXT:/ConfigVariable - Value (value of the variable to be set):
EXT:/ConfigVariableValueNote: The specified configuration file contains a variable which points to the database location.
- File Create Directory (PCK.AUTOMIC_FILESYSTEM.PRV.PROMPTSET_CREATE_DIR):
- Save the Workflow.
-
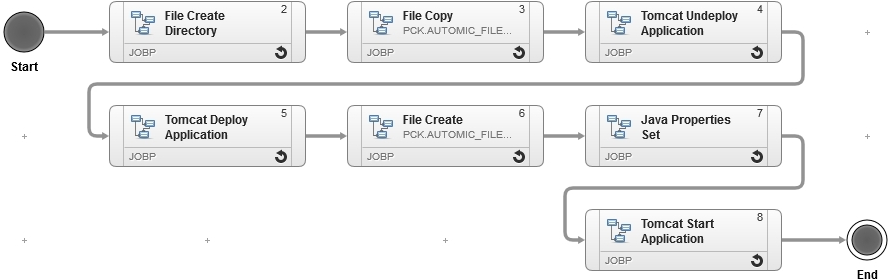
Go back to the Application Workflow and double-click the FE Workflow. The FE Workflow will copy the .war file to a staging directory and then deploy it to a Tomcat server. Afterward it will modify the configuration file to name the servers that hold the business logic. Add the following actions and connect them as shown:
- File Create Directory
- File Copy
- Tomcat Undeploy Application
- Tomcat Deploy Application
- File Create
- Java Properties Set
-
Tomcat Start Application
- Click on one action after another, select the PromptSets tab and switch to the variable mode by hovering over the parameters and clicking :
-
Set the following variables:
Note: You can type the variables or use the variable picker (
) to select them from the list.- File Create Directory (PCK.AUTOMIC_FILESYSTEM.PRV.PROMPTSET_CREATE_DIR)
- Directory name:
EXT:/target/target_files_dirs
- Directory name:
- File Copy (PCK.AUTOMIC_FILESYSTEM.PRV.PROMPTSET.COPY)
- Source directory:
EXT:/source/source_files_dirs - Target directory:
EXT:/target/target_files_dirs - Overwrite existing: YES.
- Exclude: leave it empty.
- Source directory:
- Tomcat Undeploy Application (PCK.AUTOMIC_TOMCAT.PRV.PROMPTSET.UNDEPLOY_APPLICATION)
Fail if not deployed: NO.
Note: The other values are already defined and do not need to be changed.
- Tomcat Deploy Application (PCK.AUTOMIC_TOMCAT.PRV.PROMPTSET.DEPLOY_APPLICATION)
- Upload (specifies if the Application files are uploaded to the Tomcat Server before the deployment): YES
- Update (When set to yes, any existing Application will be undeployed first and an updated if deployed.): YES
- Farm deployment (if set to yes, it makes a farm deployment of a war-file into a cluster): NO
- Fail if deployed (if set to yes, the action fails with an error message if the Application has been already deployed, and you try the deploy it again): NO
Note: The other values are already defined and do not need to be changed.
- File Create (PCK.AUTOMIC_FILESYSTEM.PRV.PROMPTSET.CREATE_FILE)
- File name:
EXT:/ConfigFile - Create Full Path: Yes (Create the file name, even when the directories in the path do not exist)
- File name:
- Java Properties Set (PCK.AUTOMIC_JAVA_PROPERTIES.PRV.PROMPTSET.UPDATE_CREATE_PROPERTY)
- Java properties file (location of the properties.file):
EXT:/ConfigFile - Variable Name:
EXT:/ConfigVariable Value:
EXT:/ConfigVariableValue- Overwrite Default File Encoding (overwrite the default java file encoding argument)
Note: The specified configuration file contains a variable which points to the business logic location.
- Java properties file (location of the properties.file):
Notes:
- Expressions represent values sourced from other entities, either in the component itself or in other entities like targets or Environments. See Viewing Dynamic Properties for more information.
- The values sourced by these expressions will be defined in the next step (Defining Custom and Dynamic Properties).
- File Create Directory (PCK.AUTOMIC_FILESYSTEM.PRV.PROMPTSET_CREATE_DIR)
- Click Save.
Your Application and component Workflows have been modified. Well done!
Next steps:
Previous steps: