Upgrading an AE System from Version 11.2 to Version 21.0
As a system administrator, you upgrade your existing Automation Engine system to the latest version.
Important!
-
It is strongly recommended to carry out the upgrade steps in the order they are listed in the CAPKI documentation, see CAPKI - Securing the ServiceManager.
-
Never upgrade a productive AE system without having it tested extensively in a separate environment.
-
If you want to upgrade from an Automation Engine version that is out of maintenance or need help with your upgrade, please contact our support department, see Support.
-
The Automic Web Interface and the AE server must have the same release version. To check other compatibility issues, see Compatibility Information or access the compatibility matrix directly.
-
If you upgrade the AE manually without using ZDU, the WPs in the new version always start in cold mode. If you upgrade by using ZDU, no cold start is required.
Prerequisites
-
Checking for Incompatibilities between Version 12.3 and 21.0
-
Checking for Incompatibilities between Version 12.2 and 12.3
-
Checking for Incompatibilities between Version 12.1 and 12.2
-
Checking for Incompatibilities between Version 12.0 and 12.1
-
Checking for Incompatibilities between Version 11.2 and 12.0
- Preparing for the Upgrade
Installation Steps
- Shutting Down the System
- Duplicating the Environment
- Upgrading the Utility Binaries
- Upgrading the AE Database
- Upgrading the Remaining Binaries
- Starting Up the System
- Upgrading the Remaining Components
The installation steps affect the following components:
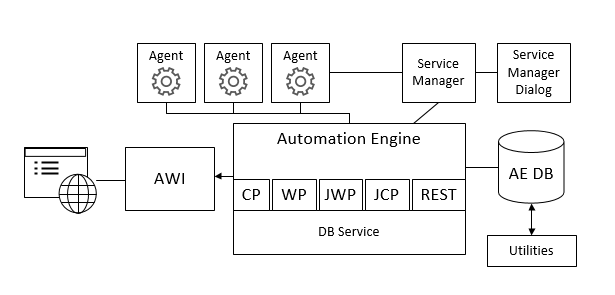
Communication processes (CPs/JCPs) are used to connect certain components (such as agents and user interfaces) with the work processes (WPs) and to handle their communication. The REST process provides a REST endpoint for the Automation Engine.
JWP stands for Java-based work process and JCP for Java-based communication process.
For more information, see Types of Server Processes.
Important! As of version 21.0, the REST process provides the REST endpoint for the Automation Engine instead of the JCP. When upgrading to this version, the current (base) version of the JCP becomes the REST process on the target version. The new JCP must be started on a separate step.
Shutting Down the System
-
Stop all clients.
Stop all clients when your are about to upgrade. This is easily done in the system control of Client 0.
For more information, see Starting and Stopping Clients by using the Application Interface.
-
Stop the AE Server Processes.
Note: If you work in a distributed server environment, all server processes on all participating computers are deactivated. Also pay attention to programs such as Watchdogs, cluster monitoring etc. before ending the server processes. They might raise an alarm or restart the Automation Engine.
You can stop the server processes using the context menu command Shutdown (AE system) :SHUTDOWN.
-
Stop the Service Manager.
-
Windows: UCYBSMCL[.EXE] -c STOP_PROCESS -h computer name -n phrase -s name of the service [-m stop mode] [-p password].
-
Unix: ucybsmcl -c STOP_PROCESS -h computer name:port number -n phrase -s name of the service [-m password] [-p password].
-
Duplicating the Environment
-
Duplicate the utility binaries (Utilities/Bin).
-
Duplicate the AE database.
As already described in the section on preparations, creating a database copy provides many advantages. Duplicate it now if you have opted for this step but have not yet executed it. If a database duplicate was already made at an earlier point in time, check if this duplicate must be upgraded.
Upgrading the Utility Binaries
Always use a separate directory in order to avoid mixing files of the different Automation Engine versions. Depending on the computer, you will either install one or several components.
-
First create a folder whose name represents the Automation Engine version. Then create an individual sub-folder for each component.
-
Install the utilities, see Installing the Utilities - UNIX or Installing the Utilities - Windows.
-
Copy the DB folder from the downloaded package to the directory of the utilities. It includes the files for loading the AE database. The DB folder must be a parallel folder of the utilities' BIN directory.
Example for Windows
Utility in C:\AUTOMIC\UTILITY\BIN
Database files in C:\AUTOMIC\UTILITY\DB
Upgrading the AE Database
Notes:
-
It is recommended that a database administrator execute the following steps.
-
Direct modifications that are made in database contents without using AE programs will result in an inconsistent database.
-
Always make a database backup before you process any work steps.
-
This process can take a while depending on the database size and upgrading complexity.
-
Ensure there is sufficient disk space for the \AUTOMIC\DB directory and that the database's LOG section can store all this data.
-
Schemes that provide access to the database should be removed after the updating process in order to avoid unintended database modifications.
-
(DB2) After updating the AE database, check the size of the tablespaces and if required, run the following SQL statement:
alter tablespace <UC4 tablespace name> reduce max:
-
The DB directory of the installation image can include several versions of SQL scripts and database files. They are required if you upgrade several versions. Be sure to use the correct version if <vers> is indicated in the document.
-
Modifications that should be made are available in the special_rt.sql file. Also execute the new_mq.sql file.
-
The DB Load log might include the message U00038042 Action required! Check index NK_AH_IDNR_bearb if it matches the definition in uc_ddl.sql. In this case, you have to update the NK_AH_IDNR_bearb index manually because an automatic update could take a long time. However, you do not have to do it during DB Load, you can do it at a later point in time.
To Upgrade the Database with the AE DB Load Utility
- Change the database scheme and loading new initial data to the database.
- On the server computer, all server processes must be stopped. Pay special attention if server processes run on several computers. Close all components and end all active tasks such as Events, Schedules and so on. The EH table should not contain any data sets. This also applies when you move the AE to a different OS. For more information, see Process Monitoring.
- On the admin computer, the directory containing the database files must be stored at the location that has been specified in the INI file parameter INPUT of the AE DB Load utility (see AE DB Load). The folder that includes the BIN directory of the utilities is the default folder.
- Utility in C:\AUTOMIC\UTILITY\BIN
- Database files in C:\AUTOMIC\UTILITY\DB
- For Windows utilities, the files for the AE database are provided in IMAGE:DB. Copy the complete DB folder to the above directory.
- For UNIX utilities:
- The database files are included in the archive db.tar.gz, which is provided in the folder IMAGE:DB. To unpack the archive, use the following commands:
gzip -d db.tar.gz or gunzip db.tar.gz
tar xvfo db.tar
(Linux: tar -zxvf db.tar.gz)
Copy the unpacked files to the defined directory. - Start the program AE DB Load to upgrade the database.Select the file <DB directory>\GENERAL\<vers>\UC_UPD.TXT
- The current database version is identified and the database upgraded. As this happens, the database structure and data are changed. Objects of client 0000 are automatically replaced or amended.
-
Select the authentication method
On the admin computer, the AE.DB Load utility displays a dialog in which you must select an authentication method.
This dialog is only displayed if the database is upgraded to a new Automation Engine version.
-
(Optional) Install partitioning with ILM
On the admin computer, a dialog opens in which you can select the settings for partitioning with ILM. For more information, see ILM - Information Lifecycle Management.
Important! You cannot undo an AE database partitioning process.
Windows example:
Upgrading the Remaining Binaries
-
Upgrade AE and ServiceManager.
- Install the Automation Engine to a new directory, see Installing the AE - UNIX or Installing the AE - Windows.
- Install the new ServiceManager version. Use a new name for the ServiceManager environment (phrase).
-
Copy the Documentation folder to the new directory.
-
Configure and Start the Java Work Process (JWP).
Note: If no JWP is available at login, the login fails and an error message is displayed. The system also notifies you if, for any reason, the minimum number of processes is not fulfilled during a session. The notification disappears once the process is running again.
The JWP is provided in the same directory as all the other Automation Engine files. The directory /configuration/ is created automatically when the JWP is first started and contains the OSGI bundle's cache.
Unpacking the files
In Windows, the JWP files are automatically copied from the SETUP.EXE program to the BIN directory. In UNIX, the files are located in the respective TAR archive.
Copy the provided "plugin" and "lib" directories into the BIN directory of the Automation Engine.
Important! If the bin directory for this installation already has a "plugin" and/or "lib" directory make sure to delete them before copying the new ones.
The subsequent installation steps depend on the database type used.
Java Cryptography Extension (JCE) (Optional - Only for SSO with Kerberos)
Important! JDK requires these policy files only if you work with Java 8. Java 9 and later versions include and use these files by default.
-
Install Java Cryptography Extension (JCE) Unlimited Strength Jurisdiction Policy.
The JCE Unlimited Strength Jurisdiction Policy has to be installed on the machines where:
- The Automic Web Interface runs.
- The Automation Engine (JWP/JCP) runs.
Download at Java Cryptography Extension (JCE) Unlimited Strength Jurisdiction Policy
For IBM Java, you must use the policy files of IBM. The unlimited jurisdiction policy files are located in directory SDK /demo/jce/policy-files/unrestricted/. For more information, see https://www.ibm.com/support/knowledgecenter/en/SSYKE2_7.1.0/com.ibm.java.security.component.71.doc/security-component/sdkpolicyfiles.html.
The Readme file contains the installation instructions on how to copy the .jar files to appropriate location (e.g.
<java-home>\lib\security). If there are multiple Java installations on the same computer, setting up a policy file for all installations is recommended.
MS SQL Server
-
Install JDBC driver.
-
Download Microsoft JDBC Driver for SQL servers.
-
Follow the installation instructions on the page (download the .exe file, run it and enter and installation directory).
-
After installing, copy the .jar file from the appropriate JRE destination folder to the <server>\bin\lib directory of the Automation Engine. Make sure to use the latest JDBC driver available for your Java version.
Check the compatibility matrix to find out which Java versions are supported. For more information, see Compatibility Information.
-
-
Activate TCP/IP in the MS SQL server. To do so:
- Open the SQL Server Configuration Manager.
- Expand SQL Server Network Configuration.
- Select Protocols for MSSQLSERVER under SQL Server Network Configuration.
- The TCP/IP must be set to Enabled in the right-hand section.
- Restart the SQL Server Services.
-
Determine the MS SQL server port.
The default port of the MS SQL server port is 1433.
Note: If you are not sure of the port of your MS SQL server instance, you can find this out from its ERRORLOG file (MSSQL > LOG). One of these messages: "Server is listening on [ 'any'<ipv4> port number]" or "Server is listening on [ 'any'<ipv6> port number]" should be found in the current log file, which contains the port.
-
Configure the database connection.
The JWP uses the same INI file (UCSRV.INI, see Automation Engine) as all the other WPs of the Automation Engine system.
JDBC connection to the database
Define a separate database connection string for the JWP in the [JDBC] section. You can automatically generate this string by using the following command:
java -jar ucsrvjp.jar -setup
The system then verifies that the JDBC driver is available and that the database connection could be established.
The advantage here is that the connection string of the other WPs ([ODBC] section) does not need to be changed or restarted.
If you want to use Windows authentication, you must append ;IntegratedSecurity=true to the JDBC connection string in the [JDBC] section of the AE INI file.
Example
SQLDRIVERCONNECT=jdbc:sqlserver://localhost:1433;databaseName=AUTOMIC;IntegratedSecurity=true
Note: When you install the JDBC driver and have to use Windows authentication, you must also copy the sqljdbc_auth.dll file to the BIN directory of the Automation Engine.
DSN-less ODBC Connection
This option uses the same database connection string that is also used by all the other WPs in the Automation Engine system. When installing a JWP for an existing system, all WPs must subsequently be restarted.
A connection string is required in the [ODBC] section of the configuration file, the syntax of which does not require DSN. The server and database name must be specified directly in this case.
SQLDRIVERCONNECT=ODBCVAR=SNNNNNRN,Driver={SQL Server Native Client VERSION};Server=tcp:SRVNAME,PORT;Database=DBNAME;UID=DBUSER;PWD=DBPWD
- VERSION- Version of SQL Server Native Client. Is displayed in the SQL Server Configuration Manager.
- SRVNAME - Name of the database computer.
- PORT - port of the MS SQL server instance.
- DBNAME - Database name.
- DBUSER - Database user.
- DBPWD - Database password.
Example
[ODBC]
SQLDRIVERCONNECT=ODBCVAR=SNNNNNRN,Driver={SQL Server Native Client 11.0};Server=tcp:dbsrv01,1433;Database=AEV10;UID=user;PWD=passwordThe entry should be on one line (no break).
Oracle
-
Install JDBC driver.
-
Copy the JDBC driver ojdbc8.jar from the Oracle database client installation to the lib folder of the JWP.
The file is located here: ORACLE_HOME/jdbc/lib/ojdbc8.jar. -
Copy the xdb6.jar, or xdb.jar, and xmlparserv2.jar files to the lib folder of the JWP to ensure that XML variables are processed correctly.
The files are either part of the Oracle database or can be downloaded from the Oracle SQL Developer website. They are located here:
-
$SQLDEVELOPER_HOME/modules/oracle.xdk/xmlparserv2.jar
-
$SQLDEVELOPER_HOME/rdbms/jlib/xdb6.jar or $SQLDEVELOPER_HOME/rdbms/jlib/xdb.jar
-
-
-
Configure the database connection
JDBC connection to the database
Define a separate database connection string for the JWP in the [JDBC] section. You can automatically generate this string by using the following command:
java -jar ucsrvjp.jar -setup
The system then verifies that the JDBC driver is available and that the database connection could be established.
More information on installing the JDBC driver is available in the Oracle JDBC installation instructions.
DB2
-
Install JDBC driver.
Copy the file db2jcc4.jar (JDBC driver) into the lib directory of the JWP.
This file is part of the DB2 client and is located in the sub-directory SQLLIB/java.
-
Configure the database connection
JDBC connection to the database
Define a separate database connection string for the JWP in the [JDBC] section. You can automatically generate this string by using the following command:
java -jar ucsrvjp.jar -setup
The system then verifies that the JDBC driver is available and that the database connection could be established.
PostgreSQL
- Install the JDBC driver.
Download the appropriate *.jar file from https://jdbc.postgresql.org/download.html and copy it into the lib directory of the JWP.
-
Configure the database connection
JDBC connection to the database
Define a separate database connection string for the JWP in the [JDBC] section. You can automatically generate this string by using the following command:
java -jar ucsrvjp.jar -setup
The system then verifies that the JDBC driver is available and that the database connection could be established.
TLS/SSL Certificate Authority for Agents (Optional)
To secure the communication between agents, the Automation Engine automatically generates a public/private key pair and a self-signed certificate authority upon first startup.
However, you can use your own CA to manage your certificate and its respective key pair. To do so, you have to create the UC_AGENT_TLS_SETTINGS variable in Client 0 and define the relevant settings. For more information, see UC_AGENT_TLS_SETTINGS - Agent Certificate Management.
TLS/SSL Certificates for LDAP (Optional)
To use TLS/SSL, the certificate(s) of the LDAP server must be available to the Java Work Process (JWP). The JWP uses the default keystore file cacerts in the lib/security directory of the JRE.
There are a number of keystore file configuration options:
-
Using an alternative keystore file:
If you want the JWP(s) to use an alternative keystore file, you have to define the file name and path to a centrally stored file in the JWP_KEYSTORE_PATH key in the UC_SYSTEM_SETTINGS variable. In case the defined path is not accessible or invalid, a log message will be written to the default log location and the JWP will use the default keystore file. For more information, see JWP_KEYSTORE_PATH.
-
Creating an individual keystore file using the JWP:
If you want to use an individual keystore file, you can create it using the following command:
java -jar ucsrvjp.jar -installcert host:port keystorePathIn case the defined path in keystorePath does not exist, the JWP creates a new keystore file in that location. You can then define a password for that keystore file.
-
Using an alternative password for keystore file access:
The default password used by the JWP is the default password of the JRE keystore. If you want the JWP to use a different password, you have to define a Login object containing that password by following these steps:
- Create a Login object (or use an existing one).
- Use the JWP_KEYSTORE_LOGIN key in the UC_SYSTEM_SETTINGS variable to enter the name of that Login object. For more information, see JWP_KEYSTORE_LOGIN.
- Open the referenced Login object, select the Login page and add a new row there.
- In the column Name, select "*", in the column Type select JWP_KEYSTORE.
- The Login info is optional for this function, but as this column cannot be empty by default, you have to enter something here.
- Enter the password you chose for the keystore file.
Adding the Certificates
-
Add certificates using the keytool.
- To use the default keystore of the JRE, go to the jre\lib\security folder of the Java installation and import the certificate with the keytool command:
- To use your own keystore file defined in the UC_SYSTEM_SETTINGS variable using the JWP_KEYSTORE_PATH key, go to the defined path and import the certificate with the keytool command:
keytool -keystore cacerts -importcert -alias ldapServer -file certficate.cer
keytool -keystore <keystore> -importcert -alias ldapServer -file certficate.cer
When prompted to trust this certificate respond by typing "Y".
For more information, see JWP_KEYSTORE_PATH.
-
Add certificates via download.
- Another option to install the certificate is the command line parameter -installcert of the Java Work Process.
- This assumes that the Java Work Process has write access to the cacerts file of the Java installation.
- This command detects the path of cacerts, connects to the specified host and port and tries to create a TLS/SSL connection.
- This command to add a certificate via download will set an optional parameter for the file name of the keystore:
java -jar ucsrvjp.jar -installcert <host>:<sslport>
java -jar ucsrvjp.jar -installcert <host>:<sslport> <keystorePath>
Notes:
-
When the parameter JWP_KEYSTORE_PATH is valid but the file doesn't exist, JWP creates a new keystore file in the same location. For more information, see JWP_KEYSTORE_PATH. During this process the user can define an individual password.
-
If a certificate is missing, the message "unable to find valid certification path to requested target" is printed and the missing certificate is downloaded and stored in the cacerts file.
Starting the JWP
Use this kind of command to start the JWP via the command line.
java -Xmx2G -jar ucsrvjp.jar -Iucsrv.ini
The file ucsrvjp.jar is provided in the same directory as the other Automation Engine files. It is used exclusively to start the JWP.
The JWP can also be started via ServiceManager.
java -Xmx2G -jar ucsrvjp.jar -svc%port% -IC:\temp\ucsrv.ini
The -svc parameter should be omitted when starting directly via the command line.
The parameter -I to specify the INI file is optional. If the parameter is missing, the JWP attempts to find the file ucsrv.ini in the current working directory (= directory in which the file ucsrvjp.jar is located).
You can start a JWP as a dedicated process with a specific role. For example, you can use the following command to start the JWP as a dedicated process with for the authentication (AUT) role:
java -Xmx2G -jar ucsrvjp.jar -Iucsrv.ini -role=AUT
You can also start the JWP with a dedicated IDX or UTL role by setting the -role command line parameter accordingly.
Note: When you assign a role to and start a JWP using the command line, this server processes is used exclusively for the role you defined in the command line. In this case, the JWP cannot take over tasks of other JWPs if they should stop.
For more information, see JWP Roles.
Important! As of version 21.0, the REST process provides the REST endpoint for the Automation Engine instead of the JCP. When upgrading to this version, the current (base) version of the JCP becomes the REST process on the target version. The new JCP must be started on a separate step.
-
-
Configure and Start the REST Process.
The files needed for the REST process are the same as the files provided for JWP in the same directory as all the other Automation Engine files.
Since the installation of the JWP is mandatory and the files necessary for the REST process are the same as those used to install the JWP, there is no need to unpack any files nor to carry out any other installation step.
Notes:
- The installation of the REST process is relevant for the AE REST API as well as for the advanced object search. Make sure to configure the [REST] section of the Automation Engine configuration file (ucsrv.ini, see Automation Engine) accordingly.
- The Automation Engine uses TLS/SSL to secure and encrypt the communication. Make sure to create the respective keystore beforehand using pkcs 12 format and to configure the [TLS] section of the Automation Engine configuration file (ucsrv.ini, see Automation Engine) accordingly. For more information, see Securing Connections to the AE (TLS/SSL).
- If no REST process is available at login, the login fails and an error message is displayed. The system also notifies you if, for any reason, the minimum number of processes is not fulfilled during a session. The notification disappears once the process is running again.
- When the REST processes is initiated, it binds to the port you have defined in the JCP.PORTS parameter in the [PORTS] section of the AE INI file. If there is no port defined in this section, it binds randomly to another port, which is necessary for the internal communication between WP and REST process. When the REST process starts, it opens a random port and sends it internally via the database to the WPs so that WPs can reach the REST process. For more information ,see Configuring Firewall and Ports.
Starting the REST Process
Use this kind of command to start the REST process via the command line:
java -Xmx2G -jar ucsrvjp.jar -Iucsrv.ini -rest
The file "ucsrvjp.jar" is provided in the same directory as the other Automation Engine files. It is used exclusively to start the JWP and the REST process.
The REST process can also be started via ServiceManager.
java -Xmx2G -jar ucsrvjp.jar -Iucsrv.ini -svc%port% -rest
The -svc parameter should be omitted when starting directly via the command line.
The parameter -I to specify the INI file is optional. If the parameter is missing, the REST process attempts to find the file ucsrv.ini in the current working directory (same directory in which the file ucsrvjp.jar is located).
Setting Up Multiple REST API Processes
The REST process installation is relevant for the AE REST API and for the advanced object search. You can install a single REST process (REST). In this case, all REST requests are sent to this single AE REST API instance and no REST API is available if the REST process is down.
You can also set up a system with multiple REST processes. In this case, two REST processes are used in a cluster but only one of them is available at the time.
It is recommended using one REST process per node. However, you can also set up a system with multiple REST processes, which can be convenient for load balancing capabilities and to provide failover capabilities, because the REST requests are sent and distributed only to available REST processes. For more information, see AE REST API - General Info.
Important!
-
When setting up a system with multiple REST processes, it is imperative that each one uses its own Automation Engine configuration file (ucsrv.ini, see Automation Engine) and that different ports are assigned for each REST process. Otherwise, the first one connects successfully while the others terminated upon trying to register the same REST port if both run on the same node. An error message is written to the log file of the REST process stating the reason for termination.
-
If no REST process is available at login, the login fails and an error message is displayed. The system also notifies you if, for any reason, the minimum number of processes is not fulfilled during a session. The notification disappears once the process is running again.
-
Configure and Start the Java Communication Process (JCP)
The files needed for the JCP are the same as the files provided for the JWP in the same directory as all the other Automation Engine files.
Since the installation of the JWP is mandatory and the files necessary for the JCP are the same as those used to install the JWP, there is no need to unpack any files nor to carry out any other installation step.
The installation of the Java Communication Process (JCP) is also relevant for the TLS/SSL connection to the UNIX, Windows, and Java based agents, the Automic Web Interface, and the Java API. This connection is done through secure WebSockets (WSS).
The port or port range assigned for this connection is defined in the WS.PORT= parameter in the [PORTS] section of the INI file of the Automation Engine (see Automation Engine). If you have installed a JCP per host, you can use the same WSS port definition in each instance.
Notes:
-
The processes require a keystore (in PKCS12 format) to work with the corresponding certificates. Make sure you have created a keystore beforehand. For more information, see Securing Connections to the AE (TLS/SSL).
You also have to define the following parameters in the [TLS] section of the INI file of the Automation Engine (ucsrv.ini):
-
keystore= Path and file where the keystore for the TLS/SSL certificate is stored
Default value: ./httpsKeyfile
This parameter is mandatory and must point to the correct target; otherwise, the process server will terminate.
-
keystorePassword= Password for the keystore file
Default value: changeit
If the value is not defined or is left empty, the system uses the default value.
-
keyPassword=Password for the key
Default value: changeit
If the value is not defined or is left empty, the system uses the default value.
-
keyAlias= Alias used for the key
Default value: jetty
If the value is not defined or is left empty, the system uses the default value.
The keystorePassword and the keyPassword can be encrypted with the UCYBCRYP Utility. For more information, see Encoding Passwords.
-
-
When the JCP is initiated, it binds to two ports:
-
The WS.PORT which is configurable in the INI file and is used by the Agents to communicate with the JCP.
-
To the port you have defined in the JCP.PORTS parameter in the [PORTS] section of the AE INI file. If there are no ports defined in this section, the JPC binds randomly to another port, which is necessary for the internal communication between WP and JCP/CP. When the JCP starts, it opens a random port and sends it internally via the database to the WPs so that WPs can reach the JCPs/CPs.
For more information, see Configuring Firewall and Ports.
-
Starting the JCP Process
Use this kind of command to start the JCP process via the command line:
java -Xmx2G -jar ucsrvjp.jar -Iucsrv.ini -cp
The file ucsrvjp.jar is provided in the same directory as the other Automation Engine files. It is used exclusively to start the JWP, JCP and the REST process.
The JCP can also be started via ServiceManager.
java -Xmx2G -jar ucsrvjp.jar -Iucsrv.ini -svc%port% -cp
The -svc parameter should be omitted when starting directly via the command line.
-
-
Upgrade the Automic Web Interface.
-
The Automation Engine and the Automic Web Interface as of v21 communicate using TLS/SSL. AWI establishes a connection with the new Java communication process (JCP), which uses trusted certificates to prove its identity to other communication partners. Therefore, make sure you have all required certificates in place before upgrading AWI.
More information:
-
As of version 21, it is no longer necessary to install an application server before installing the Automic Web Interface because the delivery artifact includes the AWI Jetty Launcher. This gives you two options:
-
you can keep your application server and upgrade AWI as usual
-
you can install a new AWI version with the Jetty Launcher and use your backed up configuration and plugin files to configure AWI. For more information, see Installing the Automic Web Interface.
-
-
Stop the Tomcat Service.
-
Open your Windows Services manager.
-
Stop the Tomcat service.
-
-
Back up current files.
You can make a safety copy of your entire AWI installation, or just the configuration files. Even though you can use very little of the previous configurations in the new version, you might find it helpful to have a copy for later reference when you configure the upgrade.
-
To back up your whole AWI installation, go to your Tomcat installation, open the webapps folder and make a backup copy of the entire awi folder.
-
To back up only the configuration files, go to the folder where you have the current AWI version installed, and make a backup copy of the folder webapps/awi/config.
-
-
Upgrade the application server.
Important! AWI usually runs on Tomcat. If you want to use another application server for the Automic Web Interface, see Installing the Automic Web Interface.
Before upgrading the application server, check the compatibility matrix to see which version is compatible with AWI. You will find the upgrade instructions and other relevant information on the homepage of your application server provider. For more information, see Compatibility Information.
-
Restart the application server.
You will find the relevant information on the homepage of your application server provider.
-
Deploy the new AWI version (WAR file) on your application server.
-
If you are using Tomcat
Copy the awi.war file to the webapps folder of the Tomcat installation. If the Tomcat is running, the awi.war file will be deployed automatically, creating a folder with the same name.
Important! Deleting the awi.war file removes the corresponding subfolder, which also undeploys the AWI.
-
If you are using WebSphere or WebLogic
Refer to the WebSphere or WebLogic official documentation for more information.
-
-
Configure the new AWI version.
For more information on how to configure your upgraded AWI, see Configuring the Automic Web Interface.
If you made a backup before you started the upgrade, then you can retrieve the following files and settings from the backup files from the previous to the new webapps/awi/config folder:
-
uc4config.xml - Configuring the Connection Between AWI and AE:
You can replace the new file with your backup.
If you have more than one AE system connection defined, you can allow your users to choose their connection at login, or you can specify any of the defined connections as the only valid connection. You defined this in the automationengine.index setting of the configuration.properties file.
Previously, users could not choose a connection and you had to be sure that your one valid connection was defined first in uc4config.xml.
If you are using self-signed certificates, you can use the trustedCertFolder= parameter to define the path to the folder where the trusted certificates are stored. Otherwise, the certificates should be installed in the Java trust store. For more information, see Securing Connections to the AE (TLS/SSL) and Preparing TLS/SSL Certificates.
-
logback.xml - Configuring Log Levels:
Do not restore your backed up version.
However, if you changed the default setting for the severity level of event messages (DEBUG) for the root element, then you might want to make the same change for AWI.
-
Theme folder:
If you had customized the color or banner logo in your previous environment, then copy the contents of your backed up webapps/awi/config/theme folder to the folder of the same name in your current AWI version.
For more information, see colors.properties - Configuring the Color Scheme.
-
-
Back up the current configuration files.
You can make a safety copy of your configuration files. Even though you can use very little of the previous configurations in the new version, you might find it helpful to have a copy for later reference when you configure the upgrade.
To back up your files, go to the folder where you have the current AWI version installed, and make a backup copy of the config folder, for example (Tomcat)
-
<webserver>/webapps/awi/config for the configuration files
-
-
Install the Automic Web Interface version that includes the AWI Jetty Launcher, see Installing the Automic Web Interface.
-
Configure the new AWI version.
For more information on how to configure your upgraded AWI, see Configuring the Automic Web Interface.
If you made a backup before you started the upgrade, then you can retrieve the following files and settings from the backup files from the previous to the new webapps/awi/config folder:
-
uc4config.xml - Configuring the Connection Between AWI and AE:
You can replace the new file with your backup.
If you have more than one AE system connection defined, you can allow your users to choose their connection at login, or you can specify any of the defined connections as the only valid connection. You defined this in the automationengine.index setting of the configuration.properties file.
Previously, users could not choose a connection and you had to be sure that your one valid connection was defined first in uc4config.xml.
If you are using self-signed certificates, you can use the trustedCertFolder= parameter to define the path to the folder where the trusted certificates are stored. Otherwise, the certificates should be installed in the Java trust store. For more information, see Securing Connections to the AE (TLS/SSL) and Preparing TLS/SSL Certificates.
-
logback.xml - Configuring Log Levels:
Do not restore your backed up version.
However, if you changed the default setting for the severity level of event messages (DEBUG) for the root element, then you might want to make the same change for AWI.
-
Theme folder:
If you had customized the color or banner logo in your previous environment, then copy the contents of your backed up webapps/awi/config/theme folder to the folder of the same name in your current AWI version.
For more information, see colors.properties - Configuring the Color Scheme.
If you made a backup of the plug-ins before you started the upgrade, you can copy them into the <jetty>/plugins/autoinstall folder in the new AWI installation. To do so, either compare the ones that were installed by default and copy the remaining ones or copy the complete backed up plug-ins making sure not to replace existing ones.
-
There are two main issues you must consider before upgrading the Automic Web Interface to version 21:
Upgrading AWI Using an Application Server
Upgrading an existing installation to the new release upgrades the AWI framework and all its plugins at the same time. Use the same steps to install hot fix packages between releases.
Upgrading AWI without Using an Application Server
In this case you install a new AWI instance that includes the AWI framework and all its plug‑ins.
Starting Up the System
-
Start the ServiceManager, see Start Parameters - ServiceManager.
-
Start the Server Processes (cold start).
Cold-start the server processes when all installation and configuration step have successfully been completed. Do so in the INI file of the server processes by setting the parameter StartMode= to COLD. Now the processes can start.
-
Wait until all Agents are reconnected.
-
Start the clients (Go).
All clients can be started from the Administration perspective of client 0000. For more information, see Starting and Stopping Clients by using the Application Interface.
Upgrading the Remaining Components
Now you can install and/or replace the remaining components:
-
Installing the Agents Manually
Before installing the agents, please read the recommendations and examples listed below.
-
Keep in mind to monitor the newly installed version for some time.
Notes:
- It is recommended to use agents of the same service pack version as the Automation Engine. In general, use the latest service pack.
- You can connect agents of an older service pack, minor or major version to an Automation Engine of a newer service pack, minor or major version. The following preconditions need to be considered:
- The agent version must still be under maintenance.
- Functions and features introduced with a newer version of the agent cannot be used with a particular agent of an older version.
- There might be exceptions. Check the incompatibilities between versions sections in the relevant upgrade documentation. For more information, see Upgrade Installation.
- You cannot connect agents of a newer minor or major version to an Automation Engine of an older minor or major version.
Examples
-
Automation Engine v12.3.6 and agent v12.3.6
Supported, best choice.
-
Automation Engine v12.3.5 and agent v12.3.6
Supported because the agent is on the same version, just a newer service pack
-
Automation Engine v12.3.6 and agent v21.0.0
Not supported because the agent is on a newer major version.
-
Automation Engine v21.0.0 and agent v12.3.6
Supported when the agent version is still under maintenance.
-
Automation Engine v21.0.0 and agent v12.0.9
Not supported when the agent version is already out of maintenance.
Important!
-
This information is valid for OS agents, application agents, and other Java-based agents such as the Rapid Automation core agent. However, it is not valid for Rapid Automation Solutions. Check the compatibility of RA Solutions in the compatibility matrix, see Compatibility Information. Even if the currently used RA Solution is compatible, make sure that the RA Solution is still under maintenance. For more information, see Component Support Lifecycle.
-
Do not remove or overwrite the installation directories of your agents. Back up the corresponding folder in order to make sure that you can quickly return to your old version.
-
The new agents must be installed in a separate directory. An adequate monitoring period is essential. It is best not to replace all agents by the new version. Replace one platform after the other, for example. First replace UNIX and only replace the next one when the agents have proven to run stably for some time.
To ensure that jobs call the new Job Messenger, follow the steps below:
-
Correct the file name of the Job Messenger in the INI file when you upgrade the agent (variable UC_EX_JOB_MD).
-
When installing the new agent in the same directory as the old one, you must delete the old Job Messenger after the installation process.
-
Instead of adjusting the INI file during the upgrading process, you can also create a link that points to the new messenger. Use uppercase letters for the old messenger names. For example, for Linux: ln -s ucxjli3m UCXJLI3M.