Example: Creating a Basic Client/User Landscape
An Automation Engine system contains three Clients: 0 (for overall administrative purposes), 500 (for creating objects, designing workflows, etc.) and 550 (for working with the already created objects). The system administrator creates the necessary Users and User Groups, configuring their privileges and access rights to functionsand assigns them to the appropriate Clients.
Tip: Read Tips and Tricks to learn about functions that can make your work more comfortable.
This page includes the following:
What Will You Learn?
- How to create Users and User Groups
- How to assign rights and privileges
- How to duplicate and edit User definitions
- How to move Users from one Client to another
- How to export User Groups from one Client and import them in another
Preliminary Considerations
With your Automation Engine installation, a standard user is provided in Client 0 that contains all available rights and privileges, namely user UC (username) in department UC with password UC.
You need it to be able to log in for the first time and start configuring your system.
-
Do not delete or rename user UC/UC/UC.
Tip: Duplicate the UC user and rename the duplicate first thing after the installation. You can use the new, renamed user as system-wide administrator.
- Change its password immediately after the installation.
- Client 0 (also called system Client) is already available when you install the Automation Engine. You use it to manage system-wide settings (login information, Calendars, Variables, and so on) and to create Users, User Groups, Clients, to set up Agents, etc.
What Does this Example Cover?
One of the first configuration tasks is setting up your User management policy. It includes the following activities:
- Defining Users
- Assigning them rights according to their roles
- Defining User Groups that help you manage those rights more efficiently
- Assigning the Users to the appropriate Clients
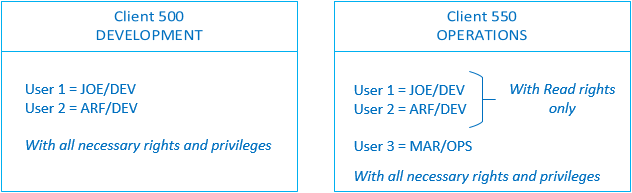
In this Use Case you will set up a system that consists of two Clients:
-
Client 500
This is your DEVELOPMENT Client, where Users design PromptSets, create Jobs, build Workflows, etc.
-
Client 550
This is your OPERATIONS Client, where Users monitor processes, carry out reporting activities, register and process errors, etc.
You will create Users (also Client administrators) and assign them the rights they need to work in their respective Clients. You will also create User Groups; they help you easily and efficiently administer User rights.
The graphic below depicts the Clients and their corresponding Users, roughly indicating the rights they should have:
Prerequisites
Clients 500 and 550 are already available in your system.
Objects Used in this Example

Overview
- Create Administrators
- Move the Administrators to Their Clients
- Create Developer Users and User Groups
- Create a User Group for Developers
- Create the First Developer User
- Assign the Developer to the User Group
- Create the Next Developer User
- Export the Developer User Group
- Export the Developers
- Import the Developer User Group
- Edit the Developer User Group
- Import the Developers
- Create an Operators User Group
- Create an Operator
- Assign the Operator to the User Group
Create Administrators
Create two new Administrator Users, one for Client 500 and another one for Client 550. You will need these Users for Client-specific administration activities.
To create a Client administrator User, duplicate the system-wide administrator User (UC/UC) and, if necessary, edit its rights. Move it to the appropriate Client. The administrator User for Client 500 is called ADM_DEVELOPMENT. The administrator User for Client 550 is called ADM_OPERATIONS:
-
Log in to Client 0 with the UC/UC/UC User credentials.
-
On the menu bar at the top of your screen click the plus (+) button that is next to the Home button.
A dropdown menu opens that displays all the perspectives.
-
Select Administration to open the Administration perspective.
-
On the Administration pane on the left hand side, click User Management to expand the node.
-
Click Users.
-
Right-click the UC User and select Duplicate.
-
On the Duplicate User dialog enter the name and department of the Client 500 administrator User.
-
Click OK.
The ADM_DEVELOPMENT User is now available in the Users list and it has the same setup and rights originally assigned to ADMIN_ALL.
Optionally, edit it to assign it a password. In our example we will leave it without password.
-
Double-click ADM_DEVELOPMENT in the Users list to open it in the same browser tan or middle click it to open it in a separate tab.
-
The ADM_DEVELOPMENT definition pages open up on the User page. In the Password section, select Change Password and Password never expires to make sure that you need not enter a password when you log in using it.
-
Save the User.
-
Repeat these steps to create the administrator User for Client 550 calling it ADM_OPERATIONS.
Move the Administrators to Their Clients
Move ADM_DEVELOPMENT to Client 500 and ADM_OPERATIONS to Client 550.
-
Right-click ADM_DEVELOPMENT and select Move User.
-
The Move User to Client dialog is displayed, where you select the target Client.
Alternatively, type the name of the Client in the Client input field.
-
Click Move.
-
Repeat these steps to move ADM_OPERATIONS to Client 550.
ADM_DEVELOPMENT and ADM_OPERATIONS are now available in Clients 500 and 550 respectively. You can log in to those Clients using these credentials.
Tip: Read Example: Working with Multiple Connections to learn how to open various connections and log in to different Clients simultaneously and arrange them in windows side by side.
Create Developer Users and User Groups
Log in to Client 500 with the ADM_DEVELOPMENT credentials to create the following:
- A User Group called DEVELOPERS that has the rights and privileges necessary to work as a developer in Client 500.
- The developer Users that will work in Client 500.
Create a User Group for Developers
Create the DEVELOPERS User Group.
-
On the Administration pane on the left hand side, expand the User Management section and click UserGroups.
-
Select Add UserGroup on the toolbar.
-
On the Add UserGroup dialog, enter the name of the group. In our case, this is called DEVELOPERS.
-
The User Group definition pages open up displaying the Automation Engine > Authorizations sub page, where you grant/deny permissions to objects.
Authorization Groups (Grp. column)
You can assign up to 9 Authorization Groups to a User Group definition. They are groups of settings by which you grant the User Group certain rights (read, write, delete, etc.) to a specific type of object.
In our example, Users that belong to the DEVELOPERS User Group must be able to design and test the behavior of Scripts, Jobs, File Transfers, Workflows, Schedules, PromptSets and Variable objects. However, they must not have access to any operation associated to Calendar objects.
Their Authorizations definition could be as follows:
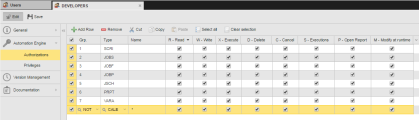
Note: Selecting NOT in the Grp column means that you deny the group the selected rights for the object Type.
-
Define the functional areas to which the Users in the DEVELOPERS User Group should have access rights. For this purpose, open the Privileges sub page and activate the checkboxes next to the functions for which you want to grant privileges.
Possible configurations:
-
Access to Explorer Folders
This controls the User access to special folders available on the Explorer navigation pane in the Process Assembly perspective. Transporting objects from one Client to another is not part of the activities of this group, so you grant it all rights except Access to Transport Case.
-
Administration
This controls the access to administration activities. The only task for which this User Group must have rights is starting objects without having to specify a Login object (they have no authorization to Login objects), so you grant only the right File Transfer: Start without Login object specified.
-
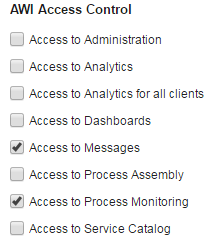
AWI Access Control
This controls the access to perspectives and other working areas in the Automic Web Interface. DEVELOPERS need access to the Process Assembly perspective (where they design the objects), to the Process Monitoring perspective (where they check the performance of their objects) and to the Messages (for troubleshooting). Therefore, you grant them the following rights:
- Access to Messages
- Access to Process Assembly
- Access to Process Monitoring
-
Advanced Editing
We are going to skip this as Users in the DEVELOPERS group will not need any right concerning it.
-
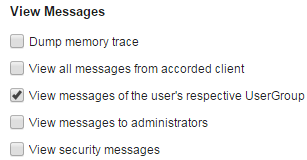
View Messages
Users in this group need read rights to all messages except those meant for system administrators, so you grant it all rights except View messages to administrators.
-
Access Control
Users in this group need access to deactivated tasks; they should be able to manipulate tasks statuses and to assume task ownership. You grant it the following rights:
- Access to deactivated tasks
- Modify the status of a task manually
- Take over task
-

Create the First Developer User
Duplicate the ADM_DEVELOPMENT User, rename it to JOE/DEV:
-
In the Users list click Add User on the toolbar.
-
On the Create User dialog enter the Username (JOE) and the department (DEV).
Assign the Developer to the User Group
Assign JOE/DEV to the DEVELOPERS User Group
JOE/DEV is now available in the Users list in Client 500. It has all rights and privileges of the ADM_DEVELOPMENT User, so you must change this.
This way, you automatically grant it the rights and privileges of that group without having to define anything specifically for the User.
-
In the Users list, right-click JOE/DEV and select Open.
-
Open the UserGroups page. Here is where you assign the User to an existing User Group.
-
Select DEVELOPERS in the Not Member of column and click the arrow to insert it in the Member of column.
-
Save your changes.
User JOE/DEV has now all necessary rights to work as a developer in your company.
Create the Next Developer User
Create the next developer User in Client 500.
-
In the Users list, right-click JOE/DEV and select Duplicate.
-
On the Duplicate User dialog enter the name and department of the new User, in this case ARF/DEV.
-
Click OK.
The ARF/DEV User is now available in the Users list and has the same setup and rights originally defined for JOE/DEV including its User Group assignment.
The setup of Client 500 is now finished; the Client administrator, the User Group and the Users are configured. You can now reuse these definitions for setting up Client 550.
Export the Developer User Group
Export the DEVELOPERS User Group from Client 500.
When you create a User Group in the Administration perspective, this group is also available as object in the root folder in the Process Assembly perspective. To move it from one Client to another, you must export the User Group object from the Process Assembly perspective and import it in the target Client.
-
Search for the DEVELOPERS User Group object. You have two possibilities:
- Switch to the Process Assembly perspective; the DEVELOPERS object is available in the objects list.
- Use the Global Search functionality. This is useful if you already have many objects in the list and finding it is difficult.
-
Right-click it and select Import / Export.
-
On the Import / Export Objects dialog activate the Export and Settings: Export with references options and click Export.
-
The XML file containing the User Group information is saved to your default Downloads folder.
Export the Developers
Export the Users from Client 500.
You want both developer Users to have read rights to the objects in Client 550. For this purpose, you export their definitions from Client 500, import them in Client 550 and edit them there.
-
Log in to Client 500 using the ADM_DEVELOPMENT credentials.
-
Switch to the Process Assembly perspective and search for the two User objects you want to export (JOE/DEV and ARF/DEV).
-
Right-click both and select Import / Export.
-
On the Import / Export Objects dialog activate Export and click the Export button.
-
The XML file containing the data on the User objects is saved to your default Downloads folder.
Import the Developer User Group
With all reusable definitions being already available for importing, log in now to Client 550 with the ADM_OPERATIONS User credentials.
Import the DEVELOPERS User Group to Client 550.
-
Open the Process Assembly perspective and right-click anywhere in the objects list to select Import / Export.
-
On the Import / Export Objects dialog click the upload icon.
-
Select the XML file where you have exported the DEVELOPERS User Group definitions and click Open.
The DEVELOPERS User Group is now in Client 550. It grants read, write, execute, etc. rights to its Users. However, you want Users associated with this User Group to have only Read rights in Client 550, so you have to edit the User Group.
Edit the Developer User Group
Edit the DEVELOPERS User Group in Client 550.
-
Switch to the Administration perspective and open the User Group list.
-
Double-click or middle-click DEVELOPERS.
-
On the Authorizations sub page, deactivate all checkboxes except those in the R-Read column.
-
Save your changes.
Import the Developers
Import the developer Users to Client 550.
-
Switch to the Process Assembly perspective and right-click anywhere in the objects list to select Import / Export.
-
On the Import / Export Objects dialog click the upload icon.
-
Select the XML file where you have exported the User definitions and click Open.
The two Users are now available in the Users lists of Client 550. They have the rights and privileges that are defined in the DEVELOPERS User Group in Client 550, that is, only Read rights to the objects.
Create an Operator and an Operator User Group
Create an Operators User Group
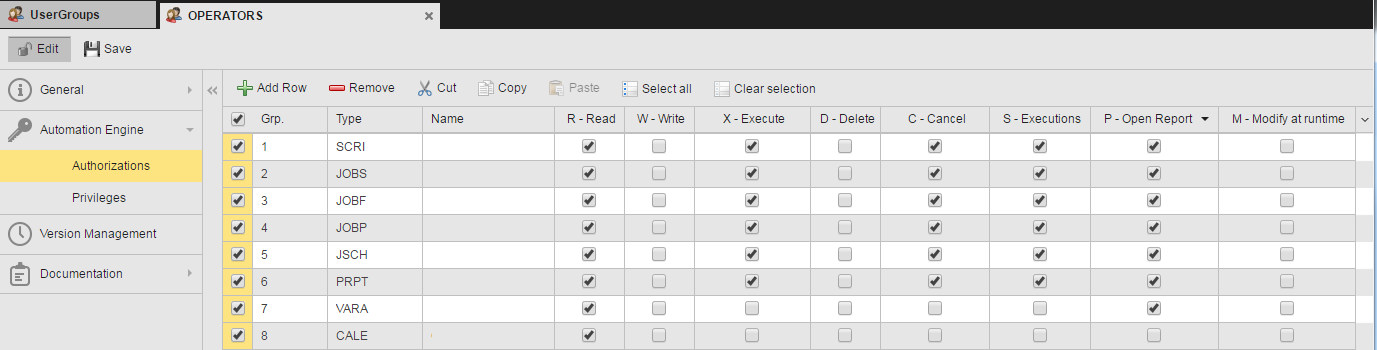
Create the OPERATIONS User Group. It has the rights and privileges necessary to work as an operator in Client 550.
Operator Users work with the same objects as the developers. However, they do not design objects or write scripts, so they do not need some of the authorizations that developers do.
Their Authorizations definition could be as follows:
Define their Privileges.
Possible configurations:
Create an Operator
Create an OPERATORS User.
-
In the Users list click Add User on the toolbar.
-
On the Create User dialog enter the name and (optionally) the department of the User.
-
Save your changes.
Assign the Operator to the User Group
Assign MAR/OPS to the OPERATORS User Group. This way, you automatically grant it the rights and privileges of that group without having to define anything specifically for the User.
-
Switch to the UserGroups page.
-
Select OPERATORS in the Not Member of column and click the arrow to insert it in the Member of column.
-
Save your changes.
You have carried out all the steps.
Useful Links
This example contains references to a number of functions that you might want to know a bit more about.
- Information on Client 0 - System Client 0000
- Global Search
- Importing/Exporting Objects
See also:
- If you are new to the Automic Web Interface, take a look at the Getting Started topics to make yourself familiar with it.
- User Management: Defining and Managing the Authorization System
- Clients
- Users (USER)
- User Groups (USRG)