Defining the Deployment Order to Targets
Watch the video:
To Define the Deployment Order of Components to Targets
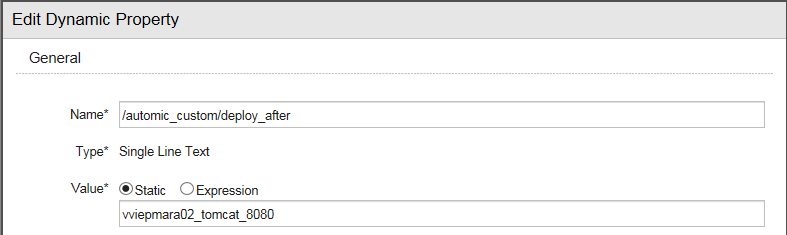
- Create a Dynamic Property named
deploy_afteron every Target where you want to deploy the Component. - In the Value field, add the name of the Target where the Component has to be previously deployed.
Note: Leave the value empty for the Target which are to be executed first.
For example: The Component webapp has to be deployed in a sequential order to the Targets DeploymentTarget1, DeploymentTarget2 and DeploymentTarget3.
- Dynamic Property added to DeploymentTarget1- name: deploy_after, value: empty
- Dynamic Property added to DeploymentTarget2 - name: deploy_after, value: DeploymentTarget1.
- Dynamic Property added to DeploymentTarget3 - name: deploy_after, value: DeploymentTarget2.
-
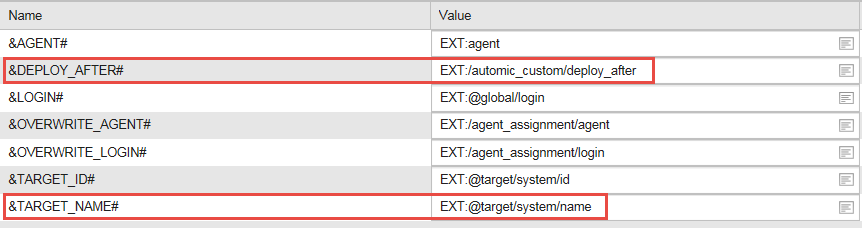
Create one Dynamic Property on the Component (for example, webapp) and name it deploy_after. Reference the deploy_after Dynamic Property defined on the Targets with the following expression:

-
Create four new CLI custom Actions with the following names:
- Create Variable Object (to be used in the Application Workflow)
- Remove Object (to be used in the Application Workflow)
- Check Deployment Order Variable (to be used in the Component Workflow)
- Write Value to VARA Object (to be used in the Component Workflow)
- Remove the operating system jobs created within the Action and replace them with the scripts provided below.
- Create the following Prompt Sets for the Actions:
Action Label Variable Name Create Variable Object Variable Name &UC4RB_VARIABLE_NAME# Folder &UC4RB_VARIABLE_FOLDER# Remove Object Variable Name &UC4RB_VARIABLE_NAME# Check Deployment Order Variable Variable Name &UC4RB_VARIABLE_NAME# Write Value to VARA Object Variable Name &UC4RB_VARIABLE_NAME# Key &UC4RB_VARIABLE_KEY# Value 1 &UC4RB_VARIABLE_VALUE# -
Create a new Script object (for example, Create Variable Object).
-
Open it, select the Process tab and enter the following command.
:SET &RET# = CREATE_OBJECT("VARA",&UC4RB_VARIABLE_NAME#,&UC4RB_VARIABLE_FOLDER#,"","I","C")Note: This command will automatically create a new VARA object to define the deployment order to the Targets.
- Add the Script object to the
Create Variable ObjectAction. - Add the Action to the beginning of the Application Workflow.
- Create another Script object (for example, Remove Object).
-
Open it, select the Process tab and enter the following command:
:SET &RET# = REMOVE_OBJECT(&UC4RB_VARIABLE_NAME#)
Note: This command will delete the VARA object.
- Add the Script object to the Remove Object Action.
- Add the Action to the end of the Application Workflow:

- Create another Script object (for example, Check Deployment Order Variable).
-
Open it, select the Process tab and enter the following command:
:PRINT "Deploy Target After: &DEPLOY_AFTER#"
:SET &TEST# = GET_VAR(&UC4RB_VARIABLE_NAME#, "DeployAfter")
:PRINT "Test:&TEST#"
:WHILE &TEST# <> &DEPLOY_AFTER#
: WAIT 5
: SET &TEST# = GET_VAR(&UC4RB_VARIABLE_NAME#, "DeployAfter")
: PRINT "Test:&TEST#"
:ENDWHILE
Note: This command will check if the Target referenced by the
deploy_afterproperty is set as a value for the keydeployAfterin the VARA object. -
Add the Script object to the
Check Deployment Order VariableAction. - Add the Action to the beginning of the Component Workflow (for example, webapp).
-
Select the Action, go to the Prompt Sets tabs and enter the following value:
DEPLOY_ORDER_&$TOP_PROCESSFLOW_RUNID#
-
Create another Script object (for example, Write Value to VARA Object).
-
Open it, select the Process tab and enter the following command:
:PUT_VAR &UC4RB_VARIABLE_NAME#, &UC4RB_VARIABLE_KEY#, &UC4RB_VARIABLE_VALUE#
Note: This command will write the value in the VARA object for a given key.
- Add the Script object to the Write Value to VARA Object Action.
- Add the Action to the end of the Component Workflow (for example, webapp).
-
Select the Action, go to the Prompt Sets tab and enter the following variable:
DEPLOY_ORDER_&$TOP_PROCESSFLOW_RUNID#
-
Enter the Key
DeployAfter -
Enter the variable value (for example &TARGET_NAME#)

- Go back to the Application Workflow and select the Component (for example, webapp).
- Select the Variables tab and add two new rows to reference the deploy order and the Target names:
- Execute the Application Workflow.
Note: Make sure the deployment order option parallel (default) is selected for the Component Workflow.