Forms View on the Process Page
The Process page of JMX, PeopleSoft, SAP and SQL Jobs provide the following two different views:
-
The plain script editor view
For more information, see Working with the Script Editor
- The Forms view described here
Both views are synchronized. Adding a command in the Form view means that the corresponding code line is simultaneously written in the script editor view. When you populate the fields in the Form view, these values are also written to the script editor. Entering or editing script elements in the script editor does the same in the Form view.
Important!
- The synchronization of the values you specify for checkboxes and radio buttons is a special case. It is not possible to set their values in a script variable when using the script editor. If you do so, when you save the Job, they are overwritten by the values selected for those check boxes and radio buttons in the Form view.
- Predefined VARA objects cannot be used in Job forms. You can only use variables and VARA objects for system and object values.
Tip: Instead of entering values in the fields of the SQL Forms you can use variable scripts. This also applies to the Script editor view.
This page includes the following:
Combining Platform-Specific Commands with Automation Engine scripting language
When building scripts for JMX, PeopleSoft, SAP or SQL Jobs you can use both platform-specific commands and the Automation Engine scripting language. You enter Automation Engine statements in the script editor view. When you switch to the Form view, these statements are grayed out to help you easily recognize them.
SQL: User-Defined Commands
User defined commands are slightly different. The Form view for these commands is empty; it is simply a text field where you can type the commands and that provides SQL highlighting.
To Use User-Defined Commands
- In the Form view, click Add Command on the right pane.
- Expand the SQL Statements node.
- Select User Defined (USER_DEFINED).
Retrieving Values from the Target System
With an active online connection to the target system, you can retrieve the values with which to populate the input fields. Click the browser button where available to open a dialog and select the data source.
The contents and layout of the dialog depend on the nature of the data you need:
- Simple dialog with a list where you select a record and click Choose to insert it in the form field
-
Dialog with a list and additional panes on the that display the details of the entry you select on the left pane. Select the value on the bottom right pane and click Choose to insert it in the form field
Notes:
-
JMX Jobs
Clicking the browser button opens the MBean Browser dialog, where you search for and retrieve data from the JMX client and insert it in your scripts.
When creating the JMX Job, on the JMX page you specify whether the MBean server is installed on the same computer as the JMX Agent or not. If it is not ( Remote JAVA VM is activated in the JMX Job definition), enter your credentials to connect to the MBean server. The Automic Web Interface remembers them during the current session, as long as you do not close the object or switch to read only mode. You must enter the credentials again if the Agent or if the connection settings are modified. For more information, see JMX Jobs.
By default, the MBean Browser displays a maximum of 300 entries. Use the Search field at the top of the dialog to restrict the number of displayed entries.
If you are working with the Set Attribute (JMX_SET_ATTRIBUTE) command, the MBean Browser dialog provides an additional Filter pane. On this pane you restrict the number of MBeans displayed on the left pane. To do so, enter the MBean Name or part of the name and clicking the Filter button.
In Max Results, you specify the maximum number of MBeans to display. This helps you avoid performance issues if the list is very long and you do not want to create unnecessary backend calls.
-
SQL Jobs
The Connection Test button on the Commands pane allows you to check whether the connection to the database is alive. Click it to have a message displayed that informs you of the status of the connection. Information on the status of the connection to the SQL system is displayed at the bottom of the dialog.
SAP Jobs
Required Authorizations
To establish the connection to the SAP system, the SAP Agent takes the SAP credentials (user name, password and client) from the Connection object for ABAP Basis. To be able to use the SAP Forms you need the following authorizations:
-
Authorization object: S_RFC
- ACTVT: 16
- RFC_NAME: BDCH, RFC1, RSAB, RSPC_API, SALX, SDIFRUNTIME, SVAR_RFC, SXBP, SXMI, SYST, BACV, SYSU
- RFC_TYPE: FUGR
-
Authorization object: S_XMI_PROD
- EXTCOMPANY: *
- EXTPRODUCT: UC4
- INTERFACE: XAL, XBP, XMB
-
Authorization object: S_TABU_DIS
This is required for the form-switching operating modes, the RSAB for Infopackages and RSPC_API for process chain forms.
- ACTVT: 03
- DICBERCLS: SPFL
Default Settings Not Displayed in the Script Editor
Many command parameters have a default value. If you keep the default value when building your scripts, the Script Editor does not display these parameters.
For example, in the case of Copy an Existing Variant commands (R3_COPY_VARIANT), such as the one used in the previous example, the default for Protect Variant is No. This means that, by default, this checkbox is unselected. The Script Editor does not display this setting.
However, if you select it, that is, if you set a value other than the default, the Script Editor includes it. In this particular case, it adds PROTECTED="YES" to the script.
Criteria Manager for R3 and ABAP Jobs
With the SAP Criteria Manager you define conditions and criteria for events and combine them in dependencies that determine which events will be logged. To build up these conditions you connect standard ABAP options with AND and OR as logical operators:

The combination of criteria and conditions is stored in the criteria profile.
If you have been granted the SAP Criteria Manager right in your user definition and provided the connection to the SAP system is active, the Form view of R3 and ABAP jobs contains an additional Criteria Manager button on the toolbar. This button provides direct access to the Criteria Manager in your SAP system and allows you to do the following directly from the Automation Engine:
- Create and define profiles (Event History, Event History Reorg and Job Interception)
- Activate and deactivate them
- Duplicate and delete them
- Add, modify and remove conditions and criteria for raised events
- Combine both (conditions and criteria) into complex dependencies
Important! Interface versions lower than XBP3.0 are not supported.
Working with the Criteria Profiles Dialog
This graphic provides a short description of the Criteria Profiles dialog.
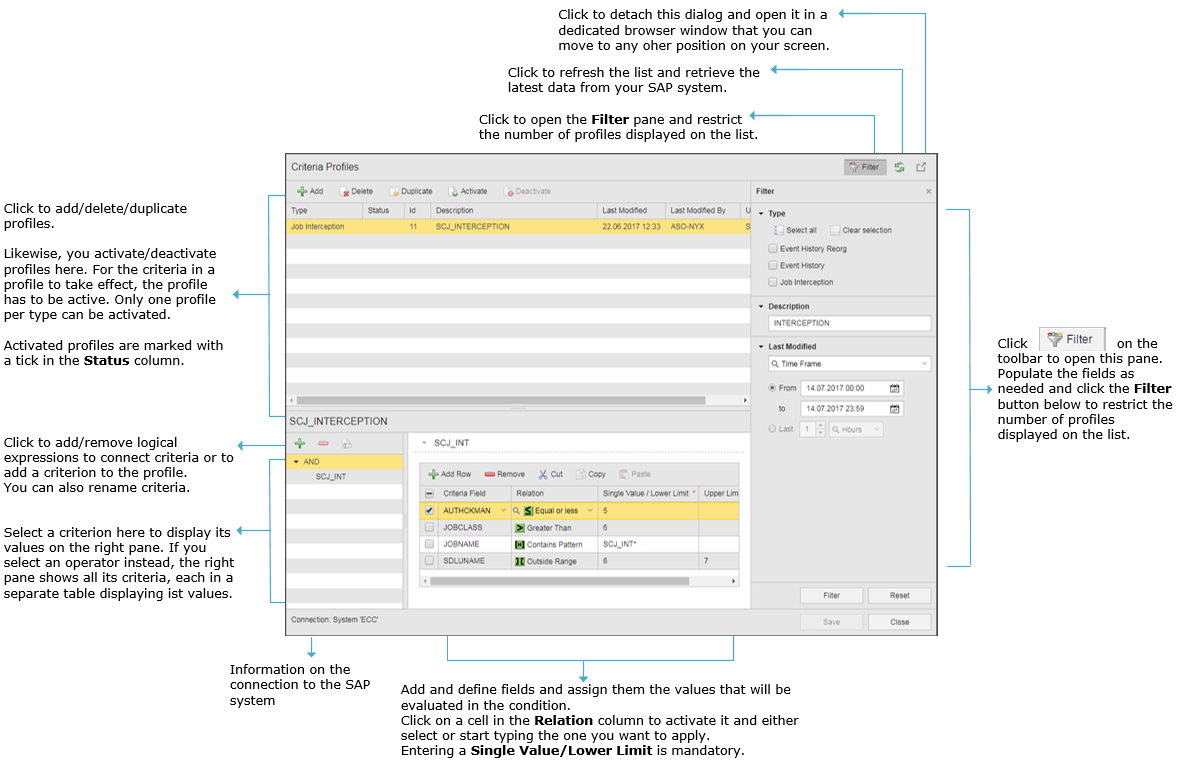
To Filter the Profiles Displayed on the List
- Click the Filter button on the toolbar of the Criteria Profiles dialog to open a pane on the right hand side displaying all the filter possibilities.
- You can restrict the profiles to a particular Type.
- You can enter a Description or part of a description. This field uses implicit wildcards at the beginning and at the end of the string you enter. For example, entering DB_BACKUP actually triggers the filter for *DB_BACKUP*.
-
By default, the Time Frame filter is set to No Time Frame. If you want to restrict the profiles displayed to those that were last modified within a specific time period, open the dropdown list and select Time Frame.
Do one of the followingActivate From/To and select the time frame:
- Either type the date and time or click the icon to open the calendar view.
- Use the arrows at the top of the calendar view to select the month.
- Click on the date.
- Use the buttons at the bottom of the calendar view to specify a time.
- Do the same to define the end of the time frame.
- Activate Last and specify the point in time on which the time frame begins. The end time is always the current timestamp.
- Click the Filter button to apply it.
Once you have filtered the contents of the list you can toggle off the Filter and leave more room for the remaining panes.
To Add, Remove or Duplicate Profiles
-
To Add Profiles
- Click the Add button on the toolbar.
- On the Add Profile dialog, select a Type.
- Optionally, enter a description that helps you identify the event later on.
- Click Add.
-
To Remove Profiles
Select the profile and click the Delete button on the toolbar.
-
To Duplicate Profiles
When duplicating profiles you cannot change the profile Type. You can (but must not) enter a new description. A duplicated profile gets a new ID and is therefore unique. Then, you can modify its criteria and conditions.
- Select the profile and click the Duplicate on the toolbar.
- Optionally, on the Duplicate Profile dialog enter a new Description.
- Click Duplicate.
- Modify its criteria and conditions on the panes below.
To Activate/Deactivate Profiles
Select a profile from the list and click Activate/Deactivate on the toolbar. Activated profiles display a tick in the Status column. There can be only one active profile per type.
To Add, Remove or Rename Nodes/Criteria for a Profile
-
To Add Criteria
- Select a profile from the list and select an operator from the bottom left pane. This activates the add button on the toolbar.
- Click it.
- Select Criterion from the menu that opens up.
- EVENTSTATE
- EVTTIMESTAMP
- EVENTID
- EVENTPARM
- AUTHCKMAN
- JOBCLASS
- JOBNAME
- SDLUNAME
- Enter the name of the new criterion on the Add dialog.
- Click Add.
The available options depend on the job type of the criteria profile.
For event history reorg, the options are:
For event history, the options are:
For job interception, the options are:
The criterion is inserted in the list right below the operator (AND or OR) you have previously selected. This means that it will be combined with the rest of the criteria in the profile using that operator. Additionally, a new row is added to the right pane, where you can start adding values to the criterion. Add and assign values to as many criteria as you need and combine them to define the dependencies that make up the profile.
-
To Remove Criteria
Select a criterion from the bottom left pane and click the minus icon.
-
To Rename Criteria
Select a criterion from the bottom left pane and click the rename icon.
To Define Fields and Values for the Criteria
-
To Add a Field
- On the bottom left pane select the criterion to which you want to add conditions.
- Click Add Row on the right pane.
-
Define the first field and its value as follows:
- Click the cell in the Criteria Field column to activate it.
- Click on the arrow to expand the options; the content of this list is retrieved from your SAP system. Select the required field.
- Click the cell in the Relation column to activate it and either select or start typing the name of the operator.
- Click the cell in the Single Value/Lower Limit column and enter the value to be evaluated. This field determines the single value or if in a range, the lower limit. This is mandatory.
- Optionally, click the cell in the Upper Limit column and enter the value to be evaluated. This field determines the upper limit when Single Value/Lower Limit is used to specify the lower limit of a range.
- Repeat these steps with as many fields as you want to specify for the criterion. You can copy/paste entries and modify them.
-
To Remove a Field
Select a row and click Remove on the toolbar.
-
To Copy/Paste Fields
- Select one or more criteria and click Copy.
- Click Paste.
The selected criteria are added at the bottom of the list.
The Criteria Manager and Automation Engine scripting language
The Automation Engine scripting language provides elements associated with the SAP Criteria Manager. For more information, see About SAP JCL for an overview. For information about the available commands, see:
- R3_ACTIVATE_CM_PROFILE activates a profile in the SAP Criteria Manager
- R3_DEACTIVATE_CM_PROFILE deactivates a profile in the SAP Criteria Manager
See also Intercepted Jobs
SQL Jobs
-
Each SQL statement must be entered in a separate line. Within a statement you can use several lines.
- By default, statements end with a semicolon (;). If you use it within an SQL statement, the SQL_SET_STATEMENT_TERMINATOR is set in the script automatically by the system and a new separator is defined. For more information, see SQL_SET_STATEMENT_TERMINATOR.
- The database Agent uses SQL statements exactly as specified in the job. It does not adapt them before passing them onto the database. Only use SQL statements that the database supports.
Note: For MS SQL Server Databases (especially in combination with transactions) SET IMPLICIT_TRANSACTIONS is set to the default value ON. Further information is available in the corresponding Microsoft documentation.
Working with the Form View
- Open the Process page of the SAP Job object.
-
Click the Form button to toggle the Form view on.
The Commands pane is displayed on the right hand side. This is where you build the SAP script using predefined commands.
- Click Add Command to open a dialog that displays all the available commands arranged in groups.
-
Select the required one. You have two options:
- Scroll through the list and expand the command group where the required one is located.
-
In the Search field at the top of the dialog start writing any word that is contained in the name of the command you need. The list below displays the commands that have the entered string in their names.
-
Click the Add Command button at the bottom of the dialog.
The command is inserted on the pane and the corresponding input and selection fields are displayed on the main page.
-
Populate the fields as required.
With an active connection you can retrieve values from the SAP system. For this purpose, click the browser where available.
- Continue adding commands and entering values until you have finished building the script.
- Save your changes.
Switch to the Script Editor view; the commands and the values you have specified are also inserted here.
To Duplicate Commands
- On the Commands pane, right-click on the command you want to duplicate.
- A context-menu is displayed. Select Duplicate.
- The new, duplicated command is inserted immediately below the original one. All settings and selections made in the original command are also available in the new one.
- Save your changes.
To Remove Commands
On the Commands pane do one of the following:
- Click the recycle bin icon on the command label.
- Right-click on the command and select Remove.
To Change the Order of the Commands/Script Elements in the Script
The Form view allows to rearrange the order of the commands, whether SAP-specific or not, by dragging and dropping them. The commands in the Script editor are rearranged accordingly.
- On the Commands pane, click on a command or on a non-SAP statement to select it.
- Hold the mouse button to drag and drop it to the position where you need it.
- Save your changes.
To Import Existing Jobs/Job Steps from SAP into the Current Script
When building a script, you can import code that is already available in jobs in the SAP system.
- Select the command after which you want to insert the job steps you want to import.
- On the Commands pane click the Import Job button.
- The Choose Job Name dialog is displayed, where you can search for the required job.
- Click OK.
- The required commands are inserted immediately after the selected command. The Search pane on the right allows you to filter and restrict the number of jobs that are displayed on the list.
- Select the appropriate job and click Choose to close the dialog.
The imported lines of code are inserted right after the command you had selected, both in the script and in the Forms view.
To Import Existing Jobs or Job Steps from SQL into the Current Script
When building a script, you can import code that is already available in jobs in the SQL system.
- Select the command after which you want to insert the job steps you want to import.
- On the Commands pane click the Import Job button.
- The Choose Job Name dialog is displayed, where you can search for the required job.
- Click OK.
- The required commands are inserted immediately after the selected command. The Search pane on the right allows you to filter and restrict the number of jobs that are displayed on the list.
-
Select the appropriate job and click Choose to close the dialog.
The imported lines of code are inserted right after the command you had selected, both in the script and in the Forms view.
See also: