Installing and Migrating Container-Based Systems
As a system administrator, you install and/or migrate Automic Automation and other component necessary to get your system running.
Tip! This section contains information relevant for container-based systems. If you are searching for information relevant to manually installed, on premises systems, see Installing the Automation Engine (AE).
The container-based model uses Kubernetes and Helm Charts, and can be used for deployments on self-hosted Kubernetes clusters and managed Kubernetes services as those provided by AWS, Azure and Google Cloud Platform.
The Automic Automation Kubernetes Edition (AAKE) offering comprises all core and container-specific components, the provided installation customizations for Automic Automation and Automic Intelligent Remediation, as well as a number of Action Packs that are loaded by default. You can download the offering from https://downloads.automic.com/, where you can also see the complete content of the offering.
The offering zip file includes:
-
All Automic Automation components
-
Automic Automation Helm Chart
Includes the values.yaml file that you can use to customize the AAKE deployment/installation.
-
Automic Automation Helm Plugin
Used to monitor the status of the AAKE installation and to run a Helm upgrade for an existing AAKE instalaltion.
Note: You can use the Automic Automation Helm plugin to monitor the progress of an installation and/or update. For more information, see Automic Automation Helm Plugin.
This page includes the following:
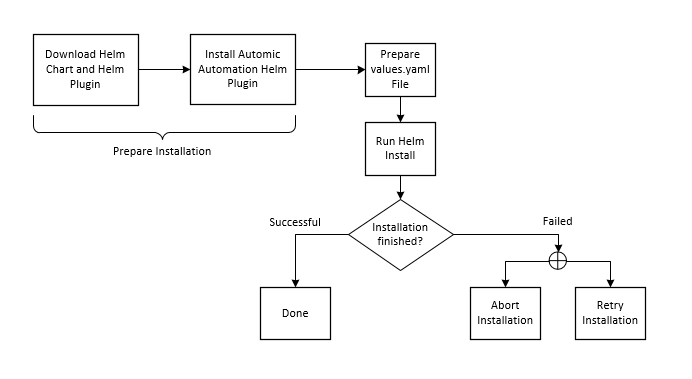
Installation Overview
Click the image to expand it.
Installing an AAKE System
You start with a new, empty AE database when you install your (v21) AAKE system from scratch.
Make sure you have all prerequisites in place before starting with the migration. For more information, see Preparing for the Container-Based Installation.
If you do not want to install Analytics, make sure you disable the installation in the values.yaml file before the installation. For more information, see Disabling the Analytics Installation.
Installation Steps
The following steps guide you through the container-based system installation.
-
If you have not done so already, download the AAKE offering and create your pull secret, see Downloading the Automic Automation Kubernetes Edition Offering.
-
If you have not done so already, install the Automic Automation Helm Plugin, see Installing the Automic Automation Helm Plugin.
-
If necessary, adapt the values.yaml file from the Helm Chart.
-
Install Automic Automation Kubernetes Edition.
Example
helm install aake automic-automation-<version>.tgz -f values.yaml
-
aake: Name of the Helm installation. You can freely choose the name of your Helm installation.
-
-f values.yaml: Provides the Helm Chart configuration to be used
Optionally, you can use -n <namespace> to set a namespace.
-
-
Use the Helm plugin to check the progress of the installation:
$ helm automic-automation status
Once the installation is complete the status is provisioned, the target and current versions should match the desired version. If this is not the case, check the Troubleshooting section of README.md file found in the Helm chart, see Automic Automation Helm Plugin.
-
Optionally, you can check the logs of the install-operator to check the installation status.
Accessing the Automic Web Interface
The new installation automatically provisions two Automic Automation clients: Client 0 and Client 100. The respective users and credentials are created automatically as well. The credentials are stored in Kubernetes secrets in the namespace in which the Helm Chart was installed:
-
client0-user: Secret name for Client 0
-
client100-user: Secret name for Client 100
Note: Wait until your instance is provisioned before you query the credentials, as these might not have been generated yet.
To get the username and password for the accounts that are created, you can call:
echo "Client 0 User: $(kubectl get secrets client0-user -o jsonpath={$.data.user} | base64 -d)"
echo "Client 0 Password: $(kubectl get secrets client0-user -o jsonpath={$.data.password} | base64 -d)"
echo "Client 100 User: $(kubectl get secrets client100-user -o jsonpath={$.data.user} | base64 -d)"
echo "Client 100 Password: $(kubectl get secrets client100-user -o jsonpath={$.data.password} | base64 -d)"
Migrating to an AAKE System
Using a backup of your existing (12.3) database allows you to migrate your existing on-premises system to a higher AAKE version. It allows you to keep your current system configuration such as clients, users, groups, object definition and so on. This means that you do not have to start from scratch and carry out a new installation.
Important! As of version 21.0, the Proxy also uses TLS/SSL to communicate with the Automation Engine. If you want to use the Proxy to connect your Agents and you already use it, do not upgrade it yet.
Pre-Migration Checklist
Before starting the migration, go through the following issues and make sure you have all requirements in place:
-
For the Automation Engine, Automic Automation Kubernetes Edition only supports PostgreSQL and Oracle databases
-
Make sure that you have configured the database connection to the existing AE database
Example AE DB - PostgreSQL
$ kubectl create secret generic ae-db-postgres \
--from-literal=host=external-postgres.location \
--from-literal=vendor=postgres \
--from-literal=port='1521' \
--from-literal=user=username \
--from-literal=db=POSTGRESDB.localdomain \
--from-literal=password=S3cret \
--from-literal=data-tablespace-name=ae_data \
--from-literal=index-tablespace-name=ae_index \
--from-literal=additional-parameters="connect_timeout=10 client_encoding=LATIN9"
-
Make sure that you set the existing system name for the Automation Engine and the Automic Web Interface using the respective environment variable in the values.yaml file
-
AUTOMIC_GLOBAL_SYSTEM for the Automation Engine
-
AUTOMIC_SYSTEM_NAME for the Automic Web Interface
For more information, see Environment Variables Relevant for Migration.
-
-
Create a Kubernetes secret that contains the admin credentials for the existing Client 0. The secret must be created in the namespace in which the AAKE system is installed.
Example
kubectl create secret generic client0-user \
  --from-literal=client='0' \
  --from-literal=user='ADMIN' \
  --from-literal=department='ADMIN' \
  --from-literal=password='UC4'
-
Set the operator.migrate parameter in the values.yaml file is set to true
Also, make sure that you have all other prerequisites in place before starting with the migration. For more information, see Preparing for the Container-Based Installation.
Analytics in the Migration Context
When migrating to an AAKE system, Analytics is never installed in the AAKE cluster. If you have Analytics installed in the version you want to upgrade, it remains on-premises.
For information on how to configure the connection between your Analytics on-premises installation and the Automic Automation Kubernetes Edition, see Configuring the Connection between Analytics On-Premises and AAKE.
Migration Scenarios
From a network perspective, when you migrate to Automic Automation Kubernetes Edition, you use a completely new instance running most likely in a different environment. This is relevant especially when disconnecting the Agents from your current system and reconnecting them to your new, AAKE instance- even more so if your system has a large number of Agents.
Note: Keep in mind that, at this stage, your Agents have not been updated yet and they still require a communication process (CP) to which they can connect.
There are three possible migration scenarios:
-
Adapt the INI files of your Agents
In this case, you modify the INI file of your Agents to connect to the cluster. To reach the CP in the cluster, you have to establish the connection through a TCP load balancer.
-
Use the Proxy to connect your Agents
When you use the Proxy, you only have to adapt the Agent connection in the INI file of the Proxy, thus avoiding having to change the INI file of each Agent. The Proxy also has to establish the connection to the CP in the cluster through a TCP load balancer.
Important! As of version 21.0, the Proxy also uses TLS/SSL to communicate with the Automation Engine. If you want to use the Proxy to connect your Agents and you already use it, do not upgrade it yet. If you do not use the Proxy already but want to use it in this scenario, make sure you install v12.3 of the Proxy, and not v21.0.
-
Use the TLS Gateway as a CP Port to connect your Agents
In this case, you configure the TLS Gateway to provide a CP Port for your Agents. Your have to configure your Agents to connect to the TLS Gateway which then establishes a TLS/SSL connection to the new Java communication process (JCP) in the cluster through an HTTPS load balancer.
More information:
Migration Steps
This section guides you through the process of migrating to a container-based system in all three migration scenarios.
Migrating Adapting the Agent INI Files
Important!
-
Since a new AAKE instance does not require a communication process (CP) by default, you have to scale your AAKE deployment to include a communication process (CP), see Scaling Deployments.
-
You must have a TCP load balancer in place to establish the connection between the Agent and the CP in the cluster. The connection must be defined on both sides: the Automation Engine and the Agent, see Connecting to the CP.
The following steps guide you through the migration adapting the INI files of your Agents:
-
In your on-premises system, stop the AE server processes.
-
Make sure all your Agents are still running in the ServiceManager. The Agents keep running but are not connected to any communication process (CP).
-
Install Automic Automation Kubernetes Edition.
Important! Make sure that the operator.migrate parameter in the values.yaml file is set to true.
-
If you have not done so already, download the AAKE offering and create your pull secret, see Downloading the Automic Automation Kubernetes Edition Offering.
-
If you have not done so already, install the Automic Automation Helm Plugin, see Installing the Automic Automation Helm Plugin.
-
If necessary, adapt the values.yaml file from the Helm Chart.
-
Install Automic Automation Kubernetes Edition.
Example
helm install aake automic-automation-<version>.tgz -f values.yaml
-
aake: Name of the Helm installation. You can freely choose the name of your Helm installation.
-
-f values.yaml: Provides the Helm Chart configuration to be used
Optionally, you can use -n <namespace> to set a namespace.
-
-
Use the Helm plugin to check the progress of the installation:
$ helm automic-automation status
Once the installation is complete the status is provisioned, the target and current versions should match the desired version. If this is not the case, check the Troubleshooting section of README.md file found in the Helm chart, see Automic Automation Helm Plugin.
-
Optionally, you can check the logs of the install-operator to check the installation status.
-
-
Scale your AAKE deployment to include a CP replica, see Scaling Deployments.
-
Configure the connection in the INI file of each Agent, see Agents INI files.
Keep in mind that you have to establish the connection with the TCP load balancer and not the CP directly, see Connecting to the CP.
-
Check that the Agents reconnect to the server/system.
Migrating Using the Proxy
Important!
-
Since a new AAKE instance does not require a communication process (CP) by default, you have to scale your AAKE deployment to include a communication process (CP), see Scaling Deployments.
-
You must have a TCP load balancer in place to establish the connection between the Agent and the CP in the cluster. The connection must be defined on both sides: the Automation Engine and the Agent, see Connecting to the CP.
-
As of version 21.0, the Proxy also uses TLS/SSL to communicate with the Automation Engine. If you want to use the Proxy to connect your Agents and you already use it, do not upgrade it yet. If you do not use the Proxy already but want to use it in this scenario, make sure you install v12.3 of the Proxy, and not v21.0. For more information, see Installing the Proxy - v.12.3.
The following steps guide you through the migration using the Proxy:
-
In your on-premises system, stop the AE server processes, as well as the Proxy Client and Proxy Server, if you already use a Proxy.
-
Make sure all your Agents are still running in the ServiceManager. The Agents keep running but are not connected to any communication process (CP).
-
Install Automic Automation Kubernetes Edition.
Important! Make sure that the operator.migrate parameter in the values.yaml file is set to true.
-
If you have not done so already, download the AAKE offering and create your pull secret, see Downloading the Automic Automation Kubernetes Edition Offering.
-
If you have not done so already, install the Automic Automation Helm Plugin, see Installing the Automic Automation Helm Plugin.
-
If necessary, adapt the values.yaml file from the Helm Chart.
-
Install Automic Automation Kubernetes Edition.
Example
helm install aake automic-automation-<version>.tgz -f values.yaml
-
aake: Name of the Helm installation. You can freely choose the name of your Helm installation.
-
-f values.yaml: Provides the Helm Chart configuration to be used
Optionally, you can use -n <namespace> to set a namespace.
-
-
Use the Helm plugin to check the progress of the installation:
$ helm automic-automation status
Once the installation is complete the status is provisioned, the target and current versions should match the desired version. If this is not the case, check the Troubleshooting section of README.md file found in the Helm chart, see Automic Automation Helm Plugin.
-
Optionally, you can check the logs of the install-operator to check the installation status.
-
-
Scale your AAKE deployment to include a CP replica, see Scaling Deployments.
-
If you have not done so yet, install the Proxy Client and Proxy Server.
Important! Since your Agents have not been upgraded yet, make sure you install v12.3 of the Proxy, see Installing the Proxy - v.12.3.
-
Configure the Agent connection in the INI file of the Proxy. Keep in mind that you have to establish the connection with the TCP load balancer and not the CP directly, see Connecting to the CP.
Note: If you use the Proxy before, make sure you delete the entry on the CP_LIST section of the INI file. Otherwise the Proxy uses that definition to connect itself to the old server, see Proxy INI file.
-
Start the Proxy processes.
-
Check that the Agents reconnect to the server/system.
Migrating Using the TLS Gateway as a CP Port
Important! The communication between the Automation Engine and the TLS Gateway uses TLS/SSL. In AAKE, the TLS Gateway establish a connection to an HTTPS load balancer, which must be reachable and requires a certificate for authentication. The address of the load balancer must be defined on both sides: the Automation Engine and the TLS Gateway.
Prerequisites: You must have the TLS Gateway installed and configured to be used a as CP port. You also must have the required certificates in place so that the TLS Gateway can establish the connection with the HTTPS load balancer an not the JCP directly.
More information:
The following steps guide you through the migration using the TLS Gateway as a CP port:
-
In your on-premises system, stop the AE server processes.
-
Make sure all your Agents are still running in the ServiceManager. The Agents keep running but are not connected to any communication process (CP).
-
Install Automic Automation Kubernetes Edition.
Important! Make sure that the operator.migrate parameter in the values.yaml file is set to true.
-
If you have not done so already, download the AAKE offering and create your pull secret, see Downloading the Automic Automation Kubernetes Edition Offering.
-
If you have not done so already, install the Automic Automation Helm Plugin, see Installing the Automic Automation Helm Plugin.
-
If necessary, adapt the values.yaml file from the Helm Chart.
-
Install Automic Automation Kubernetes Edition.
Example
helm install aake automic-automation-<version>.tgz -f values.yaml
-
aake: Name of the Helm installation. You can freely choose the name of your Helm installation.
-
-f values.yaml: Provides the Helm Chart configuration to be used
Optionally, you can use -n <namespace> to set a namespace.
-
-
Use the Helm plugin to check the progress of the installation:
$ helm automic-automation status
Once the installation is complete the status is provisioned, the target and current versions should match the desired version. If this is not the case, check the Troubleshooting section of README.md file found in the Helm chart, see Automic Automation Helm Plugin.
-
Optionally, you can check the logs of the install-operator to check the installation status.
-
-
If you have not done so yet, install the TLS Gateway and configure it so that it can be used as a CP port and so that it can connect to the HTTPS load balancer.
More information:
-
Configure the Agent connection in the INI file of the TLS Gateway, see TLS Gateway.
Tip: Make sure that the hostname= and cp_port= parameters in the [TCP/IP] section of the INI file of the TLS Gateway reflect the CP connection that your Agents currently use, thus avoiding having to change the INI file of each Agent.
-
Check that the Agents reconnect to the server/system.
Scaling Deployments
Changing the number of replicas for a new installation or before/after an upgrade allows you to scale your deployments for AWI, JCP, REST. JWP, CP, and WP. You can set the number of replicas in the values.yaml file in the Helm Chart. Make sure you follow the sizing guidelines relevant for your installation.
Example
The following example shows the values.yaml file configuration for a default namespace:
spec:
  version: "21.0.0"
  awiReplicas: 2
  cpReplicas: 0
  jcpRestReplicas: 2
  jcpWsReplicas: 2
  jwpReplicas: 2
  wpReplicas: 6
By default, the CP replicas are set to zero because a new AAKE environment does not require CPs. However, if you want to connect non-TLS/SSL Agents and/or CallAPIs, you do require a CP. For more information, see Connecting to the CP.
Use the Helm upgrade to apply the replica changes:
helm upgrade aake automic-automation.tgz --install -f values.yaml
You can also scale deployments using kubectl commands. However, these values do not persist after an upgrade or after changing the configuration map.
Example
kubectl scale deployment awi --replicas=2
kubectl scale deployment jcp-rest --replicas=2
kubectl scale deployment jwp --replicas=3
The -- replicas parameter changes the number of running pods for the corresponding deployment thus allowing you to scale your Automation Engine.
More information:
- Types of Server Processes
- Automic Automation System Requirements and Sizing
- Automic Automation Helm Plugin
Multiple Automation Engine Instances in a Kubernetes Cluster
You can run multiple Automation Engine instances in one Kubernetes Cluster. To do so, make sure you apply the image pull secret provided in each namespace in which you install the Helm Chart. Also, make sure that you provide the namespace in the helm install call.
Example
This example creates the namespace automic-demo-01 and installs the Helm Chart in that namespace.
helm install aake automic-automation-<version>.tgz -n automic-demo-01 --create-namespace kubectl apply -n automic-demo-01 -f values.yaml -f gcr-image-pull-secret-automic.yaml
Removing an AAKE Installation
You can remove an AAKE installation by uninstalling the Helm installation.
Example
helm uninstall aake
Make sure to use the name of your Helm installation.
Important! It is not recommended deleting the entire namespace to remove an AAKE installation, as it removes all resources within the namespace as well as the namespace itself.
Troubleshooting
Cannot create Custom Resource Definitions (CRD). Error: failed to install CRD crds
Your Kubernetes user must have the necessary permissions to CRD in the cluster; otherwise, you get an error message stating the failure to install CRD crds.
If you cannot get the permissions required to create CRDs in the cluster, you can extract the CRD from the Helm Chart. To do so, carry out the following steps:
-
Download and unpack the Helm Chart.
-
Copy the Automic Automation CRD from crds/broadcom-.com_automicautomations_crd.yaml.
-
Send it your Kubernetes cluster administrator, who can then apply the CRD with the following command:
kubectl apply -f broadcom.com _automicautomations_crd.yaml
See also: