Installing the Automic Web Interface

The Automic Web Interface is Automic Automation's graphical user interface. When you download it from our download center, the delivery ZIP file already contains everything that you need to install, start and configure the Automic Web Interface. It also contains the AWI plugins, all necessary bundles and libraries, and the Java API.

It is no longer necessary to install an application server before installing the Automic Web Interface because the delivery artifact includes the AWI Jetty Launcher. However, if you do have an application server (Tomcat, WebSphere or WebLogic), you can still follow the old installation method. This topic provides instructions for installing the Automic Web Interface in all possible setups.

Important: The Automic Web Interface and the AE server must have the same release version. To check other compatibility issues, see Compatibility Information or access the compatibility matrix directly.

This page includes the following:
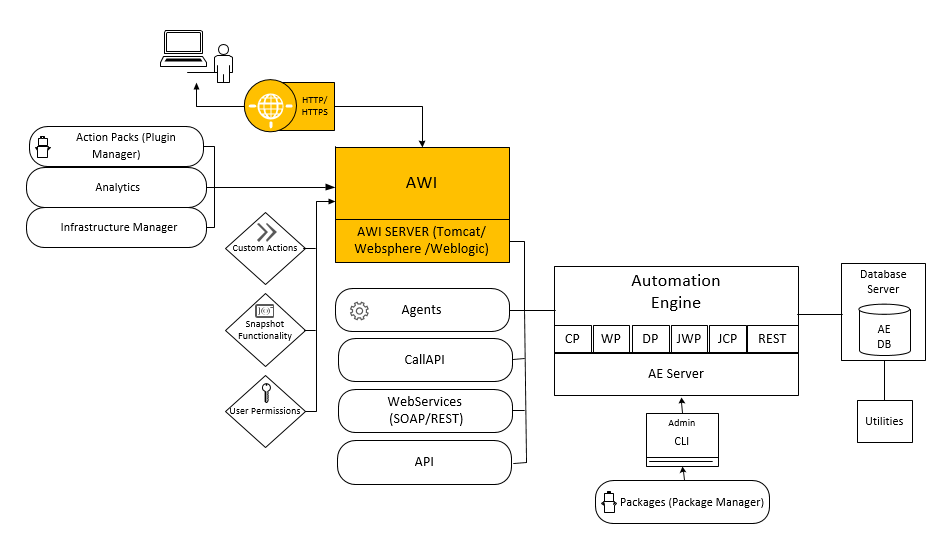
System Overview

The graphic below is a high-level overview of the installation process. The areas where you must do something to install the Automic Web Interface are highlighted.

Click the image to expand it.

Graphic depicting the system overview with focus on the web interface

TLS/SSL Connection between AWI and the Automation Engine

As of version 21.0, the Automation Engine and the Java components communicate using TLS/SSL. These components establish a connection with the Java communication process (JCP), which uses trusted certificates to prove its identity to other communication partners.

You can use the trustedCertFolder= parameter in the respective configuration file to define the path to the folder where the trusted certificates are stored. Otherwise, the certificates should be installed in the Java trust store. For more information, see Securing Connections to the AE (TLS/SSL).

Content of the Delivery Artifact

The delivery ZIP file that you download from our download center contains the following files and folders:

  • aa-webui-launcher.jar

    Launcher to start AWI within a Java process

  • awi.war

    Web application file for Tomcat, WebSphere and WebLogic

  • /config

    Folder containing the AWI configuration files (logback.xml, uc4config.xml, configuration.properties, plugin configuration, and so forth)

    Note: Some configuration files are delivered with an additional ".sample" extension to ensure that your existing configuration files will not be overwritten when you update the AWI installation. You can remove ".sample" and adapt the parameters in these files or you can use the old, already configured files.

  • /lib

    EquinoxOSGi runtime libraries

  • /osgi-tmp

    Temporary folder for OSGi related files and the AWI log file

  • /plugins/autoinstall

    AWI plugins

  • /plugins/java-api-bundles

    Java API

  • /plugins/osgi-support-bundles

    OSGi runtime (Felix, Service Runtime)

  • /THIRD-PARTY-LICENSES

    Folder that contains a copy of the used licenses

  • THIRD-PARTY-LICENSES.txt

    List of third-party libraries used in AWI

See also Plugins and Configuration Files Location.

Installing AWI

The delivery artifact contains the aa-webui-launcher.jar. This is the Jetty Launcher, which will automatically start AWI within a Java process without your having to install it. However, if you are upgrading from a previous version and still want to use your application server for the AWI installation, you can do so.

Select the answer that applies to your setup to display the instructions that are relevant for you.

Will you install AWI using an application server?

Select your application server

Important! We recommend that you deploy the AWI WAR file on a dedicated application server that you use exclusively for this purpose.

To Run AWI with the Bundled Jetty Application Server

Overview

  1. Download and extract the AWI ZIP file.
  2. Start AWI.
  3. Enable TLS/SSL.
  4. Configure the connection to the Automation Engine systems.
  5. Configure your browser.
  6. Verify that AWI is working as expected (health check).

Follow these Instructions

  1. Download and extract the AWI ZIP file.

    Go to our download center at https://downloads.automic.com/ to download and extract the Automic Web Interface ZIP file. This screenshot shows the content of the ZIP file:

    Screenshot of the explorer showing the content of the AWI delivery artifact after extraction

  2. Start AWI.

    But default, AWI starts using an insecure connection (http).

    You have the following options to start AWI:

    • Start AWI using the command line

      Open the command line and execute the following command:

      java -jar C:\temp\awi\aa-webui-launcher.jar -console

      The -console parameter at the end of the command is optional. If you set it, the AWI log files will be written to the console instead of to the /osgi-tmp folder. For more information, see Log File Location.

      The Automic Web Interface has started successfully when the following line is displayed:

      2020-06-30 15:45:45,183 46b2-a41e-0d03a9131bd3 [INFO ] NOSESSION/- NOUI [com.uc4.ecc.jetty.JettyServerLauncher] - JettyServerLauncher started: http://localhost:8080/awi

      Notes:

      • The displayed line contains the URL
      • (Optional) If you want to change the port where AWI runs, add the following parameter to the configuration.properties file:

        http.port=80

    • Start AWI using the Service Manager

      1. Add a new entry to the Service Manager.

        Screenshot of the UC4 Service Manager dialog showing a new entry for the AWI

      2. Copy and paste the following command to the properties panel:

        java -Xrs -jar C:\temp\awi\aa-webui-launcher.jar

        Screenshot of the Automic Web Interface Properties dialog in the Sercice Manager

  3. Enable TLS/SSL.

    For more information, see Enabling TLS/SSL for Installations with the Bundled Jetty Launcher.

  4. Configure the connection to the Automation Engine systems.

    You have the following options to configure the connections to Automation Engine systems:

    • Using the uc4config.xml configuration file

      After launching AWI for the first time, the uc4config.xml.sample file is created in the awi\config folder in your installation path. You can rename it (remove the additional .sample extension) or you can copy an old, already configured file to this folder.

      The uc4config.xml file lets you define connections to more than one AE system.

      If you define multiple connections, you must configure the automationEngine.index property of the configuration.properties file. In this property you define whether users will be able to select between those connections or whether they will be able to connect only to the first connection specified in uc4config.xml.

      For the changes to take effect, stop and restart the application server.

    • Using environment variables

      When you configure a connection to the Automic Web Interface using environment variables, the following applies:

      • When you log into AWI, this connection is displayed in the Connection field and in its drop-down selection list.

      • The uc4config.xml file is no longer required.

        However, you can use both environment variables and uc4config.xml. If the connection and system names used in the uc4config.xml file and in the environment variable are the same, the environment connection is used. If the names are different, both connections are listed and selectable in the Connection field.

      • You can define only one Automation Engine connection.

        If you want to define more that one, set the automationEngine.index property in the configuration.properties file to something other than -1. As a result, the AE connection defined in the environment variable is ignored and is not displayed in the Connection field.

      • If you use an environment variable to define a trace level, this value also overrides the one defined in the uc4config.xml file. Otherwise, the default value is used.

      Environment Variables for AE Connections

      All environment variables for AE connections must use the prefix AUTOMIC followed by an underscore: AUTOMIC_.

      Environment variables for AE connections
      Key Description
      AUTOMIC_SYSTEM_NAME (Mandatory)

      Name of the Automation Engine system you want to connect to.

      When logging into AWI, in the Connection field and in its drop-down selection list, the system name is displayed in parenthesis next to the connection name.

      Example:

      • AUTOMIC_SYSTEM_NAME: AUTOMIC
      • AUTOMIC_CONNECTION_NAME: AE_TEST
      • Connection: AE_TEST (AUTOMIC)
      AUTOMIC_CONNECTION_NAME (Optional)

      Name of the connection.

      If this value is not defined, the system name is used also as the connection name.

      Example:

      • AUTOMIC_SYSTEM_NAME: AUTOMIC
      • AUTOMIC_CONNECTION_NAME:
      • Connection: AUTOMIC (AUTOMIC)
      AUTOMIC_SYSTEM_CPS (Mandatory)

      Description: Definition of the connection to the communication processes (JCPs) of the Automation Engine system

      Value: Address (IP address:Port) or (hostname:Port) of the JCPs, separated by a semicolon

      Example:

      127.0.0.1:2217;127.0.0.1:2218

      AUTOMIC_TRACE_LEVEL (Optional)

      Description: Trace level of XML operations

      Allowed values: 0 - 3

      • 0: off
      • 1: send calls
      • 2: receive calls
      • 3: all

      Environment Variables for General AWI Properties

      You can also use environment variables to define custom property settings for the communication between the Automation Engine and the Automic Web Interface. You must use the prefix AUTOMIC followed by an underscore for these variables, too.

      Key:AUTOMIC_<Property name> (all uppercase)

      Value: Property value

      Example:

      AUTOMIC_AUTOMATIONENGINEOPENCONNECTIONTIMEOUTMILLISECONDS=9999

      Also, if the property name includes a period, you must replace the period with an underscore. For example, the property name for automationEngine.index must be defined as AUTOMIC_AUTOMATIONENGINE_INDEX.

  5. Configure your browser.

    • Enable cookies
    • Disable pop-up blockers
    • Empty the cache after each upgrade
  6. Verify that AWI is working as expected (health check).

    Use the AWI's health check to verify that the application server has deployed AWI correctly and that it is up and running.

    1. Add the word status to the URL:

      http://hostName:<port>/AWI/status

    2. The standard HTTP 200 OK status response code is returned and a page is displayed with the word OK indicating that AWI is running. Otherwise, the corresponding standard HTTP message is displayed.

    You can use this health check endpoint in your internal URL monitoring systems to ensure that AWI is functioning properly.

    You can also use this endpoint in Shell scripts to call the status of the Automic Web Interface.

Log File Location

AWI stores the log files in the /osgi-tmp folder. Each running instance creates a subfolder with an ascending number, starting at 0. The folders contain both the osgi-related data and the AWI log files.

Exception: If you start AWI using the command line and you add the -console parameter to the command, the log is written to the console instead.

See also:

AWI is running successfully. Now you can start configuring it. The following topics guide you through the AWI configuration activities:

See Troubleshooting Problems on AWI Clients for tips about how to ensure that users see all AWI parts correctly and have no login problems.

After installing and configuring AWI you can start setting up your system or you can continue with the installation of other plug-ins and components.

For more information, see Requirements and Installation Types.

To Install and Run AWI Using Tomcat

Prerequisite: Tomcat is already installed.

Overview:

  1. Increase the memory that Tomcat allocates to AWI.
  2. Check that Tomcat starts automatically.
  3. Start Tomcat.
  4. Deploy the WAR file.
  5. Configure the connection to the Automation Engine.
  6. Start AWI.
  7. Configure your browser.
  8. Verify that AWI works as expected (health check).

Follow these Instructions

  1. Use the memory parameter Heap size to increase the memory that Tomcat can allocate to AWI to at least 2GB.

    By default, Tomcat allocates a low amount of memory to an application. This is not sufficient for AWI, which keeps a lot of UI state data in memory.

    Windows:

    1. Go to the bin folder in your Tomcat installation (...Apache Software Foundation\Tomcat<version>\bin).
    2. Right-click the .exe file and, from the context menu, select Run as administrator.
    3. On the Java tab, set the heap size by setting the Maximum memory pool to the maximum possible on your system, for example 8192MB (-Xmx8192m).

    Linux:

    In the CATALINA_OPTS environment variable, set the heap space to the maximum possible on your system, for example 8192MB.

  2. Make sure that Tomcat starts automatically when you start the server in which it is installed, for example, with a Windows service or an init script.

  3. Start Tomcat and go to the default URL to verify that it is responsive.

  4. Deploy the WAR file.

    Copy the awi.war file to the webapps folder of the Tomcat installation. If the Tomcat is running, the awi.war file will be deployed automatically, creating a folder with the same name.

    Important! Deleting the awi.war file removes the corresponding subfolder, which also undeploys the AWI.

  5. Configure the connection to the Automation Engine systems.

    You have the following options to configure the connections to Automation Engine systems:

    • Using the uc4config.xml configuration file

      After launching AWI for the first time, the uc4config.xml.sample file is created in the awi\config folder in your installation path. You can rename it (remove the additional .sample extension) or you can copy an old, already configured file to this folder.

      The uc4config.xml file lets you define connections to more than one AE system.

      If you define multiple connections, you must configure the automationEngine.index property of the configuration.properties file. In this property you define whether users will be able to select between those connections or whether they will be able to connect only to the first connection specified in uc4config.xml.

      For the changes to take effect, stop and restart the application server.

    • Using environment variables

      When you configure a connection to the Automic Web Interface using environment variables, the following applies:

      • When you log into AWI, this connection is displayed in the Connection field and in its drop-down selection list.

      • The uc4config.xml file is no longer required.

        However, you can use both environment variables and uc4config.xml. If the connection and system names used in the uc4config.xml file and in the environment variable are the same, the environment connection is used. If the names are different, both connections are listed and selectable in the Connection field.

      • You can define only one Automation Engine connection.

        If you want to define more that one, set the automationEngine.index property in the configuration.properties file to something other than -1. As a result, the AE connection defined in the environment variable is ignored and is not displayed in the Connection field.

      • If you use an environment variable to define a trace level, this value also overrides the one defined in the uc4config.xml file. Otherwise, the default value is used.

      Environment Variables for AE Connections

      All environment variables for AE connections must use the prefix AUTOMIC followed by an underscore: AUTOMIC_.

      Environment variables for AE connections
      Key Description
      AUTOMIC_SYSTEM_NAME (Mandatory)

      Name of the Automation Engine system you want to connect to.

      When logging into AWI, in the Connection field and in its drop-down selection list, the system name is displayed in parenthesis next to the connection name.

      Example:

      • AUTOMIC_SYSTEM_NAME: AUTOMIC
      • AUTOMIC_CONNECTION_NAME: AE_TEST
      • Connection: AE_TEST (AUTOMIC)
      AUTOMIC_CONNECTION_NAME (Optional)

      Name of the connection.

      If this value is not defined, the system name is used also as the connection name.

      Example:

      • AUTOMIC_SYSTEM_NAME: AUTOMIC
      • AUTOMIC_CONNECTION_NAME:
      • Connection: AUTOMIC (AUTOMIC)
      AUTOMIC_SYSTEM_CPS (Mandatory)

      Description: Definition of the connection to the communication processes (JCPs) of the Automation Engine system

      Value: Address (IP address:Port) or (hostname:Port) of the JCPs, separated by a semicolon

      Example:

      127.0.0.1:2217;127.0.0.1:2218

      AUTOMIC_TRACE_LEVEL (Optional)

      Description: Trace level of XML operations

      Allowed values: 0 - 3

      • 0: off
      • 1: send calls
      • 2: receive calls
      • 3: all

      Environment Variables for General AWI Properties

      You can also use environment variables to define custom property settings for the communication between the Automation Engine and the Automic Web Interface. You must use the prefix AUTOMIC followed by an underscore for these variables, too.

      Key:AUTOMIC_<Property name> (all uppercase)

      Value: Property value

      Example:

      AUTOMIC_AUTOMATIONENGINEOPENCONNECTIONTIMEOUTMILLISECONDS=9999

      Also, if the property name includes a period, you must replace the period with an underscore. For example, the property name for automationEngine.index must be defined as AUTOMIC_AUTOMATIONENGINE_INDEX.

  6. Start AWI.

    1. Enter http://hostName:<port>/AWI/ in the address bar of your Internet browser:

      • hostName = The name of the computer on which the application server runs, such as "localhost".

      • <port>= The default port for the application server, which may vary depending on the setup of the application server.

    2. Log in to Client 0 with your user name and password.

      Client 0 is a system Client that is supplied by default with your installation. Here you add further Clients, create Users, assign them to their corresponding Clients, and so on. For more information, see System Client 0000 .

  7. Configure your browser.

    • Enable cookies
    • Disable pop-up blockers
    • Empty the cache after each upgrade
  8. Verify that AWI is working as expected (health check).

    Use the AWI's health check to verify that the application server has deployed AWI correctly and that it is up and running.

    1. Add the word status to the URL:

      http://hostName:<port>/AWI/status

    2. The standard HTTP 200 OK status response code is returned and a page is displayed with the word OK indicating that AWI is running. Otherwise, the corresponding standard HTTP message is displayed.

    You can use this health check endpoint in your internal URL monitoring systems to ensure that AWI is functioning properly.

    You can also use this endpoint in Shell scripts to call the status of the Automic Web Interface.

See also:

AWI is running successfully. Now you can start configuring it. The following topics guide you through the AWI configuration activities:

See Troubleshooting Problems on AWI Clients for tips about how to ensure that users see all AWI parts correctly and have no login problems.

After installing and configuring AWI you can start setting up your system or you can continue with the installation of other plug-ins and components.

For more information, see Requirements and Installation Types.

To Install and Run AWI Using WebSphere

Prerequisite: WebSphere is already installed.

The JAXB supplied by WebSphere does not provide the configuration required by AWI. To ensure that it runs properly, you must disable the JAXB and configure WebSphere as described in the following steps.

Overview:

  1. Change the classloader delegation mode.
  2. Turn off web services annotation scanning and set the correct JAXB context.
  3. Restart WebSphere.
  4. Deploy the WAR file.
  5. Configure the connection to the Automation Engine.
  6. Start AWI.
  7. Configure your browser.
  8. Verify that AWI works as expected (health check).

Follow these Instructions:

  1. Change the classloader delegation mode PARENT_FIRST (default) to PARENT_LAST. To do so you can do one of the following:

    Important: If you have other applications running on WebSphere, please make sure that you only change the classloader setting for the Automic Web Interface module.

  2. Turn off web services annotation scanning and set the correct JAXB context as follows:

    1. In the WebSphere administrative console select Servers.

    2. Expand Server Type and select WebSphere application. Select the name of your server.

    3. Expand Java and Process Management and select Process Definition.

    4. In the Additional Properties section click Java Virtual Machine.

    5. In Custom Properties do the following:

      1. Set the com.ibm.websphere.webservices.DisableIBMJAXWSEngine property to true.

        If it does not already exist, you can create it clicking New.

      2. Set the javax.xml.bind.JAXBContext property to com.sun.xml.internal.bind.v2.ContextFactory.

        If it does not already exist, you can create it clicking New.

  3. Restart WebSphere. Go to the default URL to verify that it is responsive.

  4. Deploy the WAR file. Refer to the WebSphere official documentation for more information.

    If you use WebSphere 8.5.5.x, make sure to delete the following files from the AWI folder before deploying the WAR file:

    • WEB-INF/lib/jaxb-api-2.2.11.jar

    • WEB-INF/lib/jaxb-core-2.2.11.jar

    • WEB-INF/lib/jaxb-impl-2.2.11.jar

  5. Configure the connection to the Automation Engine systems.

    You have the following options to configure the connections to Automation Engine systems:

    • Using the uc4config.xml configuration file

      After launching AWI for the first time, the uc4config.xml.sample file is created in the awi\config folder in your installation path. You can rename it (remove the additional .sample extension) or you can copy an old, already configured file to this folder.

      The uc4config.xml file lets you define connections to more than one AE system.

      If you define multiple connections, you must configure the automationEngine.index property of the configuration.properties file. In this property you define whether users will be able to select between those connections or whether they will be able to connect only to the first connection specified in uc4config.xml.

      For the changes to take effect, stop and restart the application server.

    • Using environment variables

      When you configure a connection to the Automic Web Interface using environment variables, the following applies:

      • When you log into AWI, this connection is displayed in the Connection field and in its drop-down selection list.

      • The uc4config.xml file is no longer required.

        However, you can use both environment variables and uc4config.xml. If the connection and system names used in the uc4config.xml file and in the environment variable are the same, the environment connection is used. If the names are different, both connections are listed and selectable in the Connection field.

      • You can define only one Automation Engine connection.

        If you want to define more that one, set the automationEngine.index property in the configuration.properties file to something other than -1. As a result, the AE connection defined in the environment variable is ignored and is not displayed in the Connection field.

      • If you use an environment variable to define a trace level, this value also overrides the one defined in the uc4config.xml file. Otherwise, the default value is used.

      Environment Variables for AE Connections

      All environment variables for AE connections must use the prefix AUTOMIC followed by an underscore: AUTOMIC_.

      Environment variables for AE connections
      Key Description
      AUTOMIC_SYSTEM_NAME (Mandatory)

      Name of the Automation Engine system you want to connect to.

      When logging into AWI, in the Connection field and in its drop-down selection list, the system name is displayed in parenthesis next to the connection name.

      Example:

      • AUTOMIC_SYSTEM_NAME: AUTOMIC
      • AUTOMIC_CONNECTION_NAME: AE_TEST
      • Connection: AE_TEST (AUTOMIC)
      AUTOMIC_CONNECTION_NAME (Optional)

      Name of the connection.

      If this value is not defined, the system name is used also as the connection name.

      Example:

      • AUTOMIC_SYSTEM_NAME: AUTOMIC
      • AUTOMIC_CONNECTION_NAME:
      • Connection: AUTOMIC (AUTOMIC)
      AUTOMIC_SYSTEM_CPS (Mandatory)

      Description: Definition of the connection to the communication processes (JCPs) of the Automation Engine system

      Value: Address (IP address:Port) or (hostname:Port) of the JCPs, separated by a semicolon

      Example:

      127.0.0.1:2217;127.0.0.1:2218

      AUTOMIC_TRACE_LEVEL (Optional)

      Description: Trace level of XML operations

      Allowed values: 0 - 3

      • 0: off
      • 1: send calls
      • 2: receive calls
      • 3: all

      Environment Variables for General AWI Properties

      You can also use environment variables to define custom property settings for the communication between the Automation Engine and the Automic Web Interface. You must use the prefix AUTOMIC followed by an underscore for these variables, too.

      Key:AUTOMIC_<Property name> (all uppercase)

      Value: Property value

      Example:

      AUTOMIC_AUTOMATIONENGINEOPENCONNECTIONTIMEOUTMILLISECONDS=9999

      Also, if the property name includes a period, you must replace the period with an underscore. For example, the property name for automationEngine.index must be defined as AUTOMIC_AUTOMATIONENGINE_INDEX.

  6. Start AWI.

    1. Enter http://hostName:<port>/AWI/ in the address bar of your Internet browser:

      • hostName = The name of the computer on which the application server runs, such as "localhost".

      • <port>= The default port for the application server, which may vary depending on the setup of the application server.

    2. Log in to Client 0 with your user name and password.

      Client 0 is a system Client that is supplied by default with your installation. Here you add further Clients, create Users, assign them to their corresponding Clients, and so on. For more information, see System Client 0000 .

  7. Configure your browser.

    • Enable cookies
    • Disable pop-up blockers
    • Empty the cache after each upgrade
  8. Verify that AWI is working as expected (health check).

    Use the AWI's health check to verify that the application server has deployed AWI correctly and that it is up and running.

    1. Add the word status to the URL:

      http://hostName:<port>/AWI/status

    2. The standard HTTP 200 OK status response code is returned and a page is displayed with the word OK indicating that AWI is running. Otherwise, the corresponding standard HTTP message is displayed.

    You can use this health check endpoint in your internal URL monitoring systems to ensure that AWI is functioning properly.

    You can also use this endpoint in Shell scripts to call the status of the Automic Web Interface.

See also:

AWI is running successfully. Now you can start configuring it. The following topics guide you through the AWI configuration activities:

See Troubleshooting Problems on AWI Clients for tips about how to ensure that users see all AWI parts correctly and have no login problems.

After installing and configuring AWI you can start setting up your system or you can continue with the installation of other plug-ins and components.

For more information, see Requirements and Installation Types.

To Install and Run AWI Using WebLogic

Prerequisite: WebLogic is already installed. The Automic Web Interface does not require any specific WebLogic configuration.

Overview:

  1. Deploy the WAR file.
  2. Configure the connection to the Automation Engine.
  3. Start AWI
  4. Configure your Browser.
  5. Verify that AWI works as expected (health check).

Follow these Instructions:

  1. Deploy the WAR file. Refer to the WebLogic official documentation for more information.

  2. Configure the connection to the Automation Engine systems.

    You have the following options to configure the connections to Automation Engine systems:

    • Using the uc4config.xml configuration file

      After launching AWI for the first time, the uc4config.xml.sample file is created in the awi\config folder in your installation path. You can rename it (remove the additional .sample extension) or you can copy an old, already configured file to this folder.

      The uc4config.xml file lets you define connections to more than one AE system.

      If you define multiple connections, you must configure the automationEngine.index property of the configuration.properties file. In this property you define whether users will be able to select between those connections or whether they will be able to connect only to the first connection specified in uc4config.xml.

      For the changes to take effect, stop and restart the application server.

    • Using environment variables

      When you configure a connection to the Automic Web Interface using environment variables, the following applies:

      • When you log into AWI, this connection is displayed in the Connection field and in its drop-down selection list.

      • The uc4config.xml file is no longer required.

        However, you can use both environment variables and uc4config.xml. If the connection and system names used in the uc4config.xml file and in the environment variable are the same, the environment connection is used. If the names are different, both connections are listed and selectable in the Connection field.

      • You can define only one Automation Engine connection.

        If you want to define more that one, set the automationEngine.index property in the configuration.properties file to something other than -1. As a result, the AE connection defined in the environment variable is ignored and is not displayed in the Connection field.

      • If you use an environment variable to define a trace level, this value also overrides the one defined in the uc4config.xml file. Otherwise, the default value is used.

      Environment Variables for AE Connections

      All environment variables for AE connections must use the prefix AUTOMIC followed by an underscore: AUTOMIC_.

      Environment variables for AE connections
      Key Description
      AUTOMIC_SYSTEM_NAME (Mandatory)

      Name of the Automation Engine system you want to connect to.

      When logging into AWI, in the Connection field and in its drop-down selection list, the system name is displayed in parenthesis next to the connection name.

      Example:

      • AUTOMIC_SYSTEM_NAME: AUTOMIC
      • AUTOMIC_CONNECTION_NAME: AE_TEST
      • Connection: AE_TEST (AUTOMIC)
      AUTOMIC_CONNECTION_NAME (Optional)

      Name of the connection.

      If this value is not defined, the system name is used also as the connection name.

      Example:

      • AUTOMIC_SYSTEM_NAME: AUTOMIC
      • AUTOMIC_CONNECTION_NAME:
      • Connection: AUTOMIC (AUTOMIC)
      AUTOMIC_SYSTEM_CPS (Mandatory)

      Description: Definition of the connection to the communication processes (JCPs) of the Automation Engine system

      Value: Address (IP address:Port) or (hostname:Port) of the JCPs, separated by a semicolon

      Example:

      127.0.0.1:2217;127.0.0.1:2218

      AUTOMIC_TRACE_LEVEL (Optional)

      Description: Trace level of XML operations

      Allowed values: 0 - 3

      • 0: off
      • 1: send calls
      • 2: receive calls
      • 3: all

      Environment Variables for General AWI Properties

      You can also use environment variables to define custom property settings for the communication between the Automation Engine and the Automic Web Interface. You must use the prefix AUTOMIC followed by an underscore for these variables, too.

      Key:AUTOMIC_<Property name> (all uppercase)

      Value: Property value

      Example:

      AUTOMIC_AUTOMATIONENGINEOPENCONNECTIONTIMEOUTMILLISECONDS=9999

      Also, if the property name includes a period, you must replace the period with an underscore. For example, the property name for automationEngine.index must be defined as AUTOMIC_AUTOMATIONENGINE_INDEX.

  3. Start AWI.

    1. Enter http://hostName:<port>/AWI/ in the address bar of your Internet browser:

      • hostName = The name of the computer on which the application server runs, such as "localhost".

      • <port>= The default port for the application server, which may vary depending on the setup of the application server.

    2. Log in to Client 0 with your user name and password.

      Client 0 is a system Client that is supplied by default with your installation. Here you add further Clients, create Users, assign them to their corresponding Clients, and so on. For more information, see System Client 0000 .

  4. Configure your browser.

    • Enable cookies
    • Disable pop-up blockers
    • Empty the cache after each upgrade
  5. Verify that AWI is working as expected (health check).

    Use the AWI's health check to verify that the application server has deployed AWI correctly and that it is up and running.

    1. Add the word status to the URL:

      http://hostName:<port>/AWI/status

    2. The standard HTTP 200 OK status response code is returned and a page is displayed with the word OK indicating that AWI is running. Otherwise, the corresponding standard HTTP message is displayed.

    You can use this health check endpoint in your internal URL monitoring systems to ensure that AWI is functioning properly.

    You can also use this endpoint in Shell scripts to call the status of the Automic Web Interface.

See also:

AWI is running successfully. Now you can start configuring it. The following topics guide you through the AWI configuration activities:

See Troubleshooting Problems on AWI Clients for tips about how to ensure that users see all AWI parts correctly and have no login problems.

After installing and configuring AWI you can start setting up your system or you can continue with the installation of other plug-ins and components.

For more information, see Requirements and Installation Types.

See also:

Plugins and Configuration Files Location