Troubleshooting Installation and Upgrade Errors
This topic contains a list of frequent errors, possible causes, and solutions.
This page includes the following:
-
Automic Continuous Delivery Automation cannot be started. Error message: unverifiable code failed policy check
Possible cause: Automic Continuous Delivery Automation is not running in a full trust environment.
Solution: The trust level can be verified by executing this command:
%windir%\system32\inetsrv\appcmd.exe list config | find "trust level"If the trust level is not set to
full(<trust level="Full" originUrl="" />), change it by executing the following command:%windir%\system32\inetsrv\appcmd.exe set config /commit:WEBROOT /section:trust /level:Full -
The Release Automation perspective in AWI cannot be accessed
Possible cause: This issue may have various causes:
- The CDA plug-in for AWI is not installed.
- The CDA plug-in for AWI is not properly configured.
- The user does not have the right to access CDA.
- The AE client is not configured for CDA.
-
The Release Automation perspective in AWI is empty and keeps reloading
Possible cause: .Net Framework now marks all Session and Authentication cookies that do not have a SameSite attribute present as being SameSite=Lax. With the authentication cookie SameSite attribute set to Lax, the CDA URL and AWI URL must be from the same domain.
Solution 1:
Use the Fully Qualified Host Name (FQHN) to configure the CDA URL and AWI URL in the customer.config and connection.properties files.
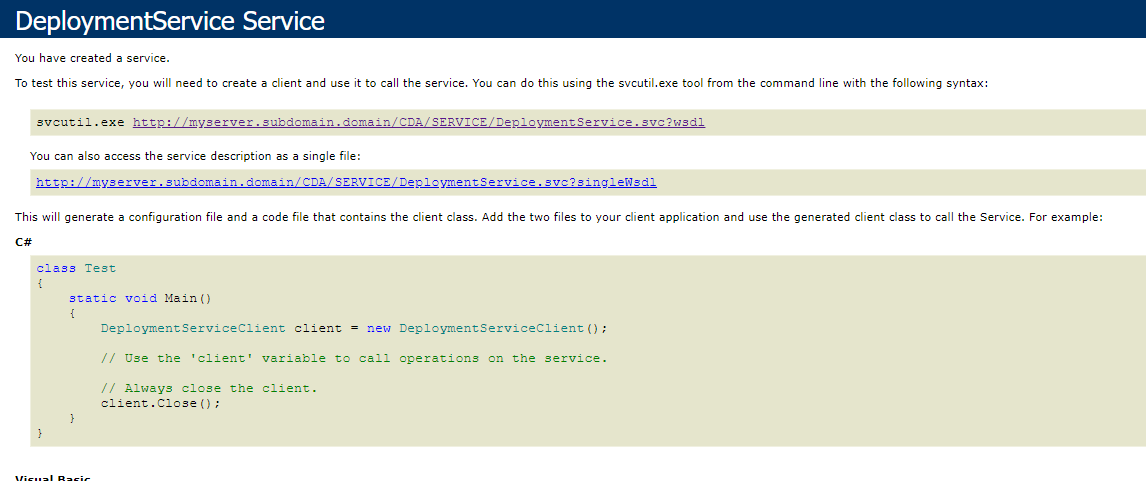
The FQHN can be found in the deploymentservice.svc page (.../service/deploymentservice.svc) of your CDA server in a browser from the client's workstation. Make sure to remove the "/service/DeploymentService.svc?wsdl" part from the URL. For example: http://myIIS/ara/service/deploymentservice.svc or http://12.34.56.78:88/CDA/service/deploymentservice.svc.
Example customer.config file:
<add key="UC4Deployment.ECCURL" value="http://myserver1.subdomain.mydomain:8080/awi/" />
Important! AWI must be called from the same domain as the one defined in the "UC4Deployment.ECCURL" key.
<add key="UC4Deployment.CallbackUrl" value="http://myserver2.subdomain.mydomain:80/CDA" />
Example connection.properties file:
url=http://myserver2.subdomain.mydomain:80/CDA
Solution 2:
If for any reason, the FQHN cannot be used or CDA and AWI are from different domains, the customer.config file needs to be modified to set the httpCookies SameSite attribute to None.
Important! New browser versions require that all cross-site cookies with SameSite=None be accessed over HTTPS connections. This enforcement comes with Chrome 80 and Firefox 69. Microsoft Edge also plans to change its default behaviors.
Authentication cookie:
<authentication mode="Forms">
      <forms loginUrl="Login.aspx" name="ckusername" protection="All" defaultUrl="Default.aspx" timeout="60" slidingExpiration="true" cookieSameSite="None">
      </forms>
</authentication>
All other cookies:
<system.web> ... <httpCookies sameSite="None" requireSSL="[true|false]" /> ... <system.web> -
The error message "Unable to determine IP address from host name" is displayed when trying to open the Release Automation tab
This issue might occur If you have installed CDA on a virtual machine and you try to access the Release Automation tab from outside the host.
Possible cause: DNS issue.
Solution: The host name must be resolved correctly. The host must be reachable from the machine where you open the browser. You can also use the IP-address instead of the host name.
-
404.3 error when accessing deploymentservice.svc
Solution: Go to the server manager, Features - Add features. Check the box for WCF Activation inside .NET Framework features.
-
Only the sidebar is visible
Solution: If no content is displayed, check if you can access the site via IP or domain name. If you can, check the HTTP binding under IIS Manager - Bindings and ensure that you do not have multiple bindings for the same port.
-
CDA entities cannot be created
Solution: Double-check whether you have set the permissions for the StateFiles and the logs folder set according to Installing the CDA Web Server
-
CDA Authentication Process is Looping (Login > Dashboard > Login ...) when Using Microsoft Internet Explorer
Solution:
CDA uses JavaScript and third party cookies.
- Ensure that all scripting is enabled in Internet Explorer: click the Tools icon (gear icon) > Internet options > Security > Internet > Custom level... > Settings > Section Scripting:
- Ensure that cookies are enabled in Internet Explorer: click the Tools icon (gear icon) > Internet options > Privacy > Settings > Accept all cookies (or white-list the CDA host name):
-
Deployment service fails with binding error
Solution: Double check whether you have an https binding established or not. Refer to Installing the CDA Web Serverfor further information.
-
Table layout issue when using Microsoft Internet Explorer Version 9 or higher
Solution: When the column width of table header and table body does not match, deactivate compatibility view for intranet sites as follows:
In Internet Explorer, click the Tools icon (gear icon) > Compatibility View Settings and clear the option Display intranet sites in Compatibility View.
-
Layout Issue: new and old CDA parts are visible in the Browser
Solution: After upgrading to a newer CDA version, clear the browser cache on each CDA client as follows before opening the upgraded AWI/CDA web-based user interface:
Microsoft Internet Explorer
- Navigate to Internet Options > General > Browsing history.
- Select Delete.
- Deactivate the Preserve Favorites website data option.
- Activate the Temporary Internet files and website files option.
- Select Delete.
Firefox
- Navigate to Options > Advanced.
- Select the Network tab.
- In the Cached Web Content section, select the Clear Now option.
Google Chrome
- Select the Menu button in the upper-right corner.
- Go to More Tools > Clear browsing data.
- From the Obliterate the following items from drop-down list, select the beginning of time.
- Select Clear browsing data.
- Activate Browsing history, Cookies and other site & plug-in data, and Cached images and files.
- Select Clear browsing data.
-
Windows Zone Identifier EXEs are not executed
Possible cause: All files downloaded from the internet are flagged and cannot be executed.
Solution: The flag must be removed from all EXEs.
- Copy the files to a FAT-Drive and go back to NTFS.
- Execute
Streams.Exe(https://technet.microsoft.com/en-us/sysinternals/streams) to know which NTFS files have associated streams. - Unpack with 7-Zip.
-
Change the policy using
gpedit.mscto enable execution (User Configuration > Administrative Templates > Windows Components > Attachment Manager > Do not preserve zone information in file attachments).
-
ONE Installer: the CDA DemoApp is not installed.
In the OneInstaller log file, entries such as "An attempt was made to load an assembly from a network location which would have caused the assembly to be sandboxed in previous versions of the .NET Framework." can be found.
Possible cause: The executable files (.EXE, .DLL, .LIB) are flagged and cannot be executed.
Solution: The flag must be removed from all EXEs.
- Copy the files to a FAT-Drive and go back to NTFS.
- Execute
Streams.Exe(https://technet.microsoft.com/en-us/sysinternals/streams) to know which NTFS files have associated streams. - Unpack with 7-Zip.
- Change the policy using
gpedit.mscto enable execution (User Configuration > Administrative Templates > Windows Components > Attachment Manager > Do not preserve zone information in file attachments). - Restart the ONE Installer
-
Windows UAC: agent does not execute all Actions
Solution: Change policy using
gpedit.mscto disable. (Computer Configuration > Windows Settings > Security Settings > Local Policies > Security Options > User Account Control: Run all administrators in Admin Approval Mode) -
SQL Server Network configuration
Possible cause: TCP/IP must be enabled
-
Internet Explorer
Possible cause: IE 9 & IE 10 support by Microsoft ends by January 2016 (for most Windows versions)
Solution:
- Upgrade to IE 11 or use Edge.
- Display all websites in Compatibility View for Intranet Sites must be disabled.
-
Insufficient user permissions in AE/CDA
Solution: Open user/group in WebUI
Automic\Release.Manager\WebUIand save again (after modification) -
Missing license to run JWP
Solution: Install license.
See: Installing the JWP
-
Missing JDBC drivers to run JWP
Solution: Copy *.jar to the AE bin folder.
See: Installing the JWP
-
Missing JDBC drivers to run Analytics back-end
Solution: Copy *.jar to the Analytics lib folder.
-
Outdated data in browser cache
Solution: Clear browser cache before accessing the updated system.
-
Entities cannot be selected
Possible cause: WebGarden
Solution: The application pool can only contain one single worker process (Web Garden is not supported). You can set the Maximum Worker Process to 1 in the Process Model pane (Actions pane > Advanced Settings > Process Model > Maximum Worker Processes).
-
Error in asynchronous call
com.uc4.bond.api.errorhandling.BondApiExceptionPossible cause: CDA is using https and the
web.config(Automic\Release.Manager\WebUI\web.config) file is configured to use http.Solution: Change the service model settings in
web.configfile. Replace the <system.serviceModel>-tag and all of its content with the following snippet:<system.serviceModel> <bindings> <basicHttpBinding> <binding name="DeploymentServiceBindingNoSec" maxReceivedMessageSize="20000000" maxBufferPoolSize="20000000" maxBufferSize="20000000" messageEncoding="Text" sendTimeout="00:05:00" receiveTimeout="00:05:00"> <security mode="None"/> <readerQuotas maxDepth="200" maxStringContentLength="20000000" maxArrayLength="16384" maxBytesPerRead="20000000" maxNameTableCharCount="16384"/> </binding> </basicHttpBinding> </bindings> <behaviors> <serviceBehaviors> <behavior name="Ventum.Bond2.Web.Service.DeploymentServiceBehavior"> <serviceMetadata httpGetEnabled="true"/> <serviceDebug includeExceptionDetailInFaults="true"/> </behavior> </serviceBehaviors> </behaviors> <services> <service behaviorConfiguration="Ventum.Bond2.Web.Service.DeploymentServiceBehavior" name="Ventum.Bond2.Web.Service.DeploymentService"> <endpoint address="" binding="basicHttpBinding" contract="Ventum.Bond2.Services.Deployments.IDeploymentService" bindingConfiguration="DeploymentServiceBindingNoSec"> <identity> <dns value="localhost"/> </identity> </endpoint> <endpoint address="mex" binding="mexHttpBinding" contract="IMetadataExchange"/> </service> </services> </system.serviceModel> -
ApplicationContentMigrator. Some Applications cannot be migrated
Possible cause: The Application Workflow name or some Component Workflow names are not compliant with the naming conventions and cannot be migrated.
It might happen that, when renaming an Application, some Workflows (RM.DEFAULT.[APPLICATIONNAME]) are not renamed correctly as a result of a timeout error.
You can find the list of non-compliant Applications and the errors that should be fixed in the report file of the ApplicationContentMigration tool.
Solution: Rename the Workflows manually before running the ApplicationContentMigration tool.
-
Artifacts cannot be created
Possible cause:
-
PCK.AUTOMIC_BOND is not the first Pack installed/upgraded.
The following issues may occur:
-
The transfer Action Packs (HTTP, FTP, and so on) do not hook the GetArtifact Action of the PCK.AUTOMIC_BOND Action Pack.
Check the following objects:
- PCK.AUTOMIC_BOND.HOOK.GET_ARTIFACT.DOWNLOAD
- PCK.AUTOMIC_BOND.HOOK.GET_ARTIFACT.DOWNLOAD_CHECKSUM

-
The EXT mapping is not added to the PCK.AUTOMIC_BOND.PUB.PROMPT_EXTERNAL_MAP vara of the PCK.AUTOMIC_BOND Action Pack.
Important! The EXT-mapping functionality is supported for the following action packs:
- PCK.AUTOMIC_TOMCAT
- PCK.AUTOMIC_JDBC
- The Artifact Source custom types are not synchronized with the Release Automation perspective.
-
- The custom type versions of the transfer Action Packs (HTTP, FTP, and so on) are not upgraded to the latest version.
Solution:
-
Run the following command in the Package Manager:
apm doctor fix
Example:
C:\Package.Manager_Package.Manager_3_1_0+build.1666\bin>apm doctor fix
Possible cause:
- The custom type versions of the transfer Action Packs (HTTP, FTP, and so on) are not upgraded to the latest version.
Solution:
-
Activate the custom type version in the Release Automation perspective.
-
-
The Context-Sensitive Online Help is not displayed or is wrongly displayed within the Automic Automation guides
Possible cause:
- The context sensitive help is using the system default values, which point to the Automic Automation guides.
Solution:
- Change the default product value in the configuration.properties file. For more information, see: configuration.properties - Configuring Your Local Setup
-
Workflows cannot be edited after upgrading CDA
Possible cause:
- The fully-qualified host name (FQHN) for the Workflow REST endpoint is not properly configured.
Solution:
-
Configure the FQHN in the ucsrv.ini file of the Automation Engine as follows:
[REST]
host=myserver.sbb01.spoc.global
-
Agents are not listed in the Assign Agents view (Release Automation perspective > Targets > Remote Staging) when loading trusted certificate in CDA
Possible cause:
The Automation Engine REST endpoint should be used with the TLS 1.2 protocol, The .NET framework, however, does not use the TLS 1.2 protocol by default.
Solution:
To solve this issue, do one of the following
-
Add the following line to the web.config file (Automic\Release.Manager\WebUI\web.config)
<add key="AppContext.SetSwitch:Switch.System.Net.DontEnableSchUseStrongCrypto" value="false" />
-
Set TLS 1.2 as default value of .NET framework by adding the following key to the registry (via regedit command)
[HKEY_LOCAL_MACHINE\SOFTWARE\Microsoft\.NETFramework\v4.0.30319]
"SchUseStrongCrypto" = dword:00000001
[HKEY_LOCAL_MACHINE\SOFTWARE\WOW6432Node\Microsoft\.NETFramework\v4.0.30319]
"SchUseStrongCrypto" = dword:00000001
Restart the computer.
Reference: https://docs.microsoft.com/en-us/mem/configmgr/core/plan-design/security/enable-tls-1-2-client
-