Creating a new Package Type and Defining Package States
Before deploying a new Application, a new Package Type and Package States must be defined in the Custom Types section.
This page includes the following:
Watch the video:
Note: See Working with Packages for more information about Packages and Stateflows.
Package Overview
Stateflow Transitions
You can manually transition the Package depending on the approach you want to take:
- If you want to free up/tear down a set of targets immediately after each successful deployment, you can further move the Package to the "Stable" state right after the Package reaches the "Live" state.
- If you want to keep the old set of targets, do not transition it to “stable” until the next release is ready.
- If you do not want to promote the new Package to “live” or if you switched the Package back to a previous state you can transition this Package to the “reject” state to free up targets for the next release.
To Create a New Package Type
- Navigate to Settings > Custom Types.
- Hover over the Package tab and click the add button displayed. The Create Custom Type dialog is shown.
- Select the Create from Existing radio button (the new type will be based on the Deployment Package Type)
- Name the new Custom Type Canary.
- Enter the version number: 1.0
- Select the Package Type.
- Select the Deployment Custom Type.
- Select the version you want to base the new Custom Type on.
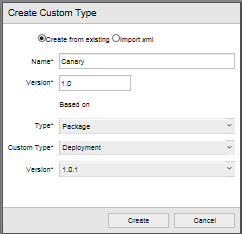
- Click Create.
To Create the Package States
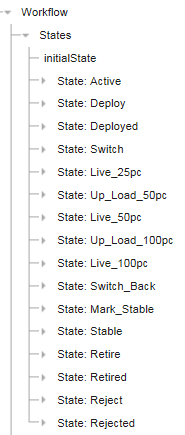
- Open the Canary Package.
- Expand the Workflow section.
- Right-click the States section and go to Add child > State
- Add the following States:
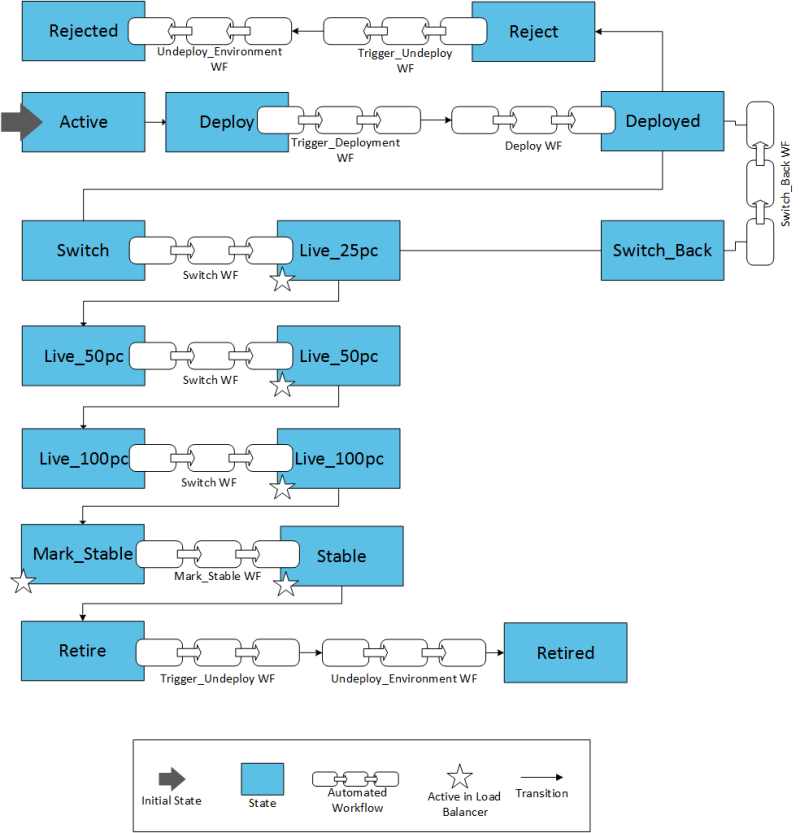
State description
- Active: initial Package state upon creation.
- Deploy: transitional state. Used to trigger the "Trigger_Deployment" & "Deploy" Workflows.
- Deployed: Package deployed into Target. Traffic has not been routed yet.
- Switch: transitional state. Used to trigger the "Switch" Workflow.
- Live_*pc: traffic is being routed to the new Target.
- Up_Load_*pc: traffic is being routed. We begin to deploy to another subset.
- Switch_Back: transitional state. Routes the traffic to a previous installation. Used to trigger the "Switch_Back" Workflow.
- Mark_Stable: transitional state. Used to trigger the "Mark_stable" Workflow.
- Stable: this is the new stable version of the Application deployed. Traffic is currently being routed to the green Targets. A new version of the Application must be installed on the blue Targets.
- Retire*: transitional state. Used to retire the current application version and free up the green Targets for a new application version. This state triggers the "Trigger_Undeploy" > "Undeploy_Environment" Workflows.
- Retired*: Package retired from production. The Target is free for a new installation.
- Reject*: transitional state. The Package is deemed unfit for production. Used to trigger the "Trigger_Undeploy" > "Undeploy_Environment" Workflows.
- Rejected*: final state for rejected Package versions. The Target is free for new installations.
-
Now define the ClosingState condition and transitions for each State:
State isClosingState Transition Transition name toState Active true Deploy Deploy Deploy Deploy false Deployed Deployed Deployed Deployed false Switch Switch Switch Reject Reject Reject Switch false Live_25pc Live_25pc Live_25pc Live_25pc false Up_Load_50pc Up_Load_50pc Up_Load_50pc Switch_Back Switch_Back Switch_Back Up_Load_50pc false Live_50pc Live_50pc Live_50pc Live_50pc false Up_Load_100pc Up_Load_100pc Up_Load_100pc Switch_Back Switch_Back Switch_Back Up_Load_100pc false Live_100pc Live_100pc Live_100pc Live_100pc false Mark_Stable Mark_Stable Mark_Stable Switch_Back Switch_Back Switch_Back Switch_Back false Deployed Deployed Deployed Mark_Stable false Stable Stable Stable Stable false Retire Retire Retire Retire false Retired Retired Retired Retired true - - - Reject false Rejected Rejected Rejected Rejected true - - - -
Finally, define the following dynamic property:
- Right-click the Properties section and select Add after > Dynamic Properties.
- Right-click the newly created Dynamic Properties section and select Add child > Property.
- Hover over the /NewProperty default value (first value displayed on the right column) and click to edit it. Enter the following values:
- Name: /general/deployment/Environment
- Protected: false
- Highlighted: false
- Type: SingleLineText
- allowCustomValues: false
Next steps: