Example: Defining Authorizations at User Level
This topic describes a very basic way to define authorizations, namely, granting or denying access rights and privileges to objects directly to Users.
In this example, an administrator creates two Users, JOHN and PETE, and assigns them rights and privileges in Client 100 (DEVELOPMENT). This is the Client in which the developers in the company design PromptSets, create Jobs, build Workflows, etc. The objects available in this Client are stored in folders.
JOHN and PETE have different responsibilities. Both can open and read the DATAWAREHOUSE and the MAINTENANCE folders, but apart from that, they will have completely different rights.
Administrators can add objects one by one to the User Authorizations list and activate the corresponding rights.
Tips:
- Read Tips and Tricks to learn about functions that can make your work more comfortable.
- Activate the SECURITY_AUDIT_FAILURE parameter in the UC_CLIENT_SETTINGS VARA object. This will allow you to see detailed information about failed access attempts of users in the Messages pane, and makes it easy to add rights that may be missing for a particular user, if required.
What Will You Learn?
- How to create User objects
- How to grant different Users different rights to the objects available in the Client
- How to deny rights to specific folders and objects
- How granting/denying rights to folders affects what users can see and do
- How to grant Users privileges to perspectives and functions
Prerequisites
- Client 100 is available and active
-
It contains the following folders:
- DATAWAREHOUSE
- MAINTENANCE
- ADMIN - neither user should have access to this folder.
-
The DATAWAREHOUSE folder contains the following Workflows:
- #1DWH.UPDATE_DATAWAREHOUSE
- #2DWH.SEND_REPORTS_TO_MANAGEMENT
-
The MAINTENANCE folder contains the following Workflows:
- JOBP.AGENT.ONBOARDING
- JOBP.REQUEST.LOGFILE.BACKUP
Overview
Create the First User Object
JOHN will receive the rights to read (R), write (W) and delete (D) objects in the DATAWAREHOUSE folder. He'll receive full rights to two specific Workflows that are stored in in the DATAWAREHOUSE folder. In the MAINTENANCE folder, he'll receive the right to read objects. He'll receive restricted rights to two specific objects within in the MAINTENANCE folder. He will not be granted any rights to the ADMIN folder.
- Log in to Client 100 using your administrator credentials.
- On the menu bar at the top of your screen select the plus (+) button that is next to the Home button.
-
A dropdown menu opens that displays all the perspectives.
- Select Administration to open the Administration perspective.
- On the Administration pane on the left hand side, click User Management to expand it.
- Click Users to display the list.
- Right-click anywhere on the list and select Add User from the context-menu or click the Add User button on the toolbar.
- On the Create User dialog enter JOHN and, optionally, the Department of the user (in our case, DEVELOPMENT) and click OK. The user is now saved to the Automation Engine database.
- The object definition pages open to the User-specific page. This is where you add the JOHN's personal data, credentials and other useful settings. Populating these fields is optional. We will leave them empty.
-
Expand the Automation Engine section on the left pane and select Authorizations.
This is where you specify the object types and objects to which JOHN will have access as well as the rights you assign him. For more information about the user authorizations, see Granting Automation Engine Authorizations.
-
Grant JOHN R, W and D rights to the DATAWAREHOUSE folder (FOLD), and full rights to two specific workflows (JOBP) that are stored in the DATAWAREHOUSE folder.
-
Now grant read rights to the MAINTENANCE folder, and to two specific objects that are located in this folder. John should be able to open and see the Folder, additionally, he should be able to see the reports and execution data of two Workflows, but he should not be able to modify them.
-
Deny JOHN access to the ADMIN folder:

Important!
- You should specifically add the objects that should not be accessible to particular users. See also: Automation Engine Folder Authorizations
- You will always see the Folder, even if you do not explicitly check the right to read it.
- Save your changes.
This means that you add the individual objects and activate the corresponding checkboxes for each:


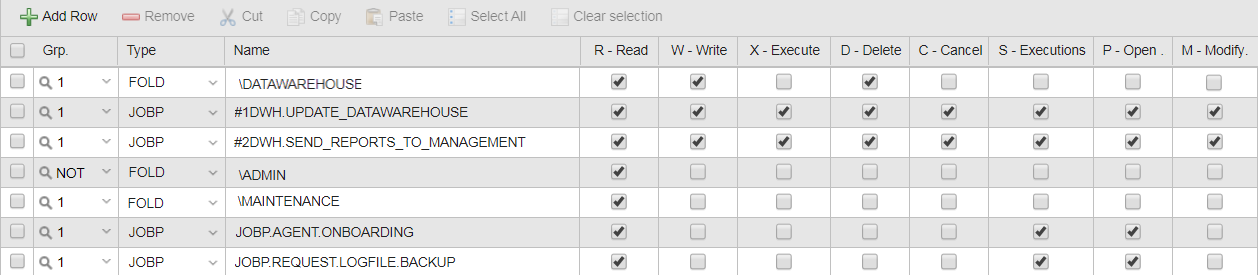
JOHN's authorizations look like this:
Create the Second User Object
PETE will receive the rights to read (R), write (W) and delete (D) objects in the MAINTENANCE folder, and full rights to the two Workflows that are stored in the MAINTENANCE folder. He will receive read rights to the DATAWAREHOUSE folder and restricted rights to two specific Workflows. He will have no rights to ADMIN.
- Grant PETE R, W and D rights to the to the MAINTENANCE folder.
- Grant Pete full rights to two specific workflows that are stored in the MAINTENANCE folder.
- Grant PETE read rights to the DATAWAREHOUSE folder.
- Grant PETE the right to open and read the two Workflows in the DATAWAREHOUSE folder, and the right to see the corresponding reports and execution data. He should not be able to modify them.
- Deny PETE access to the ADMIN folder.
- Save your changes.
PETE's Authorizations look like this:

Assign the Users Privileges
After assigning the access rights to folders and objects, you must make sure that users have the necessary rights to the perspective with which they will work and to the functions they will perform.
-
Select Privileges on the left pane. For more information about the user privileges, see Granting Automation Engine Privileges.
-
Typically, developer users could have the privileges listed below, but of course this depends on your company's policy:
Access to Explorer Folders
- Access to Recycle Bin
- Access to Version Management folder
AWI Access Control
- Access to Dashboards
- Access to Messages
- Access to My Catalog
- Access to Process Assembly
- Access to Process Monitoring
View Messages
- View all messages from accorded client
No matter in which client you create a User, it will automatically be available in Client 0 as well. Thus, Client 0 provides an overview of all the Users in your Automation Engine system. This means that you can create User either on their target Clients or on Client 0 and then move them to their Clients (see (Client 0 only) To Move Users).
See also:
See also:
- If you are new to the Automic Web Interface, take a look at the Getting Started topics to make yourself familiar with it.
- User Management: Defining and Managing the Authorization System
- Clients
- Users (USER)
- User Groups (USRG)