Migrating the AE DB to UTF-8
As of v24, Automic Automation requires you to migrate the data in your existing (source) AE DB to a new (destination) database configured for UTF-8 before you can start the regular upgrade process to v24. Different scenarios are available to help you plan your migration and upgrade process. Broadcom provides an Action Pack called UTF-8 DB Migration Action Pack on the Marketplace that you can use to perform the migration.
Important!
-
First migrate your system and then upgrade it. This is necessary because AE databases used single-byte encodings in previous versions, providing character sets similar to basic (0-127) + extended (128-255) ASCII. The basic ASCII characters have the exact binary representation in UTF-8 and can be mapped directly to UTF-8. However, the extended ASCII ones have a 2-byte representation in UTF-8, and therefore, you cannot just change the encoding of an existing AE DB to enable it for UTF-8. To learn more about UTF-8 changes in Automic Automation, see Universal Language Support (Unicode)
-
If you use Broadcom's UTF-8 DB Migration Action Pack, be aware that the source and the target databases MUST BE of the same type. For example, it is not possible to migrate a PostgreSQL database to an MS SQL one.
This page includes the following:
Migration & Upgrade Scenarios
Read through the following three scenarios to decide how to migrate your AE database to UTF-8 and upgrade to v24.
Scenario 1
Migrate your non-UTF-8 AE DB and continue to upgrade your existing AE v21 to v24.
| Step | Title | Description |
|---|---|---|
| 1 | Create a UTF-8 destination AE DB |
|
| 2 | Backup existing source AE DB |
|
| 3 | Import the AE DB Migration Action Pack |
You can import it in AE v12.3 and v21. |
| 4 | Execute the Action Pack |
|
| 5 | Shut down the AE |
You have to upgrade your AE to v24 manually, so now you shut it down. The data in the source AE DB does not change anymore. |
| 6 | Execute SQL queries in the destination AE DB |
|
| 7 | Upgrade the AE to v24 |
Now, you perform the manual upgrade to v24 using the new binaries as usual. The connection strings in all INI files have to be adapted so that they
Once all this is done, you technically have v24 AE and a UTF-8 ready destination AE DB that was not v24 upgraded yet. |
| 8 | Upgrade the UTF-8 destination AE DB to v24 | With this AE DB Load step, you upgrade the destination AE DB with UTF-8 encoded data to a v24 one regarding DB schema and initial data. Once this is done, you finally have a v24 AE and v24 AE DB ready for operation. |
Scenario 2
You already have a UTF-8 AE DB and only upgrade your existing AE v21 to v24.
If your database is already configured for UTF-8, you can immediately proceed with the manual upgrade process to v24 without migrating it.
All you need to do is adapt the encoding to UTF-8 in the connection strings in the INI files. In previous versions, it was set to a single-byte encoding such as latin1, latin9, etc., because the AE did not support UTF-8 then. If you do not know which encoding is used in your Automic Automation database, contact your AE DB admin, who will know or can check.
Scenario 3
(Oracle only) Migrate your AE DB to UTF-8 only and continue using the AE v21 because you want to upgrade later.
If you migrate your source AE DB to a UTF-8 destination AE DB, you can connect your v21 AE to this destination AE DB.
In that case, both the AE and the AE DB are still on v21 (only the data got converted to UTF-8), and you do not even need to adapt the connection string encoding as the AE v21 expects the same encoding as in the past. The data is processed/handled in AE v21 context in legacy encoding (such as latin9) but stored as UTF-8 in the AE DB.
This scenario might be interesting for users who want to validate the new UTF-8 AE DB that still works with their current v21 AE before they upgrade to v24.
Exceptions & Restrictions
The following AE DB Migration exceptions and restrictions apply if your database is already UTF-8 encoded:
-
PostgreSQL
UTF-8 has always been the recommended encoding for PostgreSQL. This means that if you have already followed this recommendation, you do not have to perform a migration. You must only adapt the DB connection string to client_endocing=UTF-8 before upgrading.
-
MS SQL
If you use an MSSQL AE DB, ensure that the source AE DB to perform the migration is on a version ≥ MSSQL Server 2017 before migrating it. The AE DB Migration Action Pack does not support MSSQL Server versions lower than 2017, you will receive an error such as STRING_AGG is not recognized. The destination AE DB must be on a version ≥ 2019 to support UTF-8. -
MS SQL
To use a UTF-8 AE database you may need to enable a Windows beta feature. For details, see the note concerning enabling this feature in Preparing the AE Database - MS SQL -
MS SQL, DB2, and Oracle
If you already configured your AE DB for the correct UTF-8 encoding in the past, you do not have to migrate it now. -
ILM activities during AE DB migration
If you use MSSQL with ILM and your system drops partitions during the AE DB migration, there might be partitions copied to the destination AE DB that wete already dropped in the source AE DB.
Size of the migrated AE DB
The following aspects are relevant:
- DB data
UTF-8 is a variable 1-4 multibyte encoding, so each and every single-byte character of the source AE DB will be converted into a variable multibyte character with 1 to 4 bytes in the destination AE DB. The majority of the converted characters will stay single-byte (basic ASCII), and some will be converted into 2-byte characters (extended ASCII such as Umlauts, ß, €, etc.). Therefore, you may expect a slight increase in size depending on the actual data to be converted. - DB field data types
As the data types of the AE DB fields have not changed, there will be no increase in this context. - DB field length
The length of some DB fields was extended, but as the data to be migrated eats up the size it needs only (but not the max field size), there will be no increase in this context.
Migration Action Pack - Process
The main part of the Action Pack is a large Workflow that provides two paths, one for a configuration with ILM data and one without ILM data. The Migration Action Pack is designed to keep the AE downtime short because the main part of the migration happens while the AE is in operation (online).
This page includes the following:
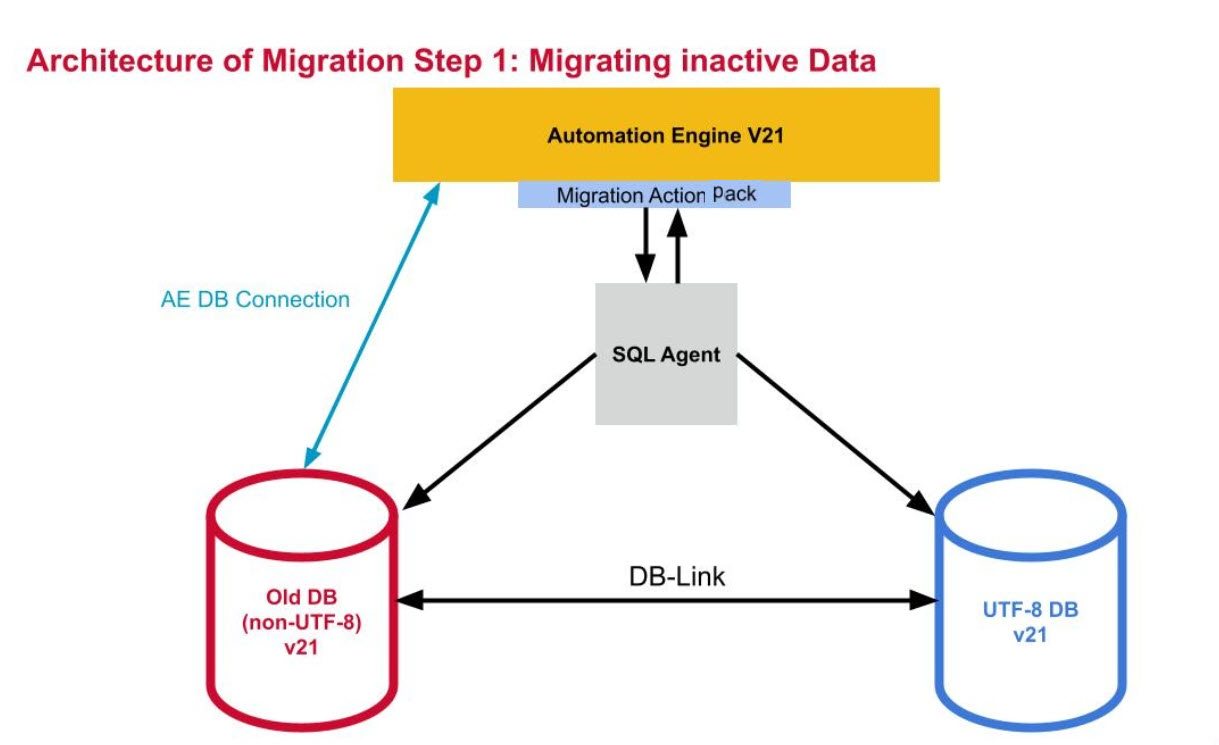
Online Part
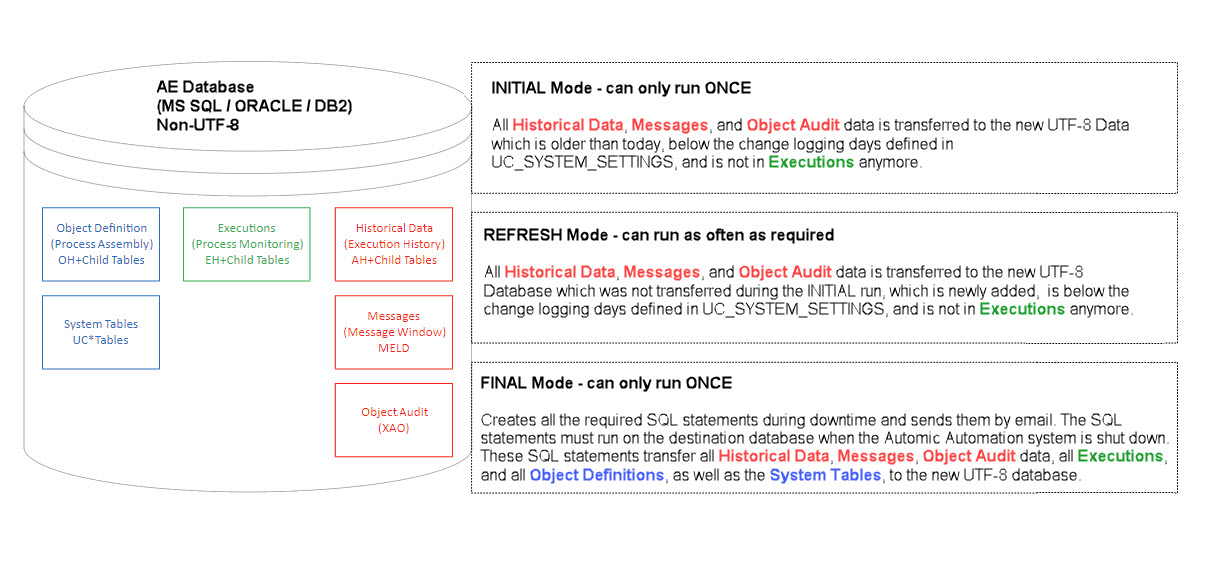
This part of the migration happens during AE operation and is parallel to your usual workload activities. It is a task focusing on the large set of historical data in the AE DB that no longer changes. Old data is copied to the new UTF-8 AE DB.
The Workflow provides three modes that copy data from the source to the destination DB:
-
Initial - copies the main part of the data.
, Messags (MELD) and Object Audit (XAO)")
-
Refresh - copies the delta data since the initial or last refresh step. It can be repeated multiple times to keep the data copied as little as possible in Final.
, Messags (MELD) and Object Audit (XAO)")
-
Final - copies the last portion of data and creates the SQL statements for the offline step.
, Messags (MELD), Object Audit (XAO), Executions (EH and Chld tables, object definitins (OH) and System tables UC)")
, Messags (MELD) and Object Audit (XAO)")
, Messags (MELD) and Object Audit (XAO)")
, Messags (MELD), Object Audit (XAO), Executions (EH and Chld tables, object definitins (OH) and System tables UC)")
See the complete data copied in the online step:
During the three modes, an SQL agent generates and executes SQL statements. The SQL statements are applied to the destination DB by selecting the data from the source and inserting it into the destination DB with the help of a DB link.
The online migration part may take some time; internal tests showed the following migration behavior:
| DB Vendor | DB Size (Source) | Migration Duration (hh:mm) | DB Size (Destination) |
|---|---|---|---|
| Oracle | 150 GB | 04:32 | |
| Oracle (without ILM) | 287 GB | 02:10 | 267 GB* |
| DB2 | 30 GB | ~06:00 | |
| MS SQL | 3 GB | ~00:45 |
The performance measures of an AE DB migration will vary significantly depending on the particular environment (AE server environment, DB server environment, source AE DB activities due to regular workload, etc.).
*) Data was compared, and no data loss was detected. The destination DB is slightly compacted/reorganized compared to the source DB.
Possible Performance Impacts
- The DB size has an impact on the end-to-end duration of the AE DB migration.
- CHANGE_LOGGING_DAYS has an impact on the different online step modes (initial, refresh, final). See also CHANGE_LOGGING Parameters.
- AE.DB Reorg has an impact on the performance of the source DB from which data is copied.
- The network speed has an impact on how fast data can be copied between the source and the destination DB.
- The remaining data to be copied in the offline step has an impact on the AE's downtime
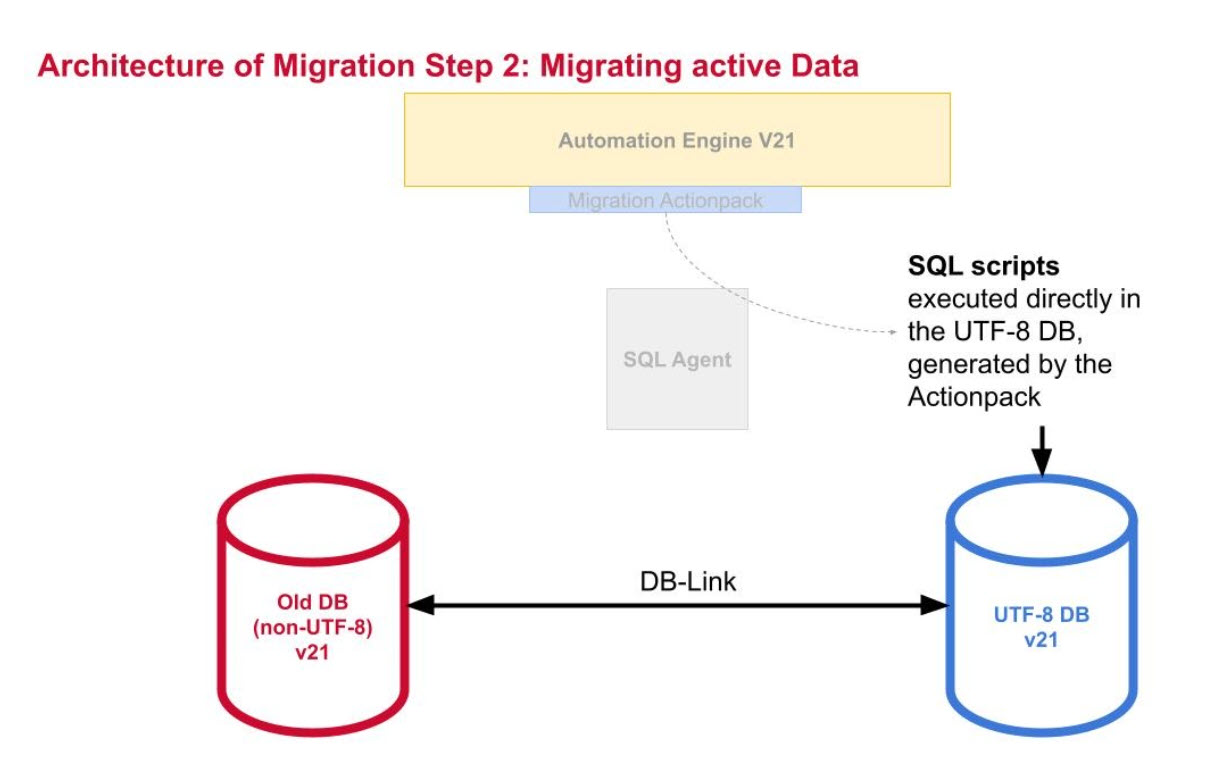
Offline Part
This migration part happens during the AE’s downtime. It focuses on recently changed data, which could not be copied in the online step. As of now, you cannot use your old database anymore.
The AE is shut down, and the AE DB data no longer changes. The SQL statements generated in the Online Step are executed on the destination DB.

The SQL statements generated after the final mode are applied to the destination DB while the AE is offline/shut down. The remaining data is copied from the source to the destination DB with the help of a DB link.
Migration Action Pack - Steps
Our Migration Action Pack allows you to migrate your MS SQL, DB2, or Oracle database to a new UTF-8 configured database.
Tips:
-
Although not mandatory, we recommend creating a backup of your existing AE DB before you start the migration process.
-
Check your CHANGE_LOGGING_DAYS settings in the UC_SYSTEM_SETTINGS variable and consider adjusting it to a lower value
-
Clean up your Process Monitoring before you start migrating your database
This page includes the following:
Prerequisites
Ensure you fulfill the following prerequisites:
-
In the UC_SYSTEM_SETTINGS of client 0, the
-
SQLVAR_INTERNAL parameter must be enabled.
-
VAR_SECURITY_LEVEL parameter must be set to 3
-
SQLVAR_MAX_ROWS must be set to a value > 1000
-
-
The DB administrator must configure an empty destination database for UTF-8 with the following character set:
-
MS SQL-Server: Latin1_General_100_CI_AS_SC_UTF8
-
DB2: UTF-8
-
Oracle: AL32UTF8
-
-
(Oracle) The DB administrator must grant the destination DB user the privilege to create DB links (GRANT CREATE PUBLIC DATABASE LINK TO <destination DB user>) before executing the Action Pack.
-
DB Service Agent must be available.
-
SQL Agent must be available.
-
Both databases (source and destination) must be accessible through the SQL Agent.
-
The two CONN objects for the source and destination DB must be set before executing the Workflow.
-
If you use an alternative database scheme for the Automation Engine to keep the Message Queue (MQ) data in a separate AE database for performance reasons, you must configure two additional CONN objects in the MSSQL MQ sub-folder. For more information, see also Integrating an Alternative MS SQL Server Schema.
Recommendations
-
Check your CHANGE_LOGGING_DAYS settings in the UC_SYSTEM_SETTINGS variable and consider adjusting it to a lower value.
-
Clean up your Process Monitoring perspective before you start.
To migrate your database to UTF-8:
-
Download the Migration Action Pack from https://marketplace.automic.com/marketplace/browse. It is called PCK.AUTOMIC_UTF-8-MIG.START.
-
Open to the Administration perspective of your Automic Automation system.
Note: Use a client other than 0 to be able to execute the Workflow included in the Action Pack.
-
Double-click Packs in the navigation pane on the left. See also About Actions, Packs and Plug-ins.
-
Click Install from File and select your downloaded package.
-
Click Install.
-
Once your package is successfully installed, right-click and select Jump to Source to open it.
-
Open the SOURCE - MOVE.UC4.DB.TO.UTF8 - SETUP.OBJECTS folder, where the Action Pack contains two CONN objects - and an MSSQL_MQ folder with two additional CONN objects to be defined if you use MSSQL with two separate AE DBs.
-
Fill in the required connection data for the source and the destination databases:
-
In the Connection sections:
-
Database Type
The type of your source/destination database. -
Server:Port
Name of the source/destination computer on which the database is available and the port number. -
Database Name
Name of the source/destination database that should be used. -
(Oracle only) Use Oracle Service
Check this box if you want to use Oracle Service.
-
-
-
Test your database connections with the provided Test button in the Connection Test section of each CONN object.
-
Execute the PCK.AUTOMIC_UTF-8-MIG.START Workflow. It guides you through a documented migration process, where you can input all the relevant parameters using a prompt with various fields.
Important!
- The Workflow automatically selects whether the migration process takes place with ILM or not. The basis of this decision is whether the AE database was loaded with partitioning (ILM). The data to be input depends on the DB vendor and whether you are using ILM or not.
- If possible, ensure that no 'drop partition' operation is executed during the database migration process with ILM.
- Executing the AE DB Migration Action Pack checks whether your source AE DB is non-UTF-8 and the destination AE DB is UTF-8 configured. If one of the two checks is positive, the migration will proceed. Otherwise, it aborts.
- You must execute the Workflow several times, running each Run Mode at least once.
-
Define the SQL Agent for the source and destination database.
-
(Oracle and DB2) Create a DB Link:
-
(Oracle) Requires a database link, a schema object in one database that enables you to access objects in another database. For details, see https://docs.oracle.com/cd/B13789_01/server.101/b10759/statements_5005.htm. For example:
CREATE DATABASE LINK uc4source CONNECT TO <SOURCE_DATABASE_USERNAME> IDENTIFIED BY '<SOURCE_DATABASE_PASSWORD>' USING '<SOURCE_DATABASE_HOST>:<SOURCE_DATABASE_PORT>/<SOURCE_DATABASE_NAME>;
Statement to get the creation of a DB-Link granted as a sysdba (if required):
sqlplus sys as sysdba
alter session set container = <pdb>
grant create database link to <dbuser>The database administrator must create the database link either manually (N), or on the fly (Y) by executing the Workflow.
-
N - No
The database administrator must manually create the database link where:
-
user = user name of the source database
-
password = password of the source database
-
hostname = host name of the source database
-
port = port of source database
-
db_name = source database name
Execute the following commands on the destination instance with a connection to the destination database:
CREATE DATABASE LINK uc4source CONNECT TO <SOURCE_DATABASE_USERNAME> IDENTIFIED BY '<SOURCE_DATABASE_PASSWORD>' USING '<SOURCE_DATABASE_HOST>:<SOURCE_DATABASE_PORT>/<SOURCE_DATABASE_NAME>;
-
-
Y - Yes
The Action Pack creates a database link. You must enter the source database password for this purpose.
Important! Ensure that you have the privilege to create DB links (GRANT CREATE PUBLIC DATABASE LINK TO <destination DB user>) before you execute the Action Pack.
-
-
(DB2) The database administrator must create the DB link manually, where:
-
db_name = source db2
-
user = source db user
-
hostname = source hostname
-
The database should be a federated one set directly on the DB instance. For details, see https://www.ibm.com/docs/en/db2/11.5?topic=systems-federated-server
The DB user with the given rights must manually create the wrapper for the database. For details, see https://www.ibm.com/docs/en/db2/11.5?topic=systems-wrappers-wrapper-modules
In the DB2 source database, the destination user needs rights:
-
Execute the following commands on the destination instance with a connection to the destination database:
DB2 => catalog tcpip node <nodename> remote <hostname> server <port>
DB2 => catalog database <db_name> as <db_name_alias> at node <nodename>
DB2 => create wrapper <wrapper_name>
DB2 => create server <db_name_alias> type db2/udb version 10.5 wrapper <wrapper_name> authorization "<user>" password "<pw>" options (dbname '<db_name_alias>')
-
Define the Run Mode of the Workflow. Each run mode uses data from the various database areas with different requirements. Therefore, you must run each mode at least once.
-
0 - Initial (default)
This online mode runs only once, while the Automation Engine runs normally in parallel with the regular workload processing.. The Workflow creates a temp table in the source database, where data is stored in the uc_migration table. It copies all historical data (statistics in AH tables), messages (MELD tables), and object audits (XAO tables) to the destination database in the background that
- do not have any activities in Process Monitoring (Executions in EH tables),
- are older than today, and
- are below the CHANGE_LOGGING_DAYS (the default is 14) defined in the UC_SYSTEM_SETTINGS variable.
Depending on your database type, the database schema and index are created.
Example:
The following query determines AH_IDNR_START. It is either the highest AH_IDNR that is older than or equal to 10000 days ago (about 27 years - rather hypothetical case) or simply the lowest AH_IDNR in the system.
select coalesce( (select max(AH_IDNR) as AH_IDNR_START from AH where ah_timestamp4 <= SYSDATE-10000),
(select min(ah_idnr) from ah)
) from dual
The query below determines AH_IDNR_END. It is the highest AH_IDNR, older than CHANGE_LOGGING_DAYS+2, and not in Process Monitoring anymore.
select max(ah_idnr) as AH_IDNR_END from ah, ovw
where ah_timestamp1 < sysdate-to_number(ovw_value1)-2 and
ovw_oh_idnr=508 and ovw_vvalue = 'CHANGE_LOGGING_DAYS' and
ah_idnr < (select min(eh_ah_idnr) from eh)
Once this mode finishes, you can start the Workflow again in Refresh mode. Use the Workflow monitor to see what is happening and check the report, which includes all steps.
-
1 - Refresh
You can run this mode as often as required while the AE is online. In this mode, the Workflow copies the delta of all new historical data (AH), messages (MELD), and object audits (XAO) to the destination database in the background that
- were not transferred during the INITIAL run,
- do not have any activities in Process Monitoring (EH) and
- are below the CHANGE_LOGGING_DAYS defined in the UC_SYSTEM_SETTINGS variable.
Start the Workflow as often as you need until you are ready to start the offline migration part (final step).
-
2 - Final
This mode runs only once while the AE is online. It creates all the required DB SQL statements that must be executed on the destination DB while the AE is offline and sends them by email. These SQL statements transfer all historical data (AH), messages (MELD), object audits (XAO), all Executions (Process Monitoring), all object definitions (Process Assembly), and the System Tables (UC_*) to the new UTF-8 database.
For details on database areas, see also Database Areas.
-
-
Enter the email address of the person or group that should receive the final instructions (DB SQL statements) after the Workflow has finished.
-
(MS SQL only) Select the correct variant.
Your source and destination databases can be used in the same or different instances. Microsoft requires a linked server to establish the contact if you use different instances.
-
0 - No (default)
The destination database is in the same instance as the source database.
-
1 - Yes
The source and destination databases are in different instances. The DBA must create a linked server called UC4_SOURCE using sp_addlinkedserver. This linked server provides access to distributed, heterogeneous queries against OLE DB data sources.
SQL Syntax
USE [master]
EXEC sp_addlinkedserver
@server = N'UC4_SOURCE',
@srvproduct = N'',
@provider = N'MSOLEDBSQL',
@datasrc = N'<DbSourceHostName>,<DbSourcePort>',
@catalog = N'<SourceDbName>'
GOExample
EXEC sp_addlinkedserver @server = N'UC4_SOURCE', @srvproduct=N'', @provider = N'MSOLEDBSQL', @datasrc = N'autmicdb.test.com,1433', @catalog = N'AEDB'
For details, see https://learn.microsoft.com/en-us/sql/relational-databases/system-stored-procedures/sp-addlinkedserver-transact-sql?view=sql-server-ver16
After defining the link, please test the connection before you try to run the migration:
select count(*) from UC4_SOURCE.ae.dbo.OH
After you have created this linked server, you can run distributed queries against this server.
-
-
(MS SQL only) Define whether you are using the Automation Engine with two separate databases:
-
0 - No (default)
There is only one database for all tables.
-
1 - Yes
An additional database is used for Message Queue (MQ) tables in the Microsoft SQL Server.
-
Submit your entries.
The Workflow runs, and depending on the defined Run Mode, you can do the following:
-
Initial: The Workflow will run long and finish with the status ENDED_OK. Start the Workflow again in Refresh mode.
-
Refresh: The Workflow will run much shorter and finish with the status ENDED_OK. Start the Workflow again in this step until you are ready to start the offline migration part, or start it again in Final mode.
-
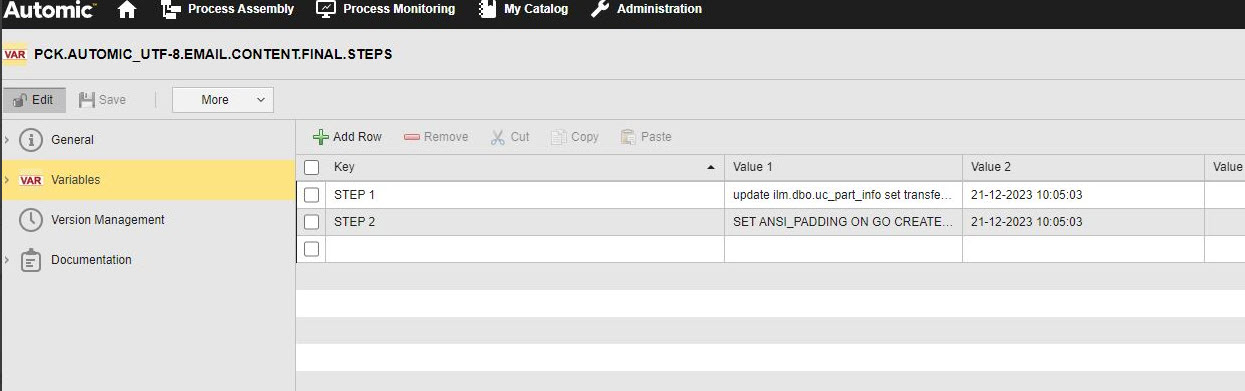
Final: The Workflow finishes and sends an email to the defined address, provided that SMTP is correctly configured and works. This email contains the DB SQL statements of this last run. The DB SQL statements are also stored in the PCK.AUTOMIC_UTF-8.EMAIL.CONTENT.FINAL.STEPS VARA object that is provided in the SOURCE - MOVE.NON-UTF8.DB.TO.UTF8 - EMAIL folder in case sending the email is not possible for any reason.
Important! If the email cannot be sent successfully in this final step, and the corresponding task fails with an error status, you can ignore this task and resume the whole Workflow.
Notes:
- If something goes wrong during the execution of the Workflow, the relevant task blocks; you can fix the error and restart the task.
- No rollback function is required because the Workflow does not change anything in the current database. The source AE DB is copied to the destination DB, and a temp table (uc_migration) that controls the data for the migration process is created. If something goes wrong, you can easily delete the destination database and the temp table and restart the migration process. If you want to perform a test run of the Action Pack, you can use a copy of your existing AE DB with actual life data.
Shut your AE and the source AE DB down.
Follow the instructions in the email that you receive and execute the SQL statements that are part of the email or in the PCK.AUTOMIC_UTF-8.EMAIL.CONTENT.FINAL.STEPS VARA object on the destination DB to complete the data copy/migration process. The Action Pack already copied the more significant part of your source AE DB to the destination DB; as part of the generated SQL queries, you now copy the remaining portion.
After executing the queries, the structure and data of the source AE DB are completely copied to the destination AE DB. The destination AE DB is a clone of the source AE DB, but UTF-8 is configured, including the data that was converted to UTF-8.
You can now decide how you want to continue:
-
Use the new UTF-8 AE DB and upgrade to v24 now
From a technical point of view, you have a v24 AE and a UTF-8 ready destination AE DB that is not yet upgraded to v24. Ensure that you update all the DB connection strings in all INI files for the correct UTF-8 encoding so that they point to the new UTF-8 configured destination AE DB and the encoding is set to the correct UTF-8 one. For details, see Upgrading an AE System from Version 21.0 to Version 24.0.
-
(Oracle only) Use the new UTF-8 AE DB in your v21 Automic Automation system and upgrade later
Doing so lets you decouple the AE DB migration for UTF-8 from the v24 upgrade for more flexibility and less time pressure.
Even if you have migrated your AE database to UTF-8, you can continue to work in your existing v21 Automic Automation system. The encoding of the DB connection string remains unchanged, as the AE components interpret the data in the v21 context in legacy encoding (such as latin9) but store it as UTF-8 in the AE DB. If Unicode/UTF-8 fully covers the character set of the legacy encoding, there are no data loss or conversion issues when you upgrade at the time that suits you best.
See also: