Setting up Single Sign-On - SAML
Single Sign-On (SSO) in Automic Automation supports the Security Assertion Markup Language 2.0 (SAML 2.0) protocol. As a system administrator, you can configure SAML to enable users to authenticate securely through your organization's identity provider.
Each department defined in tAutomic Automation can be linked to a designated SAML Identity Provider. The Automation Engine (Automic Automationy's) functions as the Service Provider during the authentication process. After a department is configured for SAML, the standard Automation Engine login type is no longer accepted. Users must log in using the SAML login type, and the Department field becomes mandatory.
For environments using Oracle databases, the JWP must correctly process XML variables. To ensure this, copy the following files to the JWP’s lib folder: orai18n.jar, xdb6.jar, xdb.jar, and xmlparserv2.jar. These files are included with the Oracle database or can be obtained from the Oracle SQL Developer site.
Configuring SAML
To configure SAML for Single Sign-On in Automic Automation, complete the following steps. Make sure you have access to both the Automation Engine configuration files and your SAML Identity Provider (IdP) settings.
-
In Client 0, enable the SAML parameter in the UC_SYSTEM_SETTINGS variable, see SAML. This step generates and populates the *CONFIG and *SP keys in the UC_SAML_SETTINGS variable.
-
The *CONFIG key contains an xml file with predefined elements that allow you to define different settings.
-
The *SP key contains the metadata that allows you to set up the Automation Engine as the SAML Service Provider with your Identity Provider application.
-
-
In the UC_SAML_SETTINGS variable, edit the XML content of the *SP key and replace the three _INSERT_ values, see UC_SAML_SETTINGS - Single Sign-On.
-
(Optional) In the XML content of the *SP key, you can configure your SAML Identity Provider to interact with the Automation Engine as a Service Provider.
The Automation Engine maps the AE Username with the value of one of the following attributes of the SAML response:
-
subject-id
Format:urn:oasis:names:tc:SAML:2.0:attrname-format:uri
When this attribute is defined, the unique ID that precedes the @ character is mapped with the AE Username.
-
NameID
Format:urn:oasis:names:tc:SAML:1.1:nameid-format:unspecified
The value that is defined here is mapped with the AE Username when no value is defined for subject-id. Which part of the value is used to map with the AE Username depends on how the value is defined:
- @ character: If the value contains this character, the part that precedes it is used for mapping
- \ character: If the value contains this character, the part that follows it is used for mapping
- If neither of the characters is used, the complete value is mapped with the AE Username.
-
aename
Format:urn:oasis:names:tc:SAML:2.0:attrname-format:uri)
Use this attribute if you cannot use neither subject-id nor NameID with your Identity Provider.
Note: If this value is defined, it is mapped with the AE username by default.
-
-
In the UC_SAML_SETTINGS variable, add a department as a key by clicking Add Key, and insert the downloaded XML content of the Identity Provider (IDPSSODescriptor) as a value. For more information, see UC_SAML_SETTINGS - Single Sign-On.
Use the department name as the name/value for the new key entry. Then paste the XML metadata from the SAML Identity Provider to the XML field of the new entry.
You can save the variable after each new key entry or after all new keys are entered.
-
(Optional) Ensure that you have a user for the department that you use as the key in step 4 where you insert the Identity Provider XML content.
Enabling Single Sign-On in your AWI Instance
After successfully configuring SAML, enable Single Sign-On (SSO) in your AWI instance as described below.
Systems Installed Manually
For systems installed manually, enable SSO by setting the following property in the configuration.properties file:
sso.saml.enabled=true
Save your changes and restart the AWI. For more information, see configuration.properties - Configuring Your Local Setup.
Automic Automation Kubernetes Edition
For container-based installations, set the following environment variable to enable SSO:
AUTOMIC_SSO_SAML_ENABLED=true
Add this variable in the values.yaml file before deployment. After the installation is provisioned, SSO must also be enabled in the awi-properties section of the ConfigMap.
For more information, see Configuring Container-Based Systems.
Notes:
-
By default, the REDIRECT method is used to bind to the Identity Provider. If you want to use POST instead, remove the REDIRECT binding from the Identity Provider metadata (key or department configuration)..
-
To maintain message integrity, it is recommended to sign both the SAML Response and the Assertion. At a minimum, the SAML Assertion must be signed.
-
When a department is configured for SAML, users can no longer change their passwords from the AWI user menu. Passwords must be managed through the Identity Provider. Updating the password in the User object has no effect while SAML is active. Password changes become effective again only if SAML is disabled for the department or globally in the UC_SYSTEM_SETTINGS variable. For details, see SAML.
-
The automatically generated x509 certificate is valid for 20 years. To renew it (including the private key), disable SAML in UC_SYSTEM_SETTINGS and delete the *SP key from the UC_SAML_SETTINGS variable. When SAML is re-enabled, a new x509 certificate and key pair are generated, replacing the previous certificate. You must then reconfigure your SAML Identity Provider for each enabled department using the new certificate. For more information, see SAML.
-
The callback URL through which AWI iis accessible must always end with a trailing slash, for example: http://localhost:8080/awi/.
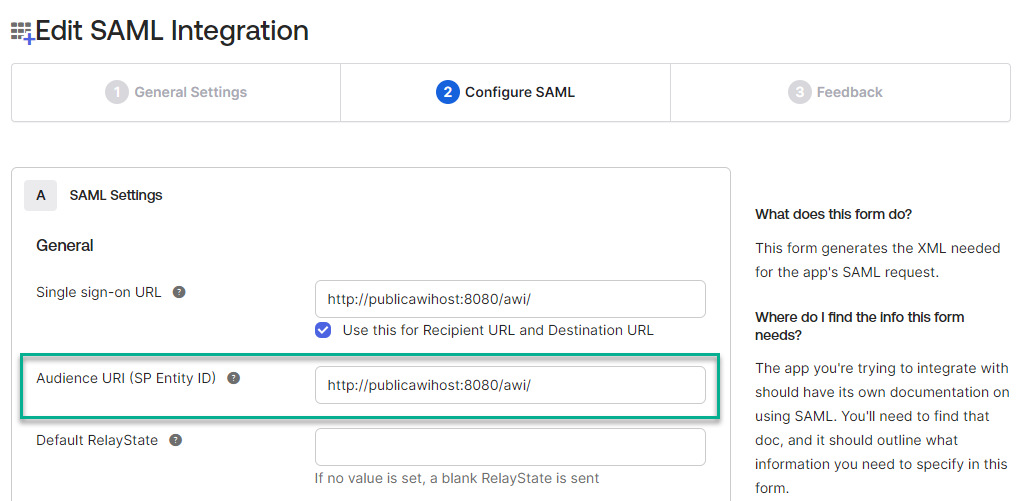
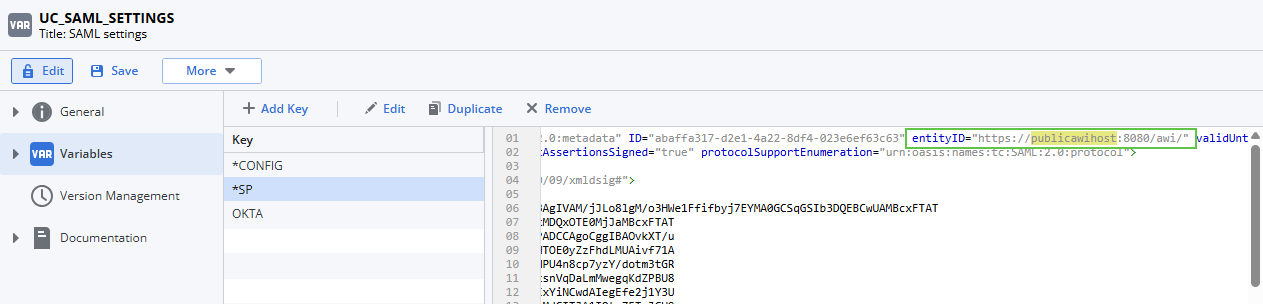
- Depending on your Identity Provider, the entity ID (referred to as Identifier in Microsoft Azure or Audience URI in Okta) must match the entityID value defined in the *SP key in the UC_SAML_SETTINGS variable.
Example
In SAML:
In Automic Automation:
- The ReplyURL must always match the AWI URL.
Enforcing Single Sign-On in your AWI Instance
After SSO with SAML has been enabled in your AWI instance, you can enforce its use to ensure that all users log in exclusively through SAML authentication.
To enforce SAML-based SSO, configure the following property in the configuration.properties file:
sso.saml.enforced=true
When this setting is enabled, access through standard login credentials is no longer possible. All users must authenticate through the configured SAML Identity Provider. This ensures a consistent and secure login experience across the environment.
If SSO is enforced while a SAML configuration issue exists (for example, if the Identity Provider is unavailable), users will be unable to access the AWI until the issue is resolved or enforcement is disabled.
To disable enforcement temporarily, set the property to false and restart the AWI:
sso.saml.enforced=false
For details about this and other security-related configuration properties, see configuration.properties - Configuring Your Local Setup.
Examples of a Valid SAML Response
<saml2p:Response Destination="http://publicawihost/awi" ID="id290636362662992466264760"
    InResponseTo="a39679651-5ffd-48ea-9a59-bf1b9ad4b7f8" IssueInstant="2019-04-10T08:59:13.357Z"
    Version="2.0" xmlns:saml2p="urn:oasis:names:tc:SAML:2.0:protocol">
    <saml2:Issuer Format="urn:oasis:names:tc:SAML:2.0:nameid-format:entity"xmlns:saml2="urn:oasis:names:tc:SAML:2.0:assertion">http://www.okta.com/exk1gximcianQOEbY0h8</saml2:Issuer>
    <ds:Signature xmlns:ds="http://www.w3.org/2000/09/xmldsig#">
        <ds:SignedInfo><ds:CanonicalizationMethod Algorithm="http://www.w3.org/2001/10/xml-exc-c14n#"/><ds:SignatureMethod Algorithm="http://www.w3.org/2001/04/xmldsig-more#rsa-sha256"/>
            <ds:Reference URI="#id290636362662992466264760">
                <ds:Transforms><ds:Transform Algorithm="http://www.w3.org/2000/09/xmldsig#enveloped-signature"/><ds:Transform Algorithm="http://www.w3.org/2001/10/xml-exc-c14n#"/></ds:Transforms><ds:DigestMethod Algorithm="http://www.w3.org/2001/04/xmlenc#sha256"/>
                <ds:DigestValue>CHD+p3Y2Fb2wMQZExoB9AB5murdi3c3ZdPOkvv65Yqs=</ds:DigestValue>
            </ds:Reference>
        </ds:SignedInfo>
        <ds:SignatureValue>...==</ds:SignatureValue>
        <ds:KeyInfo>
            <ds:X509Data>
                <ds:X509Certificate>...</ds:X509Certificate>
            </ds:X509Data>
        </ds:KeyInfo>
    </ds:Signature>
    <saml2p:Status xmlns:saml2p="urn:oasis:names:tc:SAML:2.0:protocol"><saml2p:StatusCode Value="urn:oasis:names:tc:SAML:2.0:status:Success"/></saml2p:Status>
    <saml2:Assertion ID="id29063636266376672635017193" IssueInstant="2019-04-10T08:59:13.357Z"
        Version="2.0" xmlns:saml2="urn:oasis:names:tc:SAML:2.0:assertion">
        <saml2:Issuer Format="urn:oasis:names:tc:SAML:2.0:nameid-format:entity"xmlns:saml2="urn:oasis:names:tc:SAML:2.0:assertion">http://www.okta.com/exk1gximcianQOEbY0h8</saml2:Issuer>
        <ds:Signature xmlns:ds="http://www.w3.org/2000/09/xmldsig#">
            <ds:SignedInfo><ds:CanonicalizationMethod Algorithm="http://www.w3.org/2001/10/xml-exc-c14n#"/><ds:SignatureMethod Algorithm="http://www.w3.org/2001/04/xmldsig-more#rsa-sha256"/>
                <ds:Reference URI="#id29063636266376672635017193">
                    <ds:Transforms><ds:Transform Algorithm="http://www.w3.org/2000/09/xmldsig#enveloped-signature"/><ds:Transform Algorithm="http://www.w3.org/2001/10/xml-exc-c14n#"/></ds:Transforms><ds:DigestMethod Algorithm="http://www.w3.org/2001/04/xmlenc#sha256"/>
                    <ds:DigestValue>4yc8XUmrGQuBMjupKPwBPTYgzDC/Yj84tySpSN4tQZ4=</ds:DigestValue>
                </ds:Reference>
            </ds:SignedInfo>
            <ds:SignatureValue>...==</ds:SignatureValue>
            <ds:KeyInfo>
                <ds:X509Data>
                    <ds:X509Certificate>...</ds:X509Certificate>
                </ds:X509Data>
            </ds:KeyInfo>
        </ds:Signature>
        <saml2:Subject xmlns:saml2="urn:oasis:names:tc:SAML:2.0:assertion">
            <saml2:NameID Format="urn:oasis:names:tc:SAML:1.1:nameid-format:unspecified">AE_USERNAME</saml2:NameID>
            <saml2:SubjectConfirmation Method="urn:oasis:names:tc:SAML:2.0:cm:bearer"><saml2:SubjectConfirmationData InResponseTo="a39679651-5ffd-48ea-9a59-bf1b9ad4b7f8"
                NotOnOrAfter="2019-04-10T09:04:13.357Z" Recipient="http://publicawihost/awi"/></saml2:SubjectConfirmation>
        </saml2:Subject>
        <saml2:Conditions NotBefore="2019-04-10T08:54:13.357Z" NotOnOrAfter="2019-04-10T09:04:13.357Z"xmlns:saml2="urn:oasis:names:tc:SAML:2.0:assertion">
            <saml2:AudienceRestriction>
                <saml2:Audience>http://publicawihost/SAML2</saml2:Audience>
            </saml2:AudienceRestriction>
        </saml2:Conditions>
        <saml2:AuthnStatement AuthnInstant="2019-04-10T08:59:13.357Z"
            SessionIndex="a39679651-5ffd-48ea-9a59-bf1b9ad4b7f8"xmlns:saml2="urn:oasis:names:tc:SAML:2.0:assertion">
            <saml2:AuthnContext>
                <saml2:AuthnContextClassRef>urn:oasis:names:tc:SAML:2.0:ac:classes:PasswordProtectedTransport</saml2:AuthnContextClassRef>
            </saml2:AuthnContext>
        </saml2:AuthnStatement>
    </saml2:Assertion>
</saml2p:Response>
<samlp:Response Destination="http://publicawihost/awi" ID="_6aed358d707b5a312dfb"
    InResponseTo="a4cabf300-c365-4bb9-8fb5-88786c90b778" IssueInstant="2019-04-10T09:08:49Z"
    Version="2.0" xmlns:samlp="urn:oasis:names:tc:SAML:2.0:protocol">
    <saml:Issuer xmlns:saml="urn:oasis:names:tc:SAML:2.0:assertion">urn:dev-iv83r8oz.eu.auth0.com</saml:Issuer>
    <Signature xmlns="http://www.w3.org/2000/09/xmldsig#">
        <SignedInfo><CanonicalizationMethod Algorithm="http://www.w3.org/2001/10/xml-exc-c14n#"/><SignatureMethod Algorithm="http://www.w3.org/2001/04/xmldsig-more#rsa-sha256"/>
            <Reference URI="#_6aed358d707b5a312dfb">
                <Transforms><Transform Algorithm="http://www.w3.org/2000/09/xmldsig#enveloped-signature"/><Transform Algorithm="http://www.w3.org/2001/10/xml-exc-c14n#"/></Transforms><DigestMethod Algorithm="http://www.w3.org/2000/09/xmldsig#sha1"/>
                <DigestValue>2nDFArabdm2Jfpb+08pmY95YaKE=</DigestValue>
            </Reference>
        </SignedInfo>
        <SignatureValue>...==</SignatureValue>
        <KeyInfo>
            <X509Data>
                <X509Certificate>...</X509Certificate>
            </X509Data>
        </KeyInfo>
    </Signature>
    <samlp:Status><samlp:StatusCode Value="urn:oasis:names:tc:SAML:2.0:status:Success"/></samlp:Status>
    <saml:Assertion ID="_Jr2Kdk5SGcvZ8HFbvs4mNikuLX4MqXW9" IssueInstant="2019-04-10T09:08:49.615Z"
        Version="2.0" xmlns:saml="urn:oasis:names:tc:SAML:2.0:assertion">
        <saml:Issuer>urn:dev-iv83r8oz.eu.auth0.com</saml:Issuer>
        <saml:Subject>
            <saml:NameID Format="urn:oasis:names:tc:SAML:1.1:nameid-format:unspecified">ae_username@automic.com</saml:NameID>
            <saml:SubjectConfirmation Method="urn:oasis:names:tc:SAML:2.0:cm:bearer"><saml:SubjectConfirmationData
            InResponseTo="a4cabf300-c365-4bb9-8fb5-88786c90b778"
                NotOnOrAfter="2019-04-10T10:08:49.615Z" Recipient="http://publicawihost/awi"/></saml:SubjectConfirmation>
        </saml:Subject>
        <saml:Conditions NotBefore="2019-04-10T09:08:49.615Z" NotOnOrAfter="2019-04-10T10:08:49.615Z">
            <saml:AudienceRestriction>
                <saml:Audience>http://publicawihost/SAML2</saml:Audience>
            </saml:AudienceRestriction>
        </saml:Conditions>
        <saml:AuthnStatement AuthnInstant="2019-04-10T09:08:49.615Z"
            SessionIndex="_Celn0TWdmITVRqMxGGxhZk4tjpMRe-0U">
            <saml:AuthnContext>
                <saml:AuthnContextClassRef>urn:oasis:names:tc:SAML:2.0:ac:classes:unspecified</saml:AuthnContextClassRef>
            </saml:AuthnContext>
        </saml:AuthnStatement><saml:AttributeStatement xmlns:xs="http://www.w3.org/2001/XMLSchema"xmlns:xsi="http://www.w3.org/2001/XMLSchema-instance"/></saml:Assertion>
</samlp:Response>
Examples
The following examples refer to third-party products whose installation, upgrade, or maintenance processes are not handled by Broadcom. Therefore, detailed instructions are not included in the product documentation as they may change at any time. Refer to the websites of the individual vendors for more details.
Using Auth0 as the SAML Identity Provider (IdP)
The following example shows how you can set up Auth0 as SAML IdP for SSO with Automic Automation:
- Create an Auth0 account at https://auth0.com/
- In User Management - User, create one or more AE users.
- This user name must match the user name in the AE (without the department). Alternatively, you can use the email address for mapping the AE user name. If you do so, ensure that you remove the first entry in the "Settings" area under nameIdentifierProbes (see below).
- Create a user with EMAIL address.
- In Details - Name, edit the user and change its name to the required AE name
-
In Applications - Applications, create an application and give it a name such as
AE
- Ignore the part Choose an application type and click Create
- Select Addons from the title bar, and SAML2 Web App
- Select Settings - Application Callback URL and enter the URL where your AWI is reachable (such as http://localhost:8080/awi/, with a slash (/) at the end)
- Replace the contents from the Settings field with the following and save your changes:
-
Do not close the view, select Usage from the title bar and download the Identity Provider Metadata (xml file).
- In Automic Automation, the UC_SYSTEM_SETTINGS variable of client 0, set the SAML key to Y
- In the UC_SAML_SETTINGS of client 0:
- Create a department key by clicking Add Key (e.g., AUTH0), and use the downloaded metadata xml file for the value.
- In the *SP key metadata, search for the value _INSERT_ and replace it three times with the URL where your AWI is reachable (such as http://localhost:8080/awi/). This URL must be the same as is set as the Application Callback URL in Auth0.
- Important! Auth0 supports signing either the whole response OR the assertion only, but not both. By default, the AE expects both to be signed, but at least the response. The Auth0 settings described above show that the parameter signResponse is set to true, which ensures that the response is signed. Also, adjust this setting in the *SP metadata:
<md:EntityDescriptor .....">
<md:SPSSODescriptor AuthnRequestsSigned="true" WantAssertionsSigned="false" - Enable SAML Login in the AWI. Open its configuration.properties file and add sso.saml.enabled=true
-
Log on to your Automic Automation system. As the Login Type, select SAML; as the department, use Auth0 as you have previously defined in the UC_SAML_SETTINGS variable.
- You should be redirected to the IdP, where you must authenticate once with the credentials defined in the user settings.
- (Optional) If Multifactor Authentication is enabled and the Auth0 Guardian app is installed on your mobile phone, you should have received an authentication request on your mobile. Confirm it.
- Now the IdP returns a SAML assertion. If the user name returned from auth0 matches a user in the AE with the department AUTH0, the response should be validated successfully and you are logged in.
- The following login request is automatically processed. You do not have to enter your credentials again.
{
"nameIdentifierFormat": "urn:oasis:names:tc:SAML:1.1:nameid-format:unspecified",
"nameIdentifierProbes": [
"http://schemas.xmlsoap.org/ws/2005/05/identity/claims/name",
"http://schemas.xmlsoap.org/ws/2005/05/identity/claims/emailaddress"
],
"mappings": {},
"createUpnClaim": false,
"passthroughClaimsWithNoMapping": false,
"mapUnknownClaimsAsIs": false,
"mapIdentities": false,
"signatureAlgorithm": "rsa-sha256",
"signResponse": true
}
Using Okta Apps
You want to use Okta Apps to log on to AWI directly from a related application in Okta. For this purpose, you must create an Application in Okta and select SAML xx in your new app integration and specify the app name.
Ensure that you have the information provided in the SAML Issuer ID field in the SAML Settings of all your Clients (Apps) point to the same entityID defined for the department in the UC_SAML_SETTING variable in the Automation Engine:
AE Settings:

SAML (Advanced) Settings:

For more information, see UC_SAML_SETTINGS - Single Sign-On.
Using SAML with Azure Active Directory (AD)
Ensure that you define the following in the UC_SAML_SETTINGS variable of Client 0:
-
In the metadata of the *CONFIG key, set disableRequestedAuthnContext to true.If set to true, RequestedAuthnContext of the SAML AuthnRequest is not sent to your Identity Provider
<disableRequestedAuthnContext>true</disableRequestedAuthnContext>
-
In the metadata of the *SP key, set AuthnRequestsSigned and WantAssertionsSigned to false
<md:SPSSODescriptor AuthnRequestsSigned="false" WantAssertionsSigned="false" protocolSupportEnumeration="urn:oasis:names:tc:SAML:2.0:protocol
For details, see the MS Azure console as described in: https://learn.microsoft.com/en-us/azure/active-directory/develop/active-directory-saml-claims-customization. Search for the NameID format section, change from "Windows domain qualified name" to "Unspecified".
Important! Always clear the browser history (cache/cookies).
Using SAML with Active Directory Federation Services (ADFS)
Prerequisities:
- ADFS must be configured and running.
- The AWI must use an https endpoint as this is required by the ADFS side.
- Automic Automation requires no particular configuration except for the values of the *SP key with _INSERT_ that need to be configured, as well as an import of the metadata.
To configure the ADFS side for SAML for the Automic AWI - Example
Note: The screens or settings might differ depending on the Windows versions and security policies used.
-
Add Relaying Party Trust wizard:
- Select Claims aware.
- Select the option Enter Data about the relying party manually.
- Under Display name, enter Automic Saml, for example.
- Skip the token encryption and click Next.
- Check Enable support for the saml 2.0 WebSSO protocol and enter the AWI URL in the following format:
- Under Relying party trust identifier, add the entitiyID configured in the *SP key in Automic Automation.
- Access control policy should be selected depending on your internal security level.
- Add the relying party trust.
https://servername:port/awi/
-
Edit the Claim Issuance Policy and Add a Rule:
- For the Claim Rule template, set Send LDAP Attributes as Claims
- Set the Claim rule name to Sample Rule for Automic, and Attribute Store should be set to Active Directory.
- In the mapping section, set the following:
- Ldap Attribute sam-Account-Name, and outgoing claim type to Name ID.
- Ldap Attribute sam-Account-Name, and outgoing claim type to aename.
- Save and apply your changes in ADFS.
See also: