


Specifying Job Capture Settings
To capture jobs, you must fill in the job capture settings on the Job Capture tab in the agent definition for Applications Manager or define a capture type job in Automation Engine v9/10. Select jobs to be captured.
To capture jobs, you must:
- Have one or more Banner jobs defined.
- Enter the job capture settings.
- Select the jobs to capture.
Prerequisite: Having One or More Banner Jobs Defined
Before entering general Job Capture settings, you need at least one job defined to select in the Default Capture Template field.
For Automation Engine v9/v10, you can create one or more jobs:
- Automatically following the steps in Automatically Creating Jobs.
- Manually the same way that you would for any other job. Be sure to select JOBS > BANNERAGENT > BANNERJOB as the object type to get the Banner tab.
For Applications Manager, you can:
- Import BANNER_OBJS.exp to create the BANNER_TEMPLATE job object.
- Create one or more jobs:
- Automatically following the steps in Automatically Creating Jobs.
- Manually the same way that you would for any other job. Be sure to select Banner > BannerJob as the job type to get the Banner tab.
The BANNER_OBJS.exp file comes pre-installed in the import directory when you install Applications Manager.
Entering General Job Capture Settings
Setting up capture is done one way for Applications Manager and another way for Automation Engine v9/10. In Applications Manager, you specify all capture settings on the Job Capture tab of the agent.
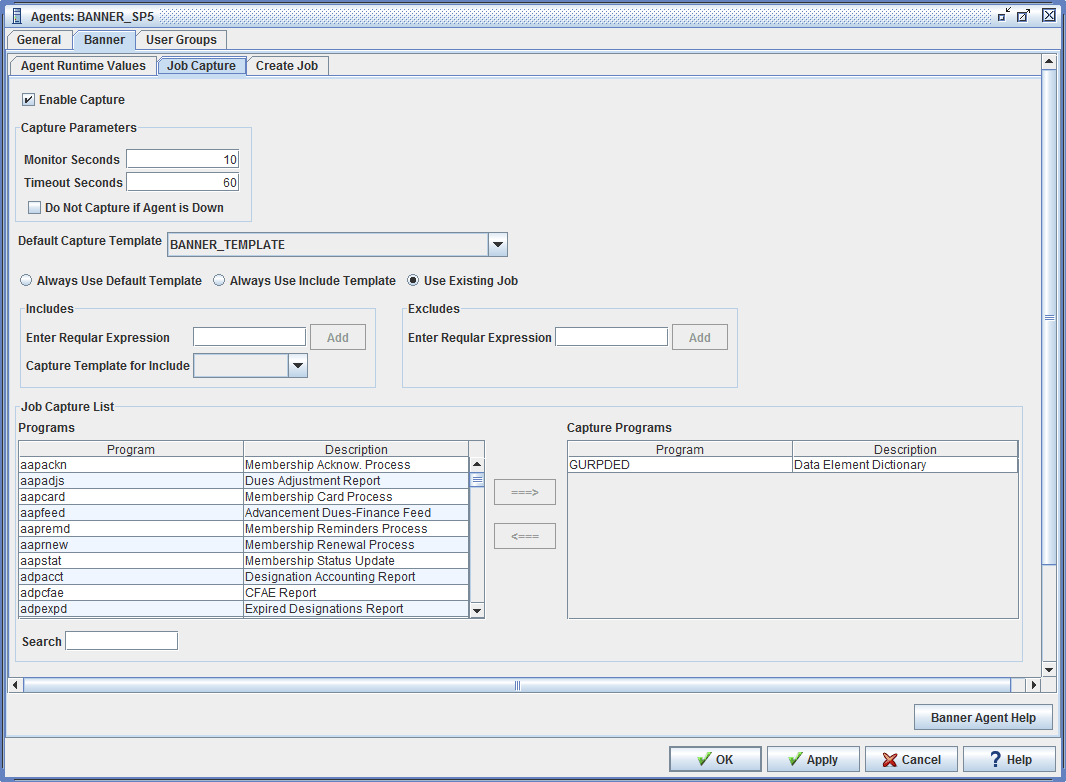
The Applications Manager Job Capture tab
In Automation Engine v9/10, you only turn on capture from the agent’s Job Capture tab logged into client 0 as shown below.
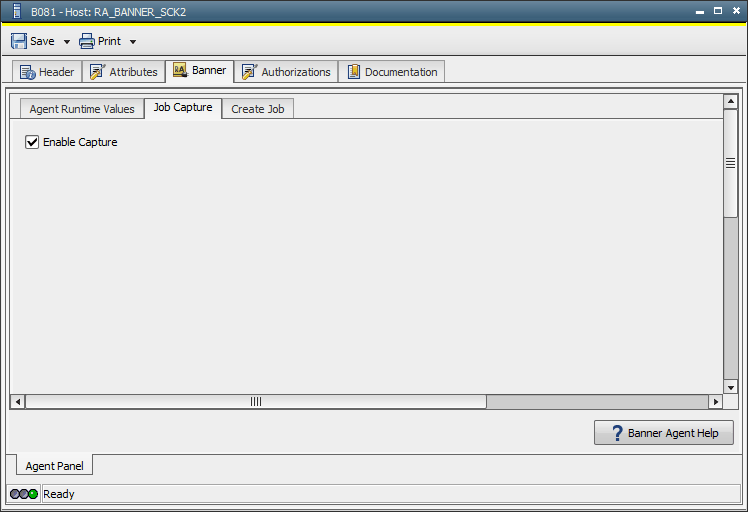
The Automation Engine v9/10 Job Capture tab
You define a Job Capture job as shown below to specify all capture settings. Starting that job initiates job capture monitoring. Canceling that job stops it. Only one of Job Capture jobs can be running at a time. The Job Capture job can only be running within one client and jobs will be captured to that client.
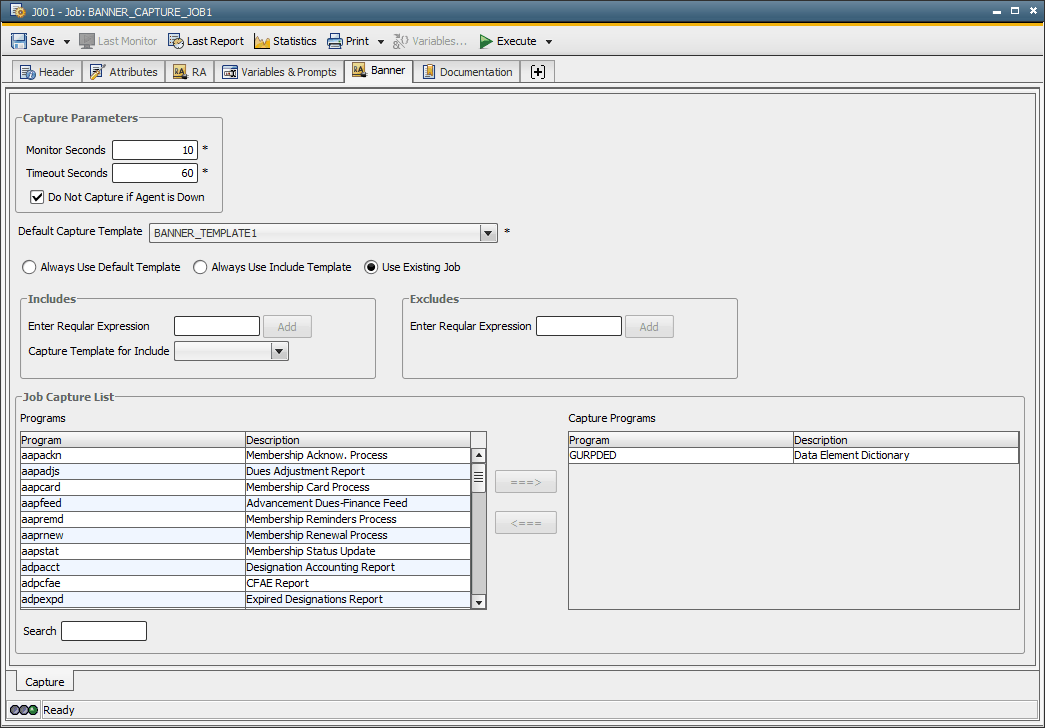
An Automation Engine v9/10 Job Capture job
Job capture settings from the Applications Manager Job Capture agent tab/Automation Engine v9/10 Job Capture job are described in the table below:
| Field | Description |
|---|---|
|
Enable Capture |
The name pretty much says it. If this box isn’t checked, you’re not capturing jobs. |
|
Seconds between each check for captured jobs. |
|
|
Timeout Seconds |
Seconds before the Banner agent will timeout if the agent has not processed the capture. |
|
Do not Capture if Agent is Down |
Allows jobs to run normally through Banner when the agent is down. |
|
Default Capture Template |
If you haven’t defined a job for a program, this template job will be used. |
|
Always Use Default Template |
When selected, the default capture template is used even when you have defined a job for a program. |
|
Always Use Include Template |
When selected, the include capture template is used when capturing included jobs. When capturing individual jobs, there is no include template, so the default template is used. |
|
Use Existing Job |
When selected, a job is used whenever you have one defined with the same name. If no job exists, the default template it used. |
Specifying Which Jobs to Capture
To specify which jobs to capture:
- Select jobs using the information in the table below:
To: Do this: Capture individual Jobs
Select the jobs from the Programs box and use the arrow button to assign them.
You can type the first few letters of a search in the Search field, and the Banner agent will filter the results. The Search field also supports UNIX regular expressions and the Oracle % wildcard for multiple characters. For more information on the Search fields, see About Rapid Automation Agents.
Create include exception rules
From the Includes box, enter a Java regular expression such as GU.* in the Enter Regular Expression field and select a template job from the Capture Template for Include field. The exception will be added to the Capture Programs box.
To delete the exception from the Capture Programs box, use the unassign arrow.
Create exclude exception rules
From the Excludes box, enter a Java regular expression in the Enter regular expression field. Click Add. The exception will be added to the Capture programs box. To delete the exception from the Capture Programs box, use the unassign arrow.
- Stop and restart processes for the agent.
Necessary Permissions for Applications Manager
If Applications Manager was not installed under the jobsub (sometimes called banjobs) account you must give read/write permissions to the Banner agent Work Directory and all sub directories to the jobsub account.
To do this you can add the Applications Manager OS account to the “banner�? group as shown below (this will need to be done by the UNIX administrator):
# usermod -G banner amuser
Then change the group of the Work Directory to the "banner" group as shown below:
# chown -R amuser:banner /u02/automic/master/banner/PPRD
Finally give group read/write permissions to the Work Directory as shown below:
# chmod -R 774 /u02/automic/master/banner/PPRD