Creating Custom In-Product Help
As an AAI administrator or supervisor, you can customize the in-product AAI Help to display your own custom help content to users in your organization. You can embed links to other resources that you want to direct your users to, including links to videos, or even completely replace the existing content with content of your own creation. You do this with Broadcom's own Integrated Content Experience (ICE) Admin tool. This topic describes your customization options and how to create and manage your own custom, in-product help for AAI.
This page includes the following:
Understanding Custom Help Content
By default, AAI provides in-product help, called AAI Help, that appears in a panel when a user clicks the question mark (?) icon in the upper right corner of a page or dialog in AAI. If you want to enhance the default help with content that is specific to your organization, you can do this by creating Custom Help that appears to your users when they call up the AAI Help instead of the default content.
Examples of custom content that you could provide include the following:
-
Custom steps with specific values that your users need to enter for various fields, instead of the default help that offers all possible options
-
A card with naming convention guidelines on pages where your users add new jobstreams, business areas, or schedulers
-
Links to company-internal web pages or to videos that contain helpful support information
-
Links to third-party tools that your company uses
You create and manage Custom Help with Broadcom's Integrated Content Experience (ICE) Admin tool. In the ICE Admin tool, you create custom content in chunks called "Cards" which you associate with the location in AAI where you want the content to appear when a user calls up AAI Help.
Using the ICE Admin tool to create cards, you can customize the in-product AAI Help, in several ways:
-
Creating Custom Cards
In-product AAI Help provides content that helps you use the page that you are currently viewing. In addition to help topics that tell you about your current page and how to use it, each help pane also provides access to content from other sources when there is relevant content available. By adding a custom card, you can share best practices or policies that are specific to your organization or call out differences in your processes from standard AAI examples.
-
Linking Custom Videos
You can create custom videos that walk users through the use of a page that conforms to your own standards and policies. You can host these videos on your local Google Drive and link to them in the custom card.
-
Completely Replacing the Content
If you have your own comprehensive set of content for using AAI, you can replace all of the content that we create with your own custom content and link it to the appropriate pages in AAI.
To create and manage your own custom content in AAI Help, involves the following steps.
-
Creating Custom Help Cards, which you can also do by Copying Custom Content from Another Configuration
Requesting Access to ICE Admin
You configure the content that displays within the AAI UI in the Integrated Content Experience (ICE) Admin tool.
To request access to the ICE Admin tool:
Before you begin, be sure you have the URL and subscription ID for each AAI subscription that you want to create Custom Help for.
-
Go to https://support.broadcom.com/ and log in. For more information about creating an account, see this Knowledge Base article.
-
Select My Cases in the navigation pane on the left.
-
Click the menu icon in the upper left of the page, next to the Broadcom logo, and select Create Case.
-
Complete the following fields:
-
Product: Select AAI as your product.
-
Subject: Enter "Request tool access for Custom Content for In-Product Help" in this field.
-
Description: In this field provide two kinds of information to describe the kind of access that you need:
-
Environments/installations:
Enter the URL and Subscription ID for each AAI subscription that you want to create Custom Help for. Each AAI subscription requires its own configuration.
If you have multiple subscriptions, please include a parenthetical description of the subscription to help distinguish them from one another.
-
Users:
The email addresses of the content creators, the people in your company who want to create custom cards
Example of Description:
Please provide access to the ICE Admin for the following:
-
To our AAI environments/instances:
-
https://AAI-Production-Install:8088/aai/web/v2/login
-
http://AAI-QA-Install:8080/aai/web/v2/login
-
http://AAI-Test-Install:8080/aai/web/v2/login
-
-
For these users
-
Person1@MyCompany.com
-
Person2@MyCompany.com
-
-
-
The ticket you create is routed to the internal approver in your organization. Once approved, the ticket is then routed to Broadcom Support.
Getting Broadcom IDs for Content Creators
To be able to access the ICE Admin tool, all content creators need to have Broadcom IDs. To get a Broadcom ID, open a support case requesting one. Make sure to include all your product subscriptions in your request so that the Integrated Content Experience (ICE) Admin will provide access to all of them for your ID.
You will receive an onboarding email that contains access credentials that let you log into the ICE Admin tool and you will be able to add and manage your custom content there.
When you log into the ICE Admin tool with your Broadcom ID, you will see a list of configurations that have been created for you based on the subscriptions that you included in your Support request.
Accessing Your Custom Content Configuration
After you submit your Broadcom Support case, you will receive an onboarding email that contains access credentials that let you log into the Integrated Content Experience (ICE) Admin tool where you can add and manage your custom content.
When you log into the ICE Admin tool, you will see a list of configurations that have been created for you based on the subscriptions that you included in your Support request.
To access a configuration:
-
Go to https://admin.ipce.broadcom.com/ after you receive an onboarding email from Broadcom.
-
Login using the credentials that you use to access Broadcom Support.
-
On the home page, under Products, select AAI to open the configurations that are assigned to you.
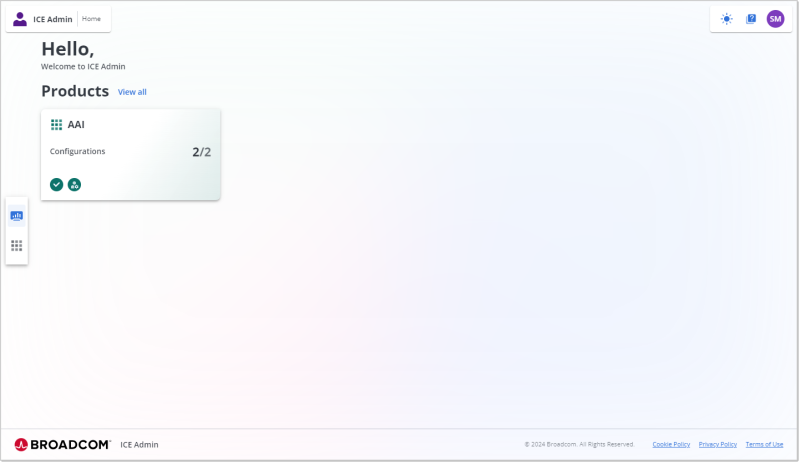
-
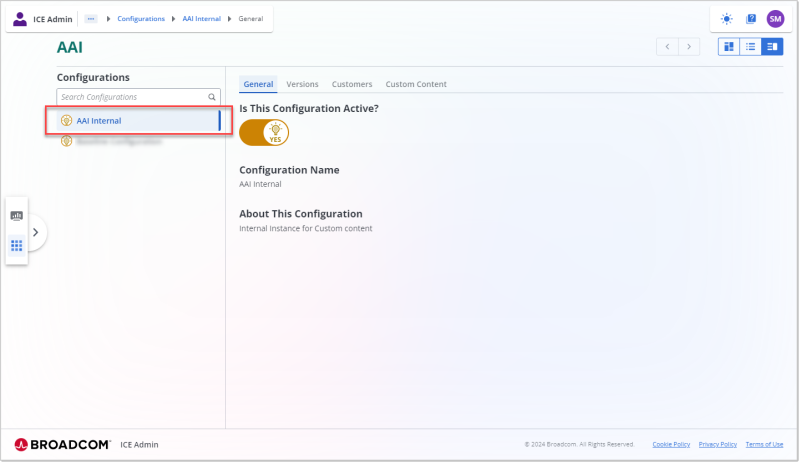
In the Configurations pane, select the configuration that you want to view.
Creating Custom Help Cards
A custom card contains custom content for your organization that can appear in the AAI Help panel for a specific page in the UI.
For example, the help for the Jobstream Runs - Grid View contains a brief description followed by cards called The Grid View Page, The List of Jobstream Runs, Creating and Using Saved Views, Filtering the Jobsteam Runs Grid View. You can add additional cards for your Custom Help content for this page. For example, here you could add a card called "Our-Company's Jobstream Naming Conventions" that contains guidance about naming new jobstreams. The title of the card and the content that displays is up to you.
To create a custom card:
-
Log into the ICE Admin tool at https://admin.ipce.broadcom.com/.
-
On the home page, under Products, select AAI to open the configurations that are assigned to you.
-
In the Configurations pane, select the configuration that you want to update.
-
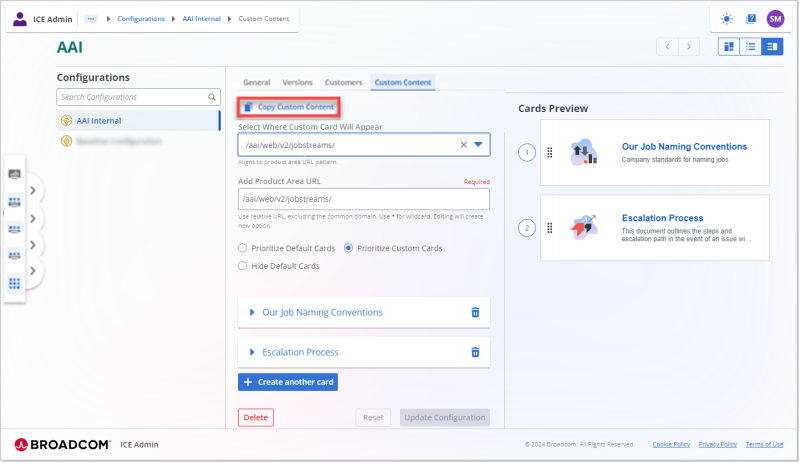
Select the Custom Content tab.
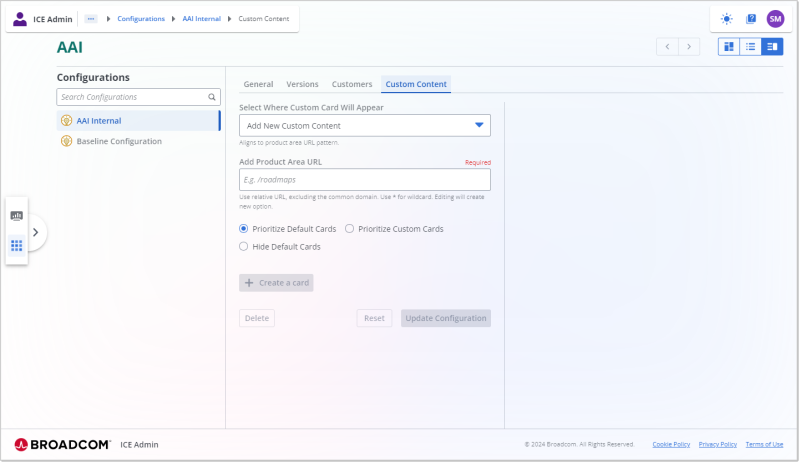
If you have defined custom content for other pages in AAI, the URLs for the defined content display in the Select Where Custom Card Will Appear field. Select any of these locations to update existing custom content.
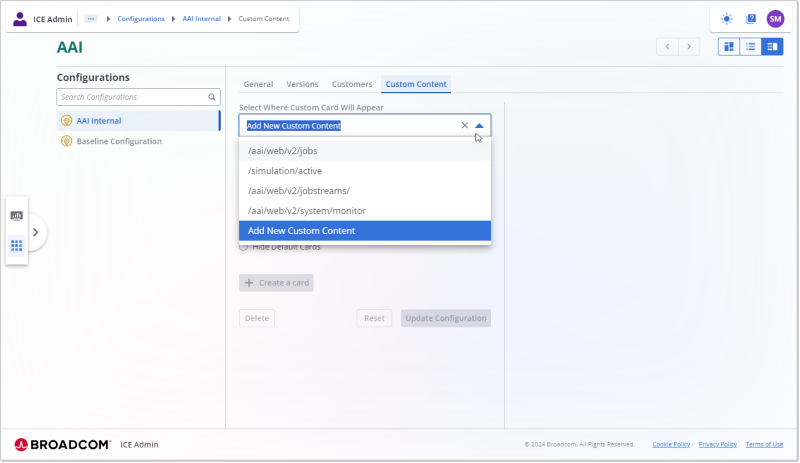
-
To create content for a new location in AAI, click the down arrow in the Select Where Custom Card Will Appear field and then select Add New Custom Content .
-
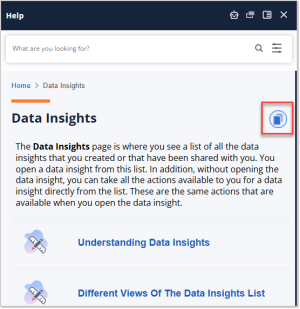
Switch to AAI and get the context URL for the page, view, tab, or dialog.
-
Go to AAI and go to the page, view, tab or dialog for which you want to create a custom card.
-
Click the question mark icon in the upper right corner of the page or the dialog to open the help pane.
-
Click the Copy button to the right of the page title to get the context URL that corresponds to the content that you see in the help.
-
-
Switch back to the ICE Admin tool, and paste the copied URL into the Add Product Area URL field.
-
Select a viewing priority of how your custom card should appear in relation to the default AAI Help cards.
-
Prioritize Custom Cards: Your cards appear above the standard cards in the AAI Help panel.
-
Hide Default Cards: Only your custom cards display. All standard AAI content is hidden.
-
Prioritize Default Cards: Your cards appear below the standard cards in the AAI Help panel.
-
-
Click the + Create a card button.
-
From the Icons list, select the icon that you want to use for your card.
-
In the Title field, enter the title that you want to display on your custom card.
-
In the Description field, enter a description for your custom card .
The description displays below the title in the custom card.
-
Define the content of the card :
-
Create a card that links to a specific URL outside of AAI:
Enter the target URL in the Link with URL field.
For example, you can use this option to link to your organization's content repository or to a YouTube video or playlist.
-
Create a card that displays content in the AAI Help panel:
Enter the desired content in the Display Information field.
You can enter this content as text, but your formatting options are limited. You can also enter this content as HTML and tag it accordingly.
-
Create a card that displays content in the Help panel and includes a link to an external source after the displayed content:
Enter the target URL in the Link with URL field.
This link appears at the bottom of your custom content.
Enter the desired content in the Display Information field as text or HTML.
Important!If you are linking to a YouTube video, you must use the embed URL rather than the watch URL. For example:
Use
https://www.youtube.com/embed/TAB_brAvKo8?si=WkxhwX-4ISFt5kOS" titleInstead of
https://www.youtube.com/watch?v=TAB_brAvKo8&list=PLynEdQRJawmzUQCBNZROx4cDIAc6ytjFO&index=1&pp=iAQB
-
-
To add an additional card to display for this page in the AAI Help panel, select Create another card.
Note:To change the order in which your cards appear in the AAI Help pane, drag and drop them in the preview pane into the sequence you want.
-
Select Update Configuration to save your changes.
Your changes will be available in the product within about seven minutes of updating the configuration.
Copying Custom Content from Another Configuration
If you have access to multiple configurations, you can copy your existing custom content from one configuration to another to save time and ensure consistency across configurations.
For example, if you have created Custom Help content for your test environment, you can copy that content to your production environment rather than re-creating that content manually.
To copy custom content:
-
Log into the ICE Admin tool at https://admin.ipce.broadcom.com/.
-
On the home page, under Products, select AAI to open the configurations that are assigned to you.
-
In the Configurations pane, select the configuration that you want to update.
-
Select the Custom Content tab.
-
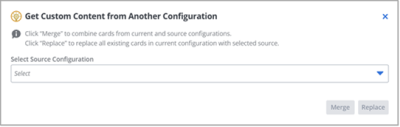
Select Copy Custom Content at the top of the page.
-
In the dialog that opens, in the Select Source Configuration field, select the configuration that you want to copy content from.
-
Select one of the following options:
-
Merge: Selecting this option copies all custom cards from the source configuration and leaves the existing cards in your current configuration in place, merging the two together. If you copy a card with the same title for the same Product Area URL, and the content for that card is different, the copied card is added to the Product Area URL rather than replacing the existing card.
-
Replace: Selecting this option removes all existing custom content in your current configuration and replaces it with the custom content from the source configuration.
A confirmation dialog appears that provides details of the merge or replace.
-
-
Review the details and select Confirm.
Deleting Custom Cards
You can delete custom cards by selecting Delete on a card.
Ensure you select Update Configuration to save your changes.
To delete a custom card:
-
Log into the ICE Admin tool at https://admin.ipce.broadcom.com/.
-
On the home page, under Products, select AAI to open the configurations that are assigned to you.
-
In the Configurations pane, select the configuration that you want to update.
-
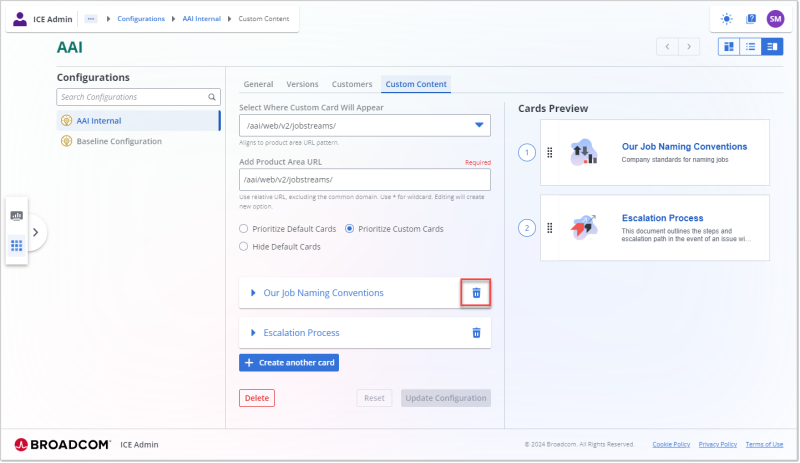
Select the Custom Content tab.
-
Select the URL for the custom content from the Select Where Custom Card Will Appear field.
-
In the tile for the card you want to remove, click the Delete trash can icon.
-
Select Update Configuration.
Your changes will be available in the product within 5 minutes of updating the configuration.
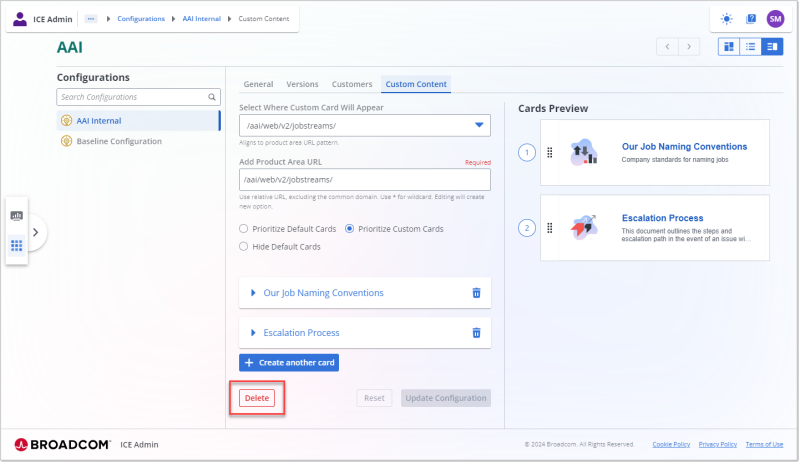
Deleting URLs in the ICE Admin Tool
If you no longer need custom content for a specific URL, you can delete the entire URL and all associated cards from your configuration.
To delete a URL:
-
Log into the ICE Admin tool at https://admin.ipce.broadcom.com/.
-
On the home page, under Products, select AAI to open the configurations that are assigned to you.
-
In the Configurations pane, select the configuration that you want to update.
-
Select the Custom Content tab.
-
Select the URLfor the custom content from the Select Where Custom Card Will Appear field.
-
Select Delete on the bottom left corner to delete the URL and all associated custom cards from this configuration.
-
Select Update Configuration.
Your changes will be available in the product within 5 minutes of updating the configuration.
See also: