Editing Jobstreams: Setting the Start Job
As a jobstream administrator, the first thing that you do when you add a jobstream is to identify its target job. Then, AAI automatically discovers the target job's upstream dependencies (its predecessors) and builds the actual jobstream back until its very first job(s). A jobstream can have many upstream branches that converge at some point; this means that it can have many starting points. The default jobstream starting points are the first jobs in each branch. AAI shows all these dependency chains by default. However, there are situations in which you may not want AAI to monitor all the earliest predecessors of the target job.
Example:
You monitor a batch process that starts every evening at 9 pm. This process has a condition on a predecessor that runs every morning at 6 am. This predecessor is of no relevance for the batch process, so you do not want to include it in the monitor. You can use the Start Job feature to set a hard start on the jobstream run. In our example, you would set the first job in the batch process as the jobstream start job, rather than the job at 6 am.
When you set start jobs you do not modify the jobstream in any way. This function only changes the portion of the jobstream that AAI visualizes in the various monitoring views; it does not affect the SLA, AAI calculations, predictions and so on. By setting start jobs you ensure that the monitoring charts are not clogged by unnecessary, long-running dependencies. However, the entire jobstream (also the jobs that run BEFORE the start jobs that you have set) are visible on the runtime view (the Gantt chart).
The most likely candidates to become start jobs are those that have a time condition, that is, those that are scheduled to run at a specific as opposed to those that run based on the success of a predecessor.
You can specify as many start jobs for a jobstream as you need.
- You can set start jobs for jobstreams from all schedulers except from CA7.
-
The Start Job feature is not available by default. An administrator with the necessary rights must enable it explicitly in the configuration tool by setting the
client.enableJobstreamStartJobsparameter to true. For more information, see Configuration Tool - Params Tab.
You set a start jobs on the Start Jobs tab on the Edit Jobstream dialog.
This page includes the following:
Setting the Start Job
To Set Start Job
-
In the Start Jobs tab click Add Jobs. The list view changes to let you select the new start jobs.
-
Use the Find Jobs dropdown list to filter the list of candidate jobs by their start times and names. Define the filter and click Find to get the resulting list of jobs. It provides the following information:
-
Name
Name of the job as defined in its scheduler.
-
Parentage
Fully qualified path from the root object all the way down to a particular job. It lets you uniquely identify the job. This information is extremely important for schedulers that allow jobs to run more than once in multiple contexts (from different places and in multiple jobstreams). The parentage identifies the exact instance of the job. IWS, ESP, Tidal and Automic Automation allow jobs to run multiple times in different contexts. AutoSys does not allow this, therefore, in AutoSys parent and parentage are always the same.
-
Type
Type of job, which is scheduler-specific.
-
Date Time Condition
Date and time when the job is set to start running.
-
-
To define one or more jobs as jobstream start jobs, select the corresponding checkboxes and click Add. You return to the initial list view, where the selected jobs are now visible.
Add as many jobs as you need. You can remove them with the Remove Job button if needed.
-
When you are done with the jobstream configuration, click Create.
Start jobs will be rebuilt after saving.
Setting the Start Job in the Thick Client
You define the jobstream start jobs on the New Jobstream dialog, in the Start Jobs tab:
.png)
-
Click the Add Jobs button to display the Start Jobs dialog.
.png)
-
Select one of the following:
-
where job has a start time
Displays the jobs that have a Start Time property that is not null.
-
by job name
Lets you search for jobs by names that match the criteria of starts with, ends with, contains and matches.
The jobs that match the selected criteria populate the table.
-
-
Select one or more jobs and click OK.
The selected jobs become the only ones that can start a jobstream run.
Defining Start Jobs from the Gantt View (Thick Client)
You can also select jobs directly from the Gantt view.
-
Select one or more jobs by pressing CTRL+ click or Shift+ click.
If you select more than one job, a reduced set of items is displayed in the pop-up menu, for example:
-
Add Start Job
-
Remove Start Job
Note:The Start Jobs feature is available for jobstreams on all schedulers other than Legacy CA7 and IWSd.
-
-
Select Add Trim Points from the pop-up menu. The Trim Points dialog is displayed:
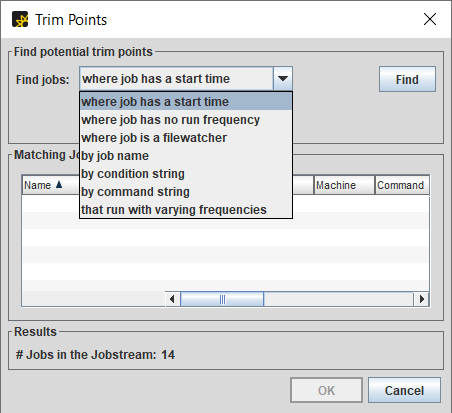
-
Select whether to exclude predecessors to the selected jobs, or to exclude the selected jobs and predecessors.
-
Save your changes. Jobs that are trimmed are rebuilt after saving.
See also: