The Job Status Data Insight
The Job Status data insight is a tool to monitor the current job execution status of all jobs in the AAI. It gives you a snapshot of overall status by showing you the total number of jobs in every possible execution status.
This topic describes the Job Status data insight, what it contains, and what filter and view options it offers.
For general information about how to work with an individual data insight, see Viewing and Using a Data Insight. For information about creating and maintaining data insights, see Adding, Editing, Copying, and Deleting Data Insights.
This page includes the following:
Purpose
The Job Status data insight offers workload administrators a quick overview of the current execution status of any or all the jobs available in the AAI server. You define the jobs that are included in this data insight using advanced filters based on any job properties.
The Job Status data insight is a good addition to your dashboard, especially if you define several with different sort criteria, such as different schedulers, and you place them on the same dashboard tab page. You can see at a glance when there is trouble with a certain scheduler.
Sample
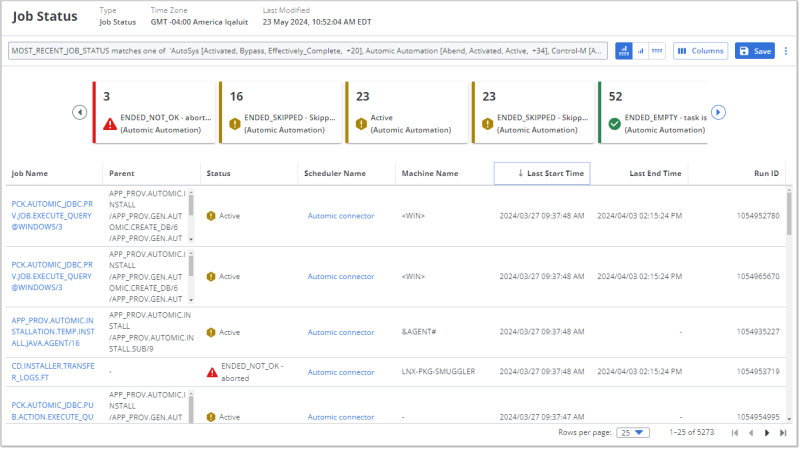
The following is an example of a Job Status data insight. The toolbar has a detailed description of the filters that are applied. The graphic is a series of tiles with the number of jobs in each detailed status. For statuses that are scheduler-specific, the scheduler type is included in parentheses below the status.
The general category of execution status is indicated by an icon and by the color of the icon as well as the left border of each tile.
-
Red and a warning triangle icon: Job runs that have failed to complete or predicted not to complete for some reason.
-
Brown and a hexagon icon: Job runs that have a status that means they ended but with neither a sucess status nor a failed status.
-
Green and a checkmark icon: Job runs that have successfully completed or are predicted to complete successfully.
-
Black and a circle with a bar icon: Job runs with a status that cannot be interpreted by AAI.
Use the arrows to the left and right of the row of tiles to scroll to more tiles.
The tiles are organized from left to right so you see the problems number up front without scrolling.
Column and Filter Options
The Job Status data insight offers advanced filtering options based on all possible job properties as well as advanced column options.
It is helpful to know that you can define filter options for properties that you never include in the columns. For example, you can filter on a specific scheduler and not define it among your columns. The jobs that are selected will all be from the same scheduler, so there's no need to add a column for it. However, it is good idea to give the data insight a meaningful name, such as Job Status on Scheduler A, and to consider adding a more detailed description on the Basic Information tab of the data insight definition.
Defining Columns for a Job Status Data Insight
The Job Status data insight gives you a lot of freedom to choose any job property to want to include as a data column in your data insight. You can also choose which columns are required, as well as an initial sort order. You do this in the data insight definition. Later, when you or other users view the data insight, you can configure the available columns as you want by rearranging them, changing the width, hiding optional columns, and changing the sort order.
To define columns for a Job Status data insight, use the following steps:
-
Open the Columns tab on the data insight in one of the following ways:
-
If you creating a new data insight, click the Columns tab and continue
-
If you want to change the filters on Job Status data insight, select Edit from the actions menu, the vertical ellipses button on either the Data Insights list or at the far right of the toolbar of the open data insight. Then click the Columns tab.
The tab is made up of two equal halves: On the left are all the possible job attributes and on the right under Selected Job Attributes, is a list of required data columns for all Job Status data insights. They are selected and grayed out. The following are the job attributes for the columns that are requires on all Job Status data insights:
-
Job Name
-
Parent
-
Status
-
Scheduler Name
-
Machine Name
-
Last Start Time
-
Last End Time
-
-
To add more columns, do the following
-
Under Available Job Attributes, choose the tab with the list of attributes By Category or the one By Name.
-
For each attribute, navigate to the attribute or use the Search field to locate it.
-
When you find it, click the checkbox to mark it.
-
Click the right arrow in the middle of the tab to move your selection to the list of Selected Job Attributes.
-
To remove an attribute from the list, select in from the list of Selected Job Attributes, and click the left arrow.
-
Continue until you have added all the attributes you want to be seen on the table.
-
-
Optionally, define the default sort order.
-
Under Selected Job Attributes , mouseover the attribute you want as your primary sort.
-
When up and down arrows appear to the right, click up for ascending sort, and down for descending.
-
Do the same for the secondary sort column, and so on. The numbers 1, 2 ,3, and so on, appear with each column you select to sort to show you the order of the sort hierarchy.
-
-
When you are finished building your filter criteria, define or edit the Filters tab, and then click Save.
Defining Filters for a Job Status Data Insight
You can define filters for the Job Status data insight only on the Filters tab of the data insight definition. Filtering is based on any combination of any job properties.
To filter a Job Status data insight, use the following steps:
-
Open the Filters tab on the data insight in one of the following ways:
-
If you creating a new data insight, click the Filters tab and continue
-
If you want to change the filters on Job Status data insight, select Edit from the actions menu, the vertical ellipses button on either the Data Insights list or at the far right of the toolbar of the open data insight. Then click the Filters tab.
-
-
Add a search criterion .
-
Select an Attribute and a Criteria value and then enter the Value to describe a selection rule for your filter.
For example, to include all jobs of the "command" type, your filter would be as follows:
-
Attribute: Job Type
-
Criteria: Matches
-
Value: command
The search is not case sensitive, so it does not matter whether you enter upper- or lower-case or a combination. AAI will ignore the cases when filtering.
-
-
Optionally, add other values for the same attribute.
-
Click the plus (+) at the far right of the current line.
-
Select a Criteria value and then enter a new Value.
-
Continue to add more values in the same way.
These values have an OR relationship. Any of them can be true for the job to be included. For example, you might continue the previous example to say that you want to include any job of the "command" or of the "CMD" type, knowing that your different schedulers use different names for jobs that have the same function, your second value would be as follow:
-
OR
-
Criteria: Contains
-
Value: CMD
-
-
Optionally, add values for another attribute that you want to be considered in the filter.
-
Click + Add Criteria
-
Select another Attribute and a Criteria value and then enter the Value to describe the next selection rule.
-
Again, if you want to another value for the attribute, click the plus (+) at the far right of the line, and define the additional value to be included.
-
-
When you are finished building your filter criteria, define or edit the Columns tab, and then click Save.