
|
Explorer |

Explorer |
Context Menu of the Explorer |

|
 Explorer
[General Information] [Folder] [Objects]
The Explorer is the central window of the UserInterface. You can use it to edit, display, administer and execute objects. Its structure and handling is basically identical to Windows Explorer.
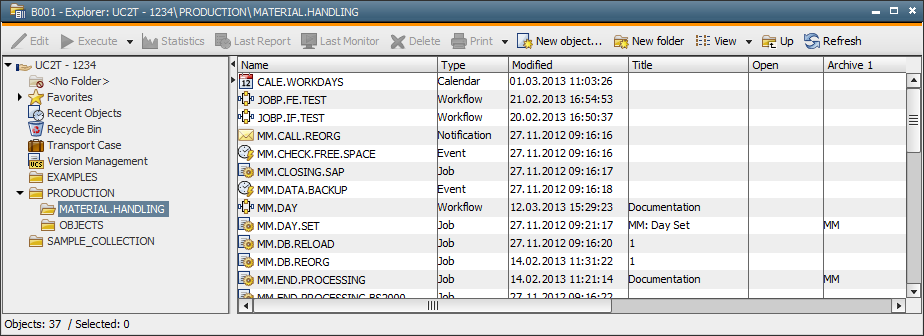
The Explorer window is divided into two parts. The left half shows the folders of a client. A newly created client initially only includes the<No Folder> folder. It includes objects that have been restored after they have been deleted, for example. You can specify the folders of a client that can be used in the authorization system. By doing so, you can limit the access of users to folders and subfolders.
The right half of the Explorer includes the objects of the folder that is currently open. The objects can be displayed with large icons, as a list or with details. Use the popup-menu command View in the UserInterface (right-click without highlighting an object) for this purpose. You can also sort objects by name, object type, title, and creation or modification date. Do so by clicking on the particular column title.
The status bar in the bottom window edge displays the number of objects in a particular folder and the number of objects that are currently selected.
Within a UserInterface, you can use several Explorers and access objects that are sorted, selected or displayed according to different criteria. Open a new Explorer by clicking the corresponding toolbar button. You can also use the Explorer... command in the File menu. Use the Window menu in the UserInterface in order to switch between Explorer windows.
[General Information] [Folder] [Objects]
In your own client, you can create any number of folders and structure them by using subfolders. You can organize them as you like. Note that you can also assign different access rights to different users. The only limitations is that the names of folders of the same hierarchy must be unique. Folders of the same names must only be used as subfolders of different folders.
| Action | Description |
|---|---|
 New object ... New object ... New folder New folder |
You can create a folder by using the New object or New folder command in the File menu of the UserInterfaces or the popup-menu command New... (right click). You can also use the toolbar buttons. The characters A-Z, 0-9, $, @, _, -, . can be used for names (max. 180 digits). You can also specify a folder title. |
 Delete Delete |
You can only delete a folder if it does not include subfolders. Otherwise, you must delete the subfolders first. Highlight the folder that should be deleted and use the Delete command in the File menu of the UserInterface or the context menu, or the button in the toolbar. Objects that are stored in the folder are not deleted but moved to <No Folder>. If there are links to one of these objects, the oldest link is deleted and the object is copied to this link. |
 Duplicate Duplicate |
Use duplicate in order to create a new folder. The objects that it includes are not duplicated. The new folder includes links to these objects instead (see below). |
[General Information] [Folder] [Objects]
Objects are the exactly defined tasks that can be edited, displayed, administered and executed in the Explorer. You can also access their statistics and reports.
| Action | Description |
|---|---|
|
New object |
You can create an object by clicking the Note that the suggested default object name can also include a counter. The administrator can specify the corresponding settings in the variable UC_OBJECT_COUNTER. |
|
Duplicate Duplicate to... |
Creates an identical copy of one or several objects in the current folder. The name that is suggested is the original object name plus the appendix .NEW.1, .NEW.2 etc. depending on the number of highlighted objects. You can use the Duplicate to command in order to select a target folder for the duplicated objects. Within an AE system, you can also use the drag & drop function to copy objects from one client to another. Keep the following information in mind:
|
| Link to... |
Stores a file link in the selected target folder. Press the shift key before you move an object or a link, and a link is also created in the target folder. A small arrow in the icon identifies links. Specific menu commands are available:
The home folder is the folder in which an object is created or duplicated, or to which it is imported. Links have always the same name as the object to which they refer. If you rename the object, all links are also renamed. If you want to delete a link, you require write access to the folder in which this link is stored. |
| Move to... | Moves the highlighted objects to the selected target folder. You can also use the drag and drop function in order to move objects between folders. If you want to move a particular object, highlight it in the right Explorer section and drag it, by holding the mouse button pressed, to the folder in the left Explorer section. |
|
Delete |
Deletes an object from all folders. To delete an object, highlight it and use the |
| Rename |
Opens a field in which you can change the object's name and title. Do so by highlighting the object and press the F2 key or select Rename in the File menu of the UserInterface or the context menu. A name field opens in which you can edit the object's name. The following characters are allowed: A-Z, 0-9, $, @, _, -, . (not more than 200 characters). If the object that should be renamed is used in other objects such as a Workflow or Schedule object, a security query displays in order to verify whether the object should also be renamed in these objects. A dialogue opens if you confirm this query (Yes). Select all the applications from the list in which the names should be replaced. If you decide that objects that are used in other objects should not be renamed, you can cancel the "Replace use" dialog. In this case, only the object itself is renamed. If a workflow uses the same task several times, all these tasks are replaced. Entries can only be replaced in Include objects and Process tabs if the administrator has activated the SEARCH_SCRIPT_FOR_USAGE key in the variable UC_CLIENT_SETTINGS. Otherwise, a warning is displayed. You cannot replace users in UserGroup objects. This is a security measure that serves to prevent from a regular user being assigned to a group that has administrator rights. However, you can replace users in other objects such as notifications. |
 Print Print |
Highlight the object that should be printed and use the symbol in the toolbar. To select another printer than your default printer, click the symbol. A print preview opens. Click the symbol again and select the printer of your choice. symbol. A print preview opens. Click the symbol again and select the printer of your choice. |
The availability of the individual Explorer functions that are described above depends on authorizations.
Different users of a client can use completely different folder structures. This includes that commands that are activated through the UserInterface's menu or the Explorer's context menu depend on the objects that are currently highlighted.
See also: