General Page
The General page is common to all object types. However, depending on the object you are defining, some sections might not be available.
This topic provides information on the following:
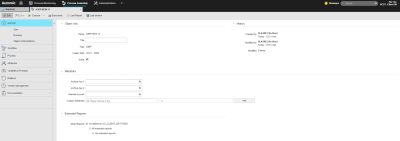
The following illustration shows a standard General page:
To Specify General Settings of an Object
-
The only settings you can change in the Object Info section are:
- Title: this is optional. We recommend to enter a short descriptive title that helps you recognize the object at a glance; it will be displayed in other areas of the system.
- Active: this checkbox is available for executable objects only. Select it if you want this object to be processed, otherwise its status is ENDED_INACTIVE_OBJECT (return code: 1925).
If you need to modify other settings, do the following:
- Open the Explorer list in the Process Assembly perspective.
- Select the corresponding object and right-click to select Rename.
-
In the Rename Object dialog you can edit both the name and the title of the object.
Object names can consist of up to 200 characters and can include the following characters:
A–Z, 0–9 and $ @ _- . #
The only exception is the name of time zones (TZ), which may consist of up to 8 characters only.
Optionally, enter a short and descriptive Title. It will be displayed in other areas of the system.
-
The History section is not editable either. It provides audit information on the object, such as the user/department who created and modified it and the number of modifications. In the case of executable objects, it also indicates when the object was last executed (Last used by) and the number of executions.
More detailed information on the object revisions are available in the Version Management Page.
-
Some fields in the Metadata section might not be available, depending on the type of object you are defining.
Field Description Archive Key 1/2 Archive keys are freely definable keywords you assign to the object. Later on you can perform searches or you can filter objects using them.
They are displayed in separate columns in the Explorer (Process Assembly perspective), in the Tasks (Process Monitoring perspective) and in the Executions lists.
You can type them here, in which case they will be available for this object only, or you can use variables you have previously defined for this purpose.
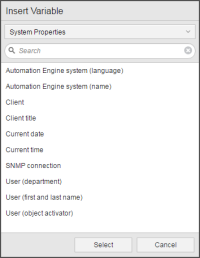
Click the icon at the right corner of the Archive Key1/Archive Key2 fields to open the Insert Variable dialog.
- Open the list at the top of the dialog to select the type of variable you want to insert here. The options are System Properties, Object Properties, Automation Variables or Variable Objects. Alternatively you can type the name of the variable in the search field.
- Select the required variable from the hit list and click Select.
Alternatively, archive keys can be set or read with the following script elements: PUT_ATT and GET_ATT. For example:
:PUT_ATT ARCHIVE_KEY1 = "MM"
:SET &second_archive_key# = GET_ATT(ARCHIVE_KEY2)
Internal Account Available for executable objects only. It is a free text, an internal value specific to your company, for example cost center, department identifier, etc.
Custom Attributes Freely definable attributes available for executable objects only.
In the Process Monitoring perspective you can then restrict the list of objects displayed in the Tasks pane by selecting one of these criteria from the Group by list.
- Select a criterion from the first drop-down list.
- Define the value you want to assign to the criterion in the second drop-down list. You can either type a new value or select an existing one from the list. The available values originate from a VARA reference object.
In case of dynamic VARA objects, opening the drop-down list may take a while. - Click Add to add the grouping criterion to the object. You must have selected values in both fields.
Click x if you want to remove it.
Within the frame of the SLM functionality, they depict the beneficiaries of a Service Level Agreement. They are used to assign the service to dedicated organizational units. See Service Level Objective - Service Selection Page.
-
The Automation Engine has a comprehensive auditing functionality that includes the possibility to produce extended reports for executable objects in addition to the standard ones. When configuring your system, the administrator can write specifications in the UC_CLIENT_SETTINGS variable that determine whether or not they should be created. If so, this variable also determines which reports should be created. This applies client-wide.
In the Extended Reports section you decide whether these settings should be applied to this object or if you want to overrule them:
Field Description As defined in UC_CLIENT_SETTINGS The extended reports are created as defined in this variable.
All extended reports This option overrules the client-wide definition. For this object, all extended reports are generated, no matter what has been specified in the UC_CLIENT_SETTINGS variable. No extended reports This option overrules the client-wide definition. For this object, no extended reports are generated, no matter what has been specified in the UC_CLIENT_SETTINGS variable.
-
If you are defining an executable object, continue specifying its general settings here:
- Fine-tune access rights at object level on the Authorization Page.
-
Build the scripts on the Process pages.
Job objects (JOBS) have three pages on which you enter the script to be processed. If you enter scripts on all of them, they are processed in the following order:
- Pre-Process
- Process
- Post-Process
- Child Post-Process (SAP and PeopleSoft only)
In case of PeopleSoft or SAP jobs, an additional Forms page is available that allow you to easily build system-specific scripts.
- Specify the object Attributes on the Attributes Pages of Executable Objects.
- In case of Job objects, register the output files that will be produced when processing them on the Output Page.
- To be able to carry out searches in those output files and, if required, perform follow-up actions, specify these settings on the Output-Scan Page.
- If you are defining an executable object, you may want to use variables or prompts. You do so on the Variables & Prompts Pages.
- In case of objects that can be part of a workflow, you may want to define the settings to backup and restore a task. This is useful to recover the last successful status in case of failed processes. YOu do this on the Rollback Page.
- The Version Management Page is always available. It lists all the versions of an object and allows you to restore it to an older version in case of a misconfiguration.
- Enter information on the object you are defining on the Documentation Page.


