User overview in User Management tab page
The Users page in the Administration perspective contains an overview table of the users that you can work with. From the Users view you can also add new users. This topic describes everything you can see and do on this view.
To get there...
What you see in the Users overview
On the Users page of User Management, you see a list of users that are defined for the system that you logged into, regardless of their folder location. For each user you see; the User Name, Last Name, First Name and primary Email address.
The user definitions that you see are the ones that are stored in the Automation Engine as USER objects for the client that you logged into.
User overview in User Management tab page
What you can do in the Users view
Primarily, in the Users view you can see and maintain user definitions. You can also filter to see only the subset of users that interest you, and refresh the list to see all changes anyone else has made to user definitions while you have been logged on. You take actions on the user definitions with the buttons and controls on the toolbar and in the context menu.
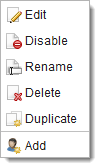
Context menu buttons
Select a user by right-clicking anywhere in its row, and a context menu (as described below) appears with buttons for actions that you can take on the user definition.
| Context Menu Button |
|
|---|---|
|
|
To edit the user. To disable the user. For a disabled user, the option is here is "Enable." To rename the user. To delete the user. To duplicate the selected user definition to use as a basis for a new user. To add a new user. |
* When you disable a user, the user definition stays but the user status is changed to "inactive." The user cannot log in to the system. You can also disable a user by removing the active status in the user definition when you define or edit the user. When you enable a user; the user status is set to "active."
|
Automic Documentation - Tutorials - Automic Blog - Resources - Training & Services - Automic YouTube Channel - Download Center - Support |
Copyright © 2017 Automic Software GmbH |
 at the far right of the column headers.