 Agents (HOST)
Agents are programs that run on the target system, which can be either an Operating System or an application such as SAP, PeopleSoft, Siebel, etc. On the one hand, Agents establish the connection between the Automation Engine and those target systems; on the other, they start the execution of tasks and make both their monitoring and the corresponding reporting possible. Agents have no Graphical User Interface; they create log files that record what occurs.
Object Definition
Object class: System object
Object type/Short form: HOST
This topic provides information on the following:
- Overview
- Adding Agents
- Editing the Agent Definition
- Login and Connection
- Job Execution
- Job Reports
- File Transfer Objects
- Monitoring and Reporting
- Prerequisites for Working with Agents
- Working with the Agents List
- Using Filters
The graphic below illustrates how Agents integrate in an Automation Engine system:
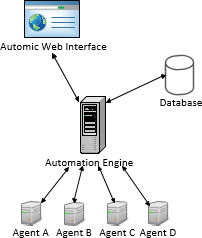
Automic provides multiple types of Agents. They are installed in the target system (either an OS or an application), that is, Agents are specific to the application or OS they connect to. Therefore, their installation must take into consideration the requirements derived from the target system. For details please refer to the Agent-specific instructions provided in the Installation Guide at Installing the Agents.
Agents are configured via their INI files.
As soon as an Agent has been succesfully installed, it is available in the Administration Perspective in client 0 and you can begin your work with it (assigning it clients, defining rights, starting/stopping it, etc.).
This means that it is not necessary to explicitly create an Agent via the UI, as it is done automatically upon installation. However, if needed you can do so in the Process Assembly perspective in client 0. Once created, you can see them, open their reports and execution data and define their logging and trace options in the Administration perspective of any client, provided you have the necessary rights.
Rapid Automation Agents are an exception. They are not created automatically upon installation, you must create them manually after you have loaded the Rapid Automation solution in the database via the Utility DB Load.
For Rapid Automation agent documentation, see the Automic Hosted Documentation.
Once an Agent has been added to your Automation Engine system, you can edit its settings as follows:
- Go to the Administration Perspective and open the list of Agents.
- Right-click the Agent and select Open or Open in New Window.
-
The Agent definition pages are displayed:
Click below for details on how to edit the data on the available standard pages:
-
Edit the Agent-specific definitions:
- Specify the agent Attributes:
- Select the License Category, for example Production or Test.
-
Enter the Trusted IPs. If your system runs with encryption, you can specify IP addresses from which the agent accepts non-encrypted connections.
The addresses must be separated by semicolons. Communication to components such as the Job Messenger, Event Monitors (BS2000, z/OS) or the Output Collector (NSK) takes place without encryption.
By default, the agent accepts non-encrypted messages from the local host (127.0.0.1 on IPv4 and ::1 on IPv6) and its own IP address. If Event Monitors on z/OS are used in LPARs on different computers, you must specify the relevant IP addresses here.
Releasing individual IP addresses is only reasonable if login attempts of former agent versions should be rejected.
-
Specify the Service Manager settings.
They are required for the connection between the agent and the Service Manager, an external monitoring tool that allows you to sart/stop the Automation Engine.
The Service Manager comes with a proprietary user interface; however, if you want to use the AWI instead, you can do so provided you enter the necessary information. This way, Agents can start directly via the User Interface or via the MODIFY_SYSTEM script element.
All values will automatically be replaced if the connection to the corresponding Service Manager service was successful. To refresh the connection you simply right-click the agent and select Update Service Manager Link from the context menu. The default port number 8871 is used, unless a different specification is provided in the SMGR_PORT_RANGE key in the UC_SYSTEM_SETTINGS variable ( UC_SYSTEM_SETTINGS - System-Wide Settings).
- Enter the Phrase, which is the name of the Service Manager environment.
- Enter the Name of the service in the Service Manager.
- Enter the Port number of the Service Manager.
-
Activate Link Agent to Service Manager, otherwise you can no longer start the agent either via the Administration Perspective or using the MODIFY_SYSTEM script element.
This specification is automatically set if the Service Manager scan for the agent was successful.
An Agent logs in only once and, once connected, it remains always connected. The following duplicate login validation takes place:
Upon installation, the Agent starts and tries to log in. If there is no Agent connection with the same name, the Automation Engine accepts the login attempt and stores the agent name, port number, start time etc. It deletes this information when the particular Agent connection ends. This ensures a clear overview of Agent connections.
If, on the other hand, the Automation Engine detects that an Agent with the same name has already logged in, it tries to establish contact. The time span in which it waits for a response can be specified in the duplicateTimeout= (section [TCP/IP] parameter in the INI file. If the Agent responds within the specified time span, the login attempt is rejected. If the Agent does not respond, the double attempt to login is accepted and the login information (such as the start time) is updated.
Agents connect via TCP/IP to the communication process (CP). The communication between CP and Agent is encrypted (see Advanced Security: Encryption and Authentication). It is the Agents that are in charge of keeping the connection alive, as well. When it is lost, they try to reconnect; the interval of reconnect attempts is configurable.
Agents can be added, edited, renamed, etc. by system administrators in Client 0 only. Configuring them is also possible in their respective INI files. They are accessible in read only mode from all other clients, according to the user privileges.
If a Job is started on an OS Agent, this job will be initiated in the OS, independent of the Agent. The Agent monitors the job and reports its status to the Automation Engine in certain cycles. When the job finishes, the Agent also reports it. This may trigger possible follow-up jobs.
Job reports may be configured in the Job object. When the job is run, they are transferred to the Automation Enginedatabase. The OS Agent provides the report as a file. The Automation Engine loads the report as individual blocks into the database.
Should the report exceed a configurable limit, only data comprising the configured size will be transferred into the database, where the last block transferred always contains the file's end. Thus the beginning and end of a job report are available in the database.
A FileTransfer is an executable object that is always executed between two OS Agents. To this end a TCP/IP connection is created between the two Agents. Here as well, the data transfer is encrypted. The Agent sending files reports the job status at intervals and the end of the job execution to the Automation Engine system. The connection between the two Agents is closed at the end of the file transfer. See File Transfer Objects (JOBF).
As soon as a job is started, the agent starts monitoring and reporting its status to the Automation Engine. Likewise, when the job finishes, it reports it too. See Reports for Servers and Agents.
Prerequisites for Working with Agents
To be able to start working with an Agent, the following steps must be carried out:
-
Install it according to the target system requirements.
-
During installation you will have to decide which Authentication Method you want to assign to the agent.
You can go for a less restrictive method at the beginning and switch to a more secure one once you have configured and tested the Agent.
-
Configure the INI file.
See Agents.
-
Authenticate the Agents. You do so in client 0.
See Agent Authentication.
-
Assign the Agent to the Clients it should have access to and define the rights it should have.
-
Define user/user group authorizations on the Agent. This grants users/user groups specific rights on the Agent. You do it in in each Client.
The Agents list in the Administration Perspective displays by default up to 5000 agents available in the client that you are logged into. The number of agents currently displayed is shown at the top left corner of the list. Optionally, you can modify the number of agents displayed from 1 to 20,000 by modifying the default value of the variable AGENT_LIST_LIMIT. If a search returns more agents than the value specified in the variable, an indicator informs the user about it.
For example, if the AGENT_LIST_LIMIT has been set to "200" and the search resulted in more than 200 agents, the top left corner of the list shows Agents (200+).
The default value is used if no value has been defined or if the value is set outside the values allowed.
Upon accessing the Agents list, the filter pane is open by default. This allows you to immediately perform a search using the Agent Name field, thus simplifying the work with the list.

For privacy reasons, we have blurred some of the texts on this screenshot. It shows the default columns, but if the list has been modified, some columns might be hidden or the order of the columns might be different. See Working with Tables.
| Column | Description |
|---|---|
| Status | Status of the agent. When an agent is inactive the icon is dimmed. |
| Name |
Name of the agent, which cannot be longer than 32 characters. All agent names are displayed in uppercase. If you are logged into client 0, when adding an agent object do not use special characters here to avoid problems in the target system |
| Authenticated |
Some agents support authenticated communication with the Automation Engine, some do not. If an agent has been authenticated since it was installed, a checkmark is displayed. |
| Version | Version of the agent. |
| Platform | Platform type of the agent. This is not the OS. |
| Hardware | Information about the computer on which the agent is running, for example, the system type, number of processors, or processor type. |
| Software | Type of platform or operating system of the agent computer. |
| Software Version | Version of the platform or operating system. |
| Last check* | The time that the agent status and other information was last checked. |
| Communication Process* | Communication process with which the agent is connected. |
| Time difference* |
Time difference between the time of the agent and the time of the Automation Engine. This is helpful for interpreting job reports when the Automation Engine and the agent run on different hosts with different system times |
| IP address |
If your system runs with encryption, you can specify IP addresses from which the agent accepts non-encrypted connections. The addresses must be separated by semicolons. Communication to components such as the Job Messenger, Event Monitors (BS2000, z/OS) or the Output Collector (NSK) takes place without encryption. By default, the agent accepts non-encrypted messages from the local host (127.0.0.1 on IPv4 and ::1 on IPv6) and its own IP address. If Event Monitors on z/OS are used in LPARs on different computers, you must specify the relevant IP addresses here. Releasing individual IP addresses is only reasonable if login attempts of former agent versions should be rejected. |
| Port no. | Port number of the agent. |
| License class* | License class of the agent. |
| MIB* |
MIB information of the agent that is used in connection with SNMP. For details please refer to the SNMP Support section in this guide. If it is available, this column displays the unique ID that identifies each monitored net element. For details please refer to the MIB section in this guide. |
| Services* |
Whether the agent performs a special service:
This is defined by the Automic administrator on client 0. |
| Compression* | Compression method that is used as standard in file transfers. |
| License Category* | Either Production or Test. |
| Authorizations* | Privileges granted to this agent in the current client
This is defined by the Automic administrator on client 0. |
| Job res. max.* |
Maximum agent resources available for jobs. This is defined by the Automic administrator on client 0. |
| FT. res. max.* |
Maximum agent resources available for file transfers. This is defined by the Automic administrator on client 0. |
| Keep alive* |
Time interval in seconds that the connection to the communication process is checked. If the connection is lost, the agent tries to reconnect automatically to the first available communication process (CP), which could be a different agent to the previous one. |
| Roles* |
Roles of the agent. The administrator can define a role (free text) for the agent in its INI file. If so, it is displayed here. |
| Last logoff | Last time in which the agent logged off the Automation Engine system. |
| Number of clients | Number of user-defined clients in which the agent has authorizations. |
| Linked | Indicates if the agent is linked to a ServiceManager. This depends on the settings made in the Service Manager section. |
| Process ID | The process identification number of the agent. |
| Net Area |
The name of the agent net area (see Net Areas in the Automation Engine). By default, the name of the Automation Engine system is used for this value. |
| ZDU Version |
Indicates base or target version of the agent in connection with a Zero Downtime Upgrade (ZDU). Values: "B" or "T" "B": Indicates the version an upgrade would be started from. Usually the actually installed and fully active version. The values are visible only when the agent is active. For inactive agents the column appears empty. |
* These columns are not displayed by default. To be able to see them, you must expand the list of additional columns by clicking the arrow (  ) to the right of the header row. ) to the right of the header row. |
|
In the toolbar, the buttons Export and Refresh are available by default. These buttons allow you to refresh the content of the table and export it as a CSV file.
It is possible to use different filters to customize the content of the Agents list.
To Use the Filter Function
All these actions are optional.
- In the fields Agent Name, Status, IP address, Current Version, Platform, Hardware, Software, Roles enter the text or value you are searching for.
- In the Linked to ServiceManager filter, click Linked and/or Not Linked to see the corresponding agents.
- At the bottom of the filter pane, click Filter to apply your filter criteria or Reset to go back to default (unchecked).
Use the buttons Select all to select and Clear selection to clear all checkboxes where available.
See also:
- Agent Authentication
- Agent Authorization Policies
- Working with Agents
- Advanced Agent Options - Tracing and Workload Distribution
- Agent Variables
- Agent Job Messenger
- Upgrade History
- UC_SYSTEM_SETTINGS - System-Wide Settings