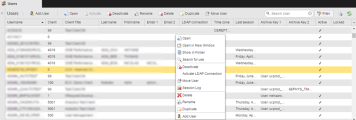
The Users page of the Administration Perspective lists all users of a client and displays all relevant user information. Right-clicking a user opens a context-menu which provides all functions available such as adding, deleting, renaming users, etc. On client 0, this page lists all users defined on all clients in the system and, in addition to the tasks available for all clients, allows you to move users from client 0 to another client.
Make sure that all Release Automation pages (Folder Authorizations, Permissions, Approval Requests) have been fully loaded before saving the changes to a user definition.
Object Definition
Object class: System object
Object type/Short name: USER
This topic provides information on the following:
- Overview
- Defining User Objects
- Working with User Objects
To access the Automation Engine system you must define at least one user. Single users are created as User objects.
The first user of a new client must be defined in system client 0; then it must be assigned to the already existing client. To move the user to the target client you can use the Duplicate/Link/Move and Move To... functions from the context menu. If this user has the required privileges, all further users can then be created in the numbered non-system client.
The user name is composed of the name of the user and his/her department separated by a slash. A maximum of 200 characters is allowed for this combination.
By default, the client 0 contains the following User object/password combination:
- User object: "UC/UC"
- Password : "UC"
In Client 0 you can add, edit, disable, rename, delete and duplicate the users defined in any client in your system. You can select just one user or you can select multiple users and perform these actions in bulk.
Note the following:
- Do not delete or rename this user. Without this user, you cannot administrate or operate the system.
- Change the password for this user immediately after the installation.
- You can define new Client objects and initial User objects for these clients after logging in with the "UC/UC" user credentials.
If you have created a local user and assigned the required authorization to it in a numbered non-system client, you can use this local user to add further users in the client.
Provided you have the necessary rights, you can add, edit, disable, rename, delete and duplicate the users defined in your client. You can select just one user or you can select multiple users and perform these actions in bulk.
The steps for defining Users are the same as for any other Automic object. This section describes the settings that are specific to only User objects.
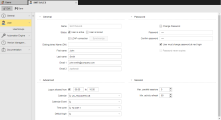
A User definition is made up of the following pages:
- Standard pages that are always available, no matter what type of object you are defining:
- User-specific pages described here.
To Define a User Object - User Settings
-
Specify the General settings
- The Name field is populated with the entry you made upon adding the object. You can change it using the rename function. See Renaming Objects/Folders.
-
A new user is active by default. Activate User is locked to deactivate it.
Entering the wrong password multiple times can result in locking the user. Also if a user is deactivated, tasks associated to that user object continue running.
-
You can select the LDAP connection option only when LDAP is configured for the Automation Engine. This means that the user login will be authenticated by a directory service such as the Microsoft Active Directory, rather than by the system.
If you activate this option, most of the fields on the page are disabled because data is retrieved from the user definition in the other directory service. The only ones that you can still specify here are the user Status options and Email 2.
Activating LDAP connection also activates the Synchronize data with LDAP now button. Click it to fill the fields with the user data from the directory service. The values that are retrieved from the LDAP settings will be grayed out and the fields disabled.
You can also activate the LDAP connection directly from the user list. Select one or more users, right-click and select Activate LDAP Connection from the context menu. If you do so in Client 0, you can activate it for user from different clients in a go.
-
The Distinguished Name (DN) field is only available if the LDAP connection is activated.
For an Oracle Directory server as LDAP server you have to define at least one user in this field. Additional users may be synchronized.
The parameter VALUE in the UC_LDAP_EXAMPLE System variable will be ignored.
- The user First/Last Name are displayed in various areas of the User Interface.
- Optionally enter the Email 1/Email 2 addresses. The user can be alerted this way via an email SNMP connection.
-
Assign this user a Password policy
By default, the password of new users is always pass. It must be changed either immediately or with the next logon of the user.
The criteria to be adhered to when specifying a password are defined by the system administrator in the UC_CLIENT_SETTINGS variable (see UC_CLIENT_SETTINGS - Various Client Settings). In addition to the required password structure, this variable also determines the intervals in which passwords must be changed, the number of failed login attempts that is allowed, the default password for new users, etc.
If users are in various international locations, special national language characters (umlauts (ä), accents (è), special letters (ß), etc.) should be avoided. Not all keyboards in all countries support such characters.
- Activate Change Password to assign the user a new password. This activates the password input fields.
- Enter the new password twice, once in Password and then again in Confirm password.
- Alternatively, activate User must change password at next login. The user will have to login first using the assigned password and change it after that.
- Activate Password never expires if your company's policy does not require regular password changes.
-
Specify the Advanced settings
- In Logon allowed from to specify the period of time in hours and minutes within which the user can logon to the system. Outside this time, any logon attempt will be denied.
- Select the Calendar and a Calendar Event that contains the dates on which the user will be able to logon to the system. Logon attempts outside these dates will be denied.
- Select the Time Zone that will be applied to this user. If you leave this option empty, the client's predefined Time Zone is used.
- Optionally, in Default Login select the Login object that contains the necessary information for the agent.
-
Select the user Session settings
-
In Max. parallel sessions select the maximum number of parallel logins you will allow for this user.
Selecting 0 enables unlimited parallel access.
-
In Min. activity refresh select the minimum time interval (in seconds) for refreshing the display.
If the user clicks the Refresh button between the defined intervals, the system will ignore the new refresh request and finish processing the previous one. This prevents the system from getting jammed up with multiple refresh requests in rapid succession.
-
- Switch to the User Group page, where you can assign the current user to one or more user groups. This will determine the user's rights to objects and privileges. See Assigning the User to User Groups.
-
If you'd rather define the Authorizations and Privileges in the User Object itself and not via a User Group, open the Automation Engine sub pages:
- On the Authorizations page you grant or deny rights to access and/or work with Automation Engine objects, files, execution data, reports, etc. See Granting Users/User Groups Authorizations to Folders/Objects for a detailed description.
- On the Privileges page you grant or deny rights to functions. See Granting Users/User Groups Privileges to Functions for a detailed description.
- Save your changes
The Users list displays all the Users available in the client that you are logged into. In client 0, the list displays all the users defined in the system.
For privacy reasons, we have blurred some of the texts on this screenshot. It shows the default columns, but if the list has been modified, some columns might be hidden or the order of the columns might be different. See Working with Tables.
|
Column |
Description |
|---|---|
|
Username |
Name of the user formed by the name and the corresponding department separated by a slash: Name/Department. |
|
Client |
Client in which the user is located. This column is available only on client 0. |
|
Client Title |
The client's title as defined in the Client object (optional). This column is available only on client 0. |
|
Last name |
User's last name. |
|
First name |
User's first name. |
|
Email1 |
User's email address. |
|
Email2* |
User's second email address |
|
LDAP connection* |
Indicates whether the user has specified the LDAP connection. |
|
Time zone* |
Time zone as specified in the User object. |
|
Last session* |
Date and time of the user's last login. |
|
Archive Key 1 and 2* |
Archive keywords as defined in the User object. |
| Active* | Indicates if the user is active or not. |
| Locked* | Indicates if the user is locked or not. |
|
* These columns are not displayed by default. To be able to see them, you must expand the list of additional columns by clicking the arrow ( |
|
The Search User box is an additional search field that is displayed only in the Users page and allows you to search for a specific user. To do so, type the text or part of the text you are looking for and all the users that meet your search criteria will be displayed in the User list.
Please note that the search is not limited to the Username but covers also First name, Last name, and, in client 0, the Client and Client Title.
It is possible to use different filters to customize the content of the User list. You can search for Active and/or Inactive users as well as for Locked and/or Not locked users. Client 0 also allows to filter the data of a certain Client.
To Use the Filter Function
All these actions are optional.
Use the buttons Select all to select all options available and Clear selection to clear all checkboxes.
- Click
 to open the filter pane.
 - Click Active to open this section and select Active or Inactive to see the corresponding users.
- Click Locked to open this section and select Locked or Not Locked to see the corresponding users.
- In client 0, click Client to see the clients available and select the relevant client or clients.
- At the bottom of the filter pane, click Filter to apply your filter criteria or Reset to go back to default (unchecked).
This function allows you to refresh the current view. To use it click ![]() on the top right-hand corner of your environment.
on the top right-hand corner of your environment.
This function allows you to export the currently visible data into a .csv file. To use it click ![]() at the top right-hand corner of your environment.
at the top right-hand corner of your environment.
Depending on the browser you are using, you will either be prompt to define the location of the file or you will find it at the bottom of your browser.
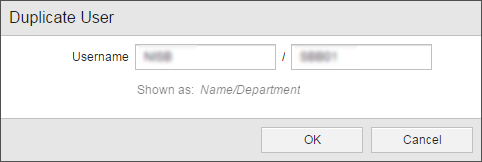
This function allows you to duplicate an existing user which is particularly useful when creating users with the same authorizations and privileges.
To Duplicate a User
-
Select a user and do the following:
- Right-click and select Duplicate or
- Click
 on the toolbar.
-
On the Duplicate User dialog, define a new Username by entering a new name and department:

-
Click OK.
The new user is now available on the Users list and has the same setup and rights assigned to the original user.
In client 0, this function is only available for client 0 users. It is no possible to duplicate users from other clients available in the Users list.
This function allows you to edit the name of an existing user.
To Rename a User
-
Select a user and do the following:
- Right-click and select Rename or
- Click
 on the toolbar.
-
On the Rename User dialog define a new Username by entering a new name and department:

-
Click Rename.
Refresh the Users list to see the newly named user.
Moving Users (only available in client 0)
When setting up a system, you can create your users in client 0 and then move them to their corresponding clients. You can do so either individually or in bulk.
To Move Users
-
Select one or more users and do the following:
- Right-click and select Move User or
- Click
 on the toolbar.
If you are moving a single user, it will be displayed in the dialog that opens. However, if you are using this function in bulk, the users to be moved will not be displayed. For example:

- Open the Client dropdown list and select the relevant client.
- Click Move.
This function is only available in client 0 and for client 0 users. It is not possible to move users from other clients.
This function allows you to activate or deactivate one or more users. This option is particularly useful if you want to temporarily set a user to inactive without having to delete it and redefining it at a later point.
To Activate/Deactivate a User
-
Select one or more users and do the following:
- Right-click and select Activate/Deactivate or
- Click
 /
/  on the toolbar.
-
If you are deactivating more than one user you are prompted to confirm your action:

- Click Deactivate.
In Client 0, you can select and activate and/or deactivate users from different clients at the same time.
Activating/Deactivating the LDAP Connection
If LDAP is configured for the Automation Engine, you can activate the LDAP connection for users. This means that the user login will be authenticated by a directory service, such as the Microsoft Active Directory, rather than by the system.
To Activate/Deactivate the LDAP Connection
-
Select and right-click one or more users.
-
Select Activate/Deactivate LDAP Connection.
Make sure the users selected have the same LDAP connection status, otherwise this option is not available.
-
You are prompted to confirm your action.
- If you have selected more than one user, the dialog indicates the number of users you have selected.
- if you have selected only one, the dialog displays the name of the user selected.
For example:

- Click Activate/Deactivate.
In Client 0, you can select and activate/deactivate the LDAP connection for users from different clients at the same time.
Alternatively, activate/deactivate this option in the user definition. See Defining the User Settings.
This function allows you to delete users.
To Delete Users
- Select one or more users and do one of the following:
- Right-click and select Delete or
- Click
 on the toolbar.
- Before actually deleting the object you must confirm your action.
- If you have selected more than one user, the dialog indicates the number of users you are about to delete.
- if you have selected only one, the dialog displays the name of the user you are about to delete.
For example:

- Click Delete.
The session log opens a new tab which displays all available information on the sessions of the current user. To access it right-click the relevant user or users and select Session Log. The following information is displayed:
| Column | Description |
|---|---|
| User name | Name of the user |
| Session Start | Date/time on which the user logged on into the system. |
| Session end | Date/time on which the user logged off. |
| Status | Status icon and status of the session. |
| Message | Additional information that describes the reason for the error. |
It you use this function in bulk and select more than one user before accessing the session log, the information is displayed in a tab per user selected (i.e. if you have selected three users, three session log tabs open).
See also:
- User Management: Defining and Managing the Authorization System
- User Groups (USRG)
- Session Log
- Granting Users/User Groups Authorizations to Folders/Objects
- Granting Users/User Groups Privileges to Functions
- Creating a Basic Client/User Landscape
- Users (USER)
- Editing Objects
- Bulk Operations
- Introduction to LDAP Sync

