Creating Component Workflow Templates
As an Application Developer or Administrator, you can create an unlimited number of Component Workflow Templates for each custom type to speed up the creation of new Workflows.
Important! The actions that you can perform depend on your folder permissions. See: Assigning Release Automation Permissions.
Prerequisites

|
All Action Packs to be used for the template Workflows are installed. |
|
|
At least one template Pack is installed (for example Tomcat). |
To Design the Component Workflow Template
- Open the Process Assembly perspective.
- In the Explorer, expand the PACKAGES folder and select the appropriate template Pack (for example, PCK.AUTOMIC_TMPL_TOMCAT).
- Open the Templates folder. The component Workflow templates are displayed in the list.
-
Right-click the component Workflow template you want to base your new template on and select the Duplicate option. The Duplicate window is displayed.
- Enter a new name for the component Workflow template (for example, TEMPLATE.INSTALL.TOMCAT.V2).
- Enter a new title for the component Workflow template, which will help you identify it later.
- Save the new component Workflow template in a folder not to be deleted when the original template Pack is updated or removed.
Note: You can create a new TEMPLATES folder to save all your customized templates.
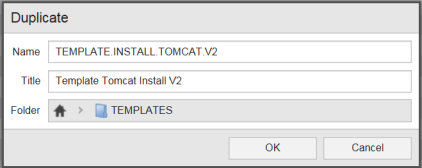
- Click OK.
- Go to the folder where you have stored the template and double-click the template to re-design it according to your needs.
- Click Save to save your changes.
To Register the New Workflow Template
After defining a new component Workflow template, you have to register it in the UC_OBJECT_TEMPLATE VARA object so that it can be used by the wizard:
- Open the Explorer.
-
Open the VARA object UC_OBJECT_TEMPLATE (for example, location folder: UC4_CLIENT_DEFAULT > SYSTEM_VARIABLE).
- Select the Variables tab. The list of VARA objects is displayed:
- Click Add Row.
- Enter the following values by clicking the corresponding cells:
- Key: ARA.INSTALL.<CustomTypeName>.<ID> (for example, ARA.INSTALL.TOMCAT.V2)
Note: The key value must be unique.
Important! The Wizard only recognizes templates which start with ARA.INSTALL and end with .DEFAULT.
- Value 1: TEMPLATE.INSTALL.TOMCAT.V2 (same as name entered for the component template Workflow).
- Key: ARA.INSTALL.<CustomTypeName>.<ID> (for example, ARA.INSTALL.TOMCAT.V2)
- Click Save.
- Log out and log back in to make the changes take effect.
Now you can add to the application Workflow a new component Workflow based on the template you have created.
To Create a Component Workflow from a Template
- Go to the Process Assembly perspective.
- Open a Workflow.
- Drag-and-drop the appropriate Component to the Workflow.
- Select Create Component Workflow from template from the pop-up context menu.
Note: This option is only displayed if there is at least one component Workflow template registered for this component custom type.
- Select the template you want to use for the component Workflow.
- Enter a Title for the component Workflow.
- Click OK.