This page includes the following:
Installation Steps
| Installing the CDA Web Server Application | » | Configuring IIS for ARA | » | Configure the Web Application - Customer.Config | » | Configure the Web Application - Web.Config | » | Register the First CDA User |
Installing the CDA Web Server Application
- Verify that the following roles and features are installed:
Features
- .NET Framework 3.5 Features
- .NET Framework 3.5 (includes .NET 2.0 and 3.0)
- HTTP Activation
- Non-HTTP Activation
- .NET Framework 4.5 Features (4 of 7)
- .NET Framework 4.5
- ASP.NET 4.5
- WCF Services (2 of 5)
- HTTP Activation
- TCP Port
- Windows PowerShell (3 of 5)
- Windows PowerShell 4.0
- Windows PowerShell 2.0 Engine
- Windows PowerShell ISE
- Windows Process Activation Service
- Process Model
- .NET Environment
- Configuration APIs
- WoW64 Support
Roles
- Web Server (IIS) (16 of 43)
- Web Server (15 of 34)
- Common HTTP Features (5 of 6)
- Default Document
- Directory Browsing
- HTTP Errors
- Static Content
- HTTP Redirection
- Health and Diagnostics (1 of 6)
- HTTP Logging
- Performance (1 of 2)
- Static Content Compression
- Security (1 of 9 installed)
- Request Filtering
- Application Development (7 of 11)
- .NET Extensibility 3.5
- .NET Extensibility 4.5
- ASP.NET 3.5
- ASP.NET 4.5
- ISAPI Extensions
- ISAPI Filters
- WebSocket Protocol
- Common HTTP Features (5 of 6)
- Management Tools (1 of 7)
- IIS Management Console
- Web Server (15 of 34)
- .NET Framework 3.5 Features
- Copy the WebUI folder to IIS.
Note: Default location: C:\Inetpub\wwwroot\
- Allow the IIS_IUSRS user for full control for the logs and StateFiles folders:
- Right-click the logs folder and select the Security tab. Click Edit, click the IIS_IUSRS group, and allow full control.
- Right-click the StateFiles folder and select the Security tab. Click Edit, click the IIS_IUSRS group, and allow full control.
- Check the configuration of IIS. See: Configuring IIS for ARA including HTTPS and the recommended IIS Application Initialization settings.
- Inside the IIS Manager, add a new application.
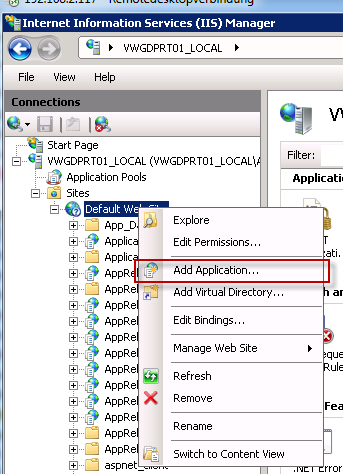
- Choose an alias (for example: "CDA"). This is used to determine the URL to open the application.
- Set the application pool to use ASP.NET in a previously installed version. Keep in mind the General Requirements for Installing the CDA Server
- Select the physical path where you have copied the web application to.
Parameter Example Value Alias
CDA Application pool ASP.NET v4.5 Physical path C:\inetpub\wwwroot\WebUI
Note: The application pool can only contain one single worker process (Web Garden is not supported). You can set the Maximum Worker Process to 1 in the Process Model pane (Actions pane > Advanced Settings > Process Model > Maximum Worker Processes).
Configure HTTPS
To ensure that all communication from and to CDA is encrypted, an HTTPS binding has to be established in the IIS Manager.
Note: If you want to roll out the application without HTTPS bindings, you will need to change the system.serviceModel element in the web.config. See Configuring the Web Application - Web.Config.
To Configure HTTPS
- Inside the IIS Manager, right-click the Default Web Site and select Edit Bindings...
- Click Add to add a new binding.
- Select the https type and your SSL certificate from the corresponding drop-down lists.
Note: If you do not have one, refer to http://technet.microsoft.com/en-us/library/cc732230%28WS.10%29.aspx for further instructions on to how to create and install an SSL certificate.
For more information, see: Securing Access with HTTPS.
Recommended IIS Application Initialization Settings
To keep the instance active at every time, the IIS Application Initialization Module sets the setting to AlwaysRunning .
Note: All workflow executions require an active instance. Especially for planned workflow executions, it is vital to have the instance active during the scheduled time window, otherwise the workflow execution fails.
IIS 8
Add the Application Initialization as Windows feature, as described in www.iis.net/learn/get-started/whats-new-in-iis-8/iis-80-application-initialization.
Configure the Web Application - Customer.Config
Tip: Save the Customer.Config in the following folder: C:\Automic\Release.Manager\WebUI
To know how to configure the customer.config see: Configuring the Web Application - Customer.Config
Configure the Web Application - Web.Config
To Configure HTTPS Endpoints for ARA
By default, CDA only enables HTTP endpoints. To use HTTPS endpoints, open the web.config file and make sure the following <endpoint> sections in the <system.serviceModel> (in bold) are enabled:
<system.serviceModel>
<bindings>
<basicHttpBinding>
<binding name="DeploymentServiceBinding" maxReceivedMessageSize="20000000" maxBufferPoolSize="20000000" maxBufferSize="20000000" messageEncoding="Text" sendTimeout="00:05:00" receiveTimeout="00:05:00">
<security mode="Transport" />
<readerQuotas maxDepth="200" maxStringContentLength="20000000" maxArrayLength="16384" maxBytesPerRead="20000000" maxNameTableCharCount="16384" />
</binding>
<binding name="DeploymentServiceBindingNoSec" maxReceivedMessageSize="20000000" maxBufferPoolSize="20000000" maxBufferSize="20000000" messageEncoding="Text" sendTimeout="00:05:00" receiveTimeout="00:05:00">
<security mode="None" />
<readerQuotas maxDepth="200" maxStringContentLength="20000000" maxArrayLength="16384" maxBytesPerRead="20000000" maxNameTableCharCount="16384" />
</binding>
</basicHttpBinding>
</bindings>
<behaviors>
<serviceBehaviors>
<behavior name="Ventum.Bond2.Web.Service.DeploymentServiceBehavior">
<serviceMetadata httpGetEnabled="true" httpsGetEnabled="true" />
<serviceDebug includeExceptionDetailInFaults="true" />
</behavior>
<behavior name="Ventum.Bond2.Web.Service.IntegrationServiceBehavior">
<serviceMetadata httpGetEnabled="true" httpsGetEnabled="true" />
<serviceDebug includeExceptionDetailInFaults="true" />
</behavior>
</serviceBehaviors>
</behaviors>
<services>
<service behaviorConfiguration="Ventum.Bond2.Web.Service.DeploymentServiceBehavior" name="Ventum.Bond2.Web.Service.DeploymentService">
<endpoint address="" binding="basicHttpBinding" contract="Ventum.Bond2.Services.Deployments.IDeploymentService"bindingConfiguration="DeploymentServiceBinding">
<identity>
<dns value="localhost"/>
</identity>
</endpoint>
<endpoint address="" binding="basicHttpBinding" contract="Ventum.Bond2.Services.Deployments.IDeploymentService" bindingConfiguration="DeploymentServiceBindingNoSec">
<identity>
<dns value="localhost" />
</identity>
</endpoint>
<endpoint address="mex" binding="mexHttpBinding" contract="IMetadataExchange" />
</service>
<service behaviorConfiguration="Ventum.Bond2.Web.Service.IntegrationServiceBehavior" name="Ventum.Bond2.Web.Service.IntegrationService">
<endpoint address="" binding="basicHttpBinding"contract="Ventum.Bond2.Services.Integrations.IIntegrationService" bindingConfiguration="DeploymentServiceBinding">
<identity>
<dns value="localhost"/>
</identity>
</endpoint>
<endpoint address="" binding="basicHttpBinding" contract="Ventum.Bond2.Services.Integrations.IIntegrationService" bindingConfiguration="DeploymentServiceBindingNoSec">
<identity>
<dns value="localhost" />
</identity>
</endpoint>
<endpoint address="mex" binding="mexHttpBinding" contract="IMetadataExchange" />
</service>
</services>
</system.serviceModel>
To Enable Net 4.5 in the web.config file
To enable Net 4.5 in the web.config file, enhance the httpRuntime entry as follows:
Example: <httpRuntime targetFramework="4.5" executionmaxRequestLength="204800" executionTimeout="360" requestValidationMode="2.0" />
Tip: Save the ARA Tools: Admin CLI, DataMigrator, DBCleanup and ImportExportCLI in the following folder: C:\Automic\Release.Manager\Utilities.
- If not done previously: download/unpack and copy the utilities to your utilities folder (for example: c:\Automic\Utilities\).
- Run Windows Powershell ISE and set the execution policy to Unrestricted by executing the following command:
set-executionpolicy unrestrictedSee: http://technet.microsoft.com/en-us/library/ee176961.aspx.
- Open the ImportExportCLI folder of your installation package (Automic\Release.Manager\Utilities\ImportExportCLI).
- Run the Powershell script
createUser.ps1. -
Optionally, enter the
AdminCredentialparameter (short:ac) to change the default internal admin name and password.Example:
c:\ARA> .\createUser.ps1 -acc:\ARA> .\createUser.ps1 -AdminCredentialThe script prompts you to change the default username and password:
Admin user-name (admin):(press enter to use the default name: "admin")Admin password:**********Note: You can also use another admin account instead of the default one:
c:\ARA> .\createUser.ps1 -ac -sys AUTOMIC/100 -usr 100/NEWADMIN/ADMINISTRATORS ....Admin user-name (admin) : 100/ADM/ADMINISTRATORSAdmin password : ********** - Enter the required parameters:
- System name and client in the format [AE system name]/[client number]
- URL of the CDA web application
- Name of the AE user in the format [client number]/[user name]/[department].
- Display name of the administrative user.
Note: Use double quotation marks for names including spaces.
- The email address of the administration user.

Alternatively, you can pass the parameters together with the command.
Example:
./createuser.ps1 -sys AUTOMIC/100 -con http://mycompany.com/ARA -usr 100/ARA/Administrators -displayname "ARA Administrator" -email ara@mycompany.com
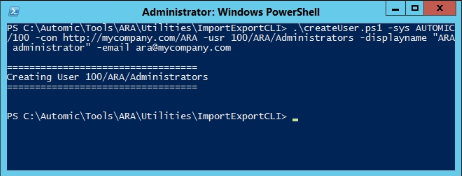
The first administrator account, that should be able to log into the CDA application with its Automation Engine credentials, has to be created.
Important! The user must already exist in the AE.
Next step: