Defining Custom and Dynamic Properties
You can define custom and dynamic properties for Applications and Components.
If you want the Workflows to hold custom properties that are not already defined in the entity type or if you want to source properties from other types during deployment, you can define custom and dynamic properties.
This page includes the following:
To Define Dynamic Properties for the Application
In this scenario we want to create three new dynamic properties for the Application. To do so:
- Right-click the WebShop 3-Tier Application in the Release Automation perspective and click Dynamic Properties in the horizontal menu.
- Create three new dynamic properties as follows:
/SourcePath
Note: This dynamic property sets the path to the Installation Package.
Type: Single Line Text
Value: Expression
Default value: InstallationPackageRepository\{@Application/system/name}
Note: You can adapt this value to your needs.
/DBServers
Type: Single Line Text
Value: Prompt
Prompt value on: Deployment Package
Caption: Database Servers
Default value: -- not specified - overwrite on Profile --
/BLServers
Type: Single Line Text
Value: Prompt
Prompt value on: Deployment Package
Caption: Business Logic Servers
Default value: -- not specified - overwrite on Profile --
Note: For more information about defining dynamic properties, see About Properties.
To Define Dynamic Properties for Components
It is recommended to carefully design the dynamic property definitions on a component-level so that they reflect both the locations of all deployable component artifacts and all the component settings which are required to configure the component as part of the Application deployment.
Note: For the purpose of this scenario, dynamic properties must not be highlighted.
DB Component
In database components the metadata can potentially point to many things, like databases, queries or scripts. Unlike a war Package for Tomcat, a script is not a defining property of the file based Component (database). Therefore, in CDA, scripts do not have a dedicated field in the Properties menu. That reference has to be populated elsewhere. For this we use dynamic properties.
The following dynamic properties must be created/updated to run the DB component deployment Workflow:
- New dynamic properties:
- /ScriptFile Name
- /DBScript
- Updated dynamic properties:
- /database/jdbc/connection/string
- /source/source_files_dirs
- /staging/working_files_dirs
To Set the Component Dynamic Properties
- Expand the Components tab and click the DB component. The dynamic properties window is displayed.
-
Two new dynamic properties must be created:
- Click the Create button to create a new dynamic property. Enter the following input:
- Name: /ScriptFileName
- Type: Single Line Text
- Value: Static
- Enter the following text in the field: WebShop3T-Schema.sql
- Click Create to complete the creation process.
Note: This dynamic property sets the name of the script file to be sourced. Example of evaluated value: WebShop3T-Schema.sql.
-
Click the Create button again to create another dynamic property. Enter the following input:
- Name: /DBScript
- Type: Single Line Text
- Value: Expression
- Enter the following text in the field:
{/staging/working_files_dirs}/{/ScriptFileName} - Click Create to complete the creation process.
Note: This dynamic property sets the location of the script file. Example of evaluated value: /WebShop 3-Tier/DB-1.0/WebShop3T-Schema.sql.
- Click the Create button to create a new dynamic property. Enter the following input:
-
Edit these three existing dynamic properties with the following values:
- Select the connection_string property and click the Edit button. Set the following values:
- Name: /database/jdbc/connection_string
- Type: Single Line Text
- Value: Expression
- Enter the following text in the field:
jdbc:postgresql://{@target/system/name}:5432/{@Application/system/name} - Click Save to complete the editing process.
Note: This dynamic property shows the system how to connect to the jdbc database, which is represented by a URL. Example of evaluated value: jdbc:postgresql://S_TEST_DB:5432/WebShop 3-Tier.
- Select the source_files_dirs property and click the Edit button. Set the following values:
- Name: /source/source_files_dirs
- Type: Single Line Text
- Value: Expression
- Enter the following text in the field:
{@Application/SourcePath}/{@deployment_Package/system/name}/{@component/system/name} - Click Save to complete the editing process.
Note: This dynamic property sets the location of the jdbc database. Example of evaluated value: s:/InstallationPackageRepository/WebShop 3-Tier/1.0/DB
- Select the working_files_dirs property and click the Edit button. Set the following values:
- Name: /staging/working_files_dirs
- Type: Single Line Text
- Value: Expression
- Enter the following text in the field:
{/staging/working_base_dir}/{@Application/system/name}/{/system/name}-{@deployment_Package/system/name} - Click Save to complete the editing process.
Note: This dynamic property shows the system where to store the files/directory on the staging server after being downloaded from the source. Example of evaluated value: /WebShop 3-Tier/DB-1.0
- Select the connection_string property and click the Edit button. Set the following values:
BL Component
The BL component contains the files that form the business logic and will be deployed to the business logic server.
The following dynamic properties must be created/updated to run the BL component deployment Workflow:
New dynamic properties:
- /ConfigFile
- /ConfigSection
- /ConfigVariable
- /ConfigVariableValue
Updated dynamic properties:
- /source/source_files_dirs
- /target/target_files_dirs
To Set the Component's Dynamic Properties
- Expand the Components tab and click the BL component. The dynamic properties window is displayed.
-
Four new dynamic properties must be created:
- Click the Create button to create a new dynamic property. Enter the following input:
- Name: /ConfigFile
- Type: Single Line Text
- Value: Expression
- Enter the following text in the field:
{/target/target_files_dirs}/{@component/system/name}.cfg - Click Create to complete the creation process.
Note: This dynamic property sets the location of the configuration file. Example of evaluated value: /WebShop 3-Tier/BL-1.0/BL.cfg
-
Click the Create button again to create another dynamic property. Enter the following input:
- Name: /ConfigSection
- Type: Single Line Text
- Value: Static
- Enter the following text in the field: DBConnectionSection
- Click Create to complete the creation process.
Note: Example of evaluated value: DBConnectionSection
-
Click the Create button again to create another dynamic property. Enter the following input:
- Name: /ConfigVariable
- Type: Single Line Text
- Value: Static
- Enter the following text in the field: DBServer
- Click Create to complete the creation process.
Note: Example of evaluated value: DBServer
-
Click the Create button again to create another dynamic property. Enter the following input:
- Name: /ConfigVariableValue
- Type: Single Line Text
- Value: Expression
- Enter the following text in the field:
{@Application/DBServers} - Click Create to complete the creation process.
Note: Example of evaluated value: S_TEST_DB
- Click the Create button to create a new dynamic property. Enter the following input:
-
Edit these two existing dynamic properties with the following values:
- Select the source_files_dirs property and click the Edit button. Set the following values:
- Name: /source/source_files_dirs
- Type: Single Line Text
- Value: Expression
- Enter the following text in the field:
{@application/SourcePath}/{@deployment_package/system/name}/{@component/system/name} - Click Save to complete the editing process
Note: This dynamic property shows the system the location of the component. Example of evaluated value: c:/temp/InstallationPackageRepository/WebShop 3-Tier/1.0/BL
- Select the target_files_dirs property and click the Edit button. Set the following values:
- Name: /target/target_files_dirs
- Type: Single Line Text
- Value: Expression
- Enter the following text in the field:
{@Application/system/name}/{/system/name}-{@deployment_Package/system/name} - Click Save to complete the editing process
Note: This dynamic property points to the local file/directory where the file is to be downloaded. Example of evaluated value: /WebShop 3-Tier/BL-1.0
- Select the source_files_dirs property and click the Edit button. Set the following values:
FE Component
The FE component contains the files that build up the front end user interface. It will be deployed to the web server.
The following dynamic properties must be set to run the component deployment Workflow:
New dynamic properties:
- /ConfigFile
- /ConfigVariable
- /ConfigVariableValue
Updated dynamic properties:
- /source/source_files_dirs
- /target/target_files_dirs
- /tomcat/appbase_directory
- /tomcat/base_url
- /tomcat/Package_full_path
- /tomcat/password
- /tomcat/relative_context_path
- /tomcat/server/home_directory
- /tomcat/username
To Set the Component's Dynamic Properties
- Unfold the Components tab and click the FE component. The dynamic properties window is displayed.
-
Three new dynamic properties must be created:
- Click the Create button to create a new dynamic property. Enter the following input:
- Name: /ConfigFile
- Type: Single Line Text
- Value: Expression
- Enter the following text in the field:
{/tomcat/full_context_path}/config/configuration.properties - Click Create to complete the creation process.
Note: This dynamic property shows the system the location of the configuration file. Example of evaluated value: C:\Program Files\Apache Software Foundation\Tomcat 7.0/webapps/WebShop/config/configuration.properties
-
Click the Create button again to create another dynamic property. Enter the following input:
- Name: /ConfigVariable
- Type: Single Line Text
- Value: Static
- Enter the following text in the field: BLServers
- Click Create to complete the creation process.
Note: Example of evaluated value: BLServers.
-
Click the Create button again to create another dynamic property. Enter the following input:
- Name: /ConfigVariableValue
- Type: Single Line Text
- Value: Expression
- Enter the following text in the field:
{@Application/BLServers} - Click Create to complete the creation process.
Note: Example of evaluated value: S_TEST_APP1.
- Click the Create button to create a new dynamic property. Enter the following input:
-
Edit these four existing dynamic properties with the following values:
- Select the Package_full_path property and click the Edit button. Set the following values:
- Name: /tomcat/Package_full_path
- Type: Single Line Text
- Value: Expression
- Enter the following text in the field:
{/target/target_files_dirs}/{/custom/Package_file_name}Note: The last expression points to the Package.war file.
- Click Saveto complete the editing process.
Note: Example of evaluated value: /WebShop 3-Tier/FE-1.0/WebShop.war
- Select the /tomcat/host property and click the Edit button. Set the following values:
- Name: /tomcat/host
- Type: Single Line Text
- Value: Expression
- Enter the following text in the field:
{@target/custom/host} - Click Save to complete the editing process.
Note: Example of evaluated value: localhost
- Select the source_files_dirs property and click the Edit button. Set the following values:
- Name: /source/source_files_dirs
- Type: Single Line Text
- Value: Expression
- Enter the following text in the field:
{@Application/SourcePath}/{@deployment_Package/system/name}/{@component/system/name} - Click Save to complete the editing process.
Note: Example of evaluated value: s:/InstallationPackageRepository/WebShop 3-Tier/1.0/FE
- Select the target_files_dirs property and click the Edit button. Set the following values:
- Name: /target/target_files_dirs
- Type: Single Line Text
- Value: Expression
- Enter the following text in the field:
{/staging/working_base_dir}/{@Application/system/name}/{/system/name}-{@deployment_Package/system/name} - Click Save to complete the editing process.
Note: Example of evaluated value: /WebShop 3-Tier/FE-1.0
- Select the Package_full_path property and click the Edit button. Set the following values:
To Define Custom Properties for Components
FE Component
The FE Component is a Tomcat web Application. The war Package contains the Application files and is the core property of the Component. Therefore, it has a dedicated field in the properties menu. In the Package Name field, enter the path to the folder where the war Package is stored to allow the system to source it:
- Click the FE component.
- Click Properties in the horizontal menu.
- Expand the Package section.
- Enter the path pointing to the Package.war file.
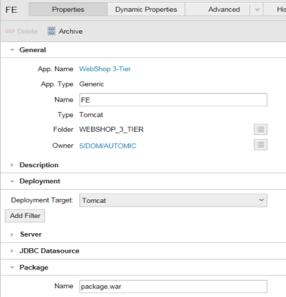
- Click Save.
Next steps:
- Configuring Deployment Workflows
- Deploying an Application to an Environment
- Deploying a New Version of the Application
Previous steps: