Working with Comparisons
As an Operator, you compare the installations of an Application on two Environments, for example, Test as opposed to Production environment.
Comparisons are based on the snapshot functionality (see: Working with Snapshots). The Environment-specific snapshot functionality (Application and Component) depends on the Action Packs installed.
Important! The actions that you can perform depend on your folder permissions, see: Folder Permissions.
This page includes the following:
Viewing the Deployment Comparisons Screen
- Start from the Environments list or from the Applications list.
- Right-click an Environment or an Application.
- Click Go to details> Comparisons
As a result, the New Comparison view is displayed.
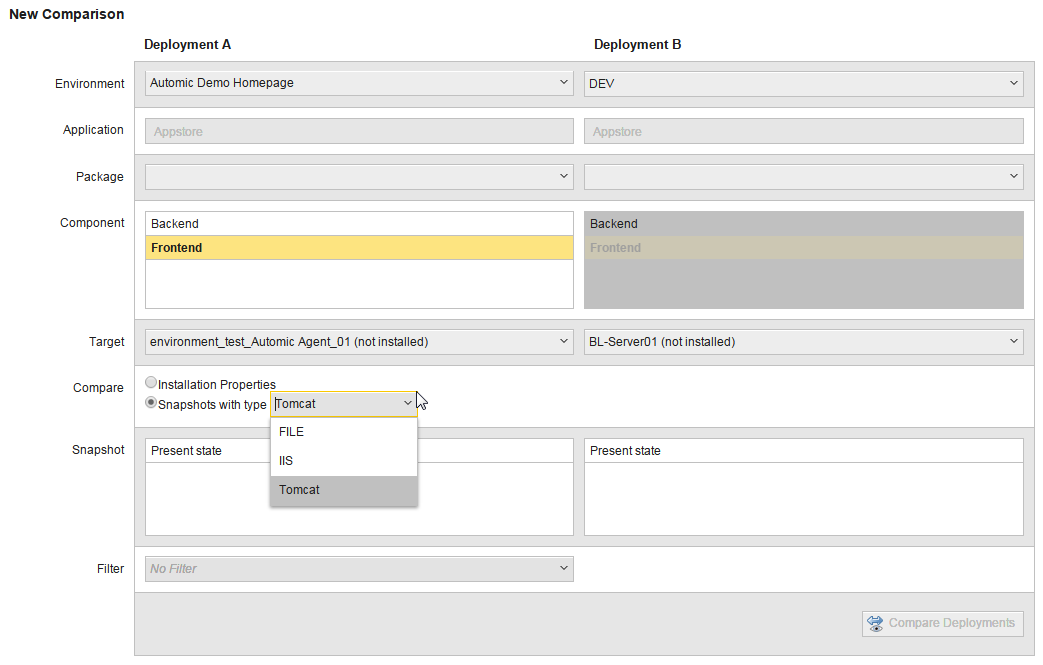
Example Screen 1
The following image shows a comparison view from the Environments List.

Note the following:
- The Environment on the left side is not changeable, as the user started from the Environment list by selecting a particular Environment.
- You must select the Application for the left side - the right side is automatically populated according to the settings of the left side.
Example Screen 2
The following image shows a comparison view from the Applications List.
Note the following:
- You must select the Environment for both sides.
- Application (on both sides) is not changeable, as the user started from the Application list by selecting a particular Application
- You can select the Package for both sides as they can be different.
You can compare either the installation properties that are used to install the Components or two snapshots of the Component.
Installation Properties
Use this option to compare the properties that were used to install the Component on the selected Deployment Targets.
Important! The comparison only works when you select two Deployment Targets where the Component is installed.
Note: If you select a Target where the Component is not installed the button is inactive.
Snapshots with type
Use this option to compare two snapshots of the Component with each other or with a present state.
Note: You cannot compare snapshot of different types.
The Snapshots list shows all Snapshots of the selected type that are available on the selected Target for the selected Component. The list is ordered by the creation date of the snapshots.
Types available for comparison (depending on the Action Packs installed):
- File
- IIS
- JBoss
- Registry
- Service
- Tomcat
- WebLogic
- WebSphere
The sidebar shows all comparison results that were initiated by you and belong to the current Application or current Environment.
When you click the Comparison Result in the sidebar, the result details are displayed.
Note: For viewing the result, you have various filter options.
Depending on the options being compared, there can be two different views:
-
Installation Properties
The result shows the (evaluated) custom and dynamic properties that were used to deploy the package. The results are displayed as a tree grid with the following properties:
- System properties are not shown or compared
- Custom properties are shown in the custom namespace
- The entries in each level are sorted alphabetically
- If a property is missing on one side it is shown as
MISSING - Passwords are displayed as
**** - Rows with different or missing values are highlighted with a different background color
- Namespaces without missing or different properties are collapsed by default, the others are expanded
-
A snapshot comparison compares the Deployment Target snapshot with each other. It is displayed as tree.
On top, the Environments, packages and Deployment Targets compared are listed. Below you find the detailed results. If the comparison result is not generated yet, the text comparing is displayed.
The result shows all values inside the snapshot. It is displayed as a tree grid with the following properties:
- All elements are listed which exist at least in one Deployment
- The elements in each level are sorted alphabetically
- If an element is missing on one side, it is shown as
MISSING - For elements that have details (for example, files), a detailed comparison (for example, line by line) can be done.
The button Show Differences is visible.Click on this button to view detailed differences in the file content. Changed content is highlighted in blue, deleted lines in red, and new content in green.
- Rows with different or missing values are highlighted with a different background color.
- Namespaces without missing or different properties are collapsed by default, the others are expanded.
Filters are used to exclude differences between Environments that either exist by nature or are known and deliberately designed this way.
Filters can be defined for both installation comparisons and snapshot comparisons.
To get rid of those differences, you can:
- Ignore one or more elements (nodes in the tree view)
- Ignore one or more attributes
- Create used-defined matching rules for elements and attributes in the comparison result.
Also, exclude filters can be saved so that they can be re-used in other comparisons.
For viewing the result, you have the following options:
- Expand All - Expand all tree nodes
- Collapse All - Collapse all tree nodes
- All - Show all properties available
- Differences - Show only the properties, where differences are found
- Filtered - Filter is used
- Save Preset... (Only enabled, if filter settings were changed). For a new filter it opens the creation dialog (see Create / change filter). For an existing filter, it saves the new settings immediately.