Creating Template Action Packs for Component Workflows
As an Application Developer or Administrator, you can create Template Action Packs for Component Workflows that can be easily distributed and installed on different CDA systems.
Important! The actions that you can perform depend on your folder permissions, see: Folder Permissions.
To Create a Template Action Pack for Component Workflows
- Create the Action Pack structure:
- Go to the Process Assembly perspective and click the Packs accordion tab in the sidebar.
- Click Add Action Pack. The New Action Pack window is displayed.
Enter a title for the Action Pack (for example, Component Workflow Template). The name for the Action Pack is suggested automatically.
- Click Add Action Pack.
- Clean up and define the Action Pack metadata:
- Switch to the Explorer.
- Navigate to the Action Pack, which is located in the PACKAGES sub-folder.
- Delete the following folders:
- ACTIONS
- RESOURCES and its subfolders
- (optional) SOURCE.
The Subworkflows (SOURCE/SHARED/JOBP) and PromptSets (SOURCE/SHARED/PROMPTSETS) are stored here.
- Delete the VARA object that is located in the CONFIG folder (for example, PCK_CUSTOM_COMPONENT_WORKFLOW_TEMPLATE.PUB.PROMPT_EXTERNAL.MAP).
- Add a new XML VARA object:
- Click Add Object.
- Name it PCK.<pack-name>.PUB.INTERFACE (for example, PCK.CUSTOM_COMPONENT_WORKFLOW_TEMPLATE.PUB.INTERFACE)
- Optionally, enter a title.
- Click Rename.
Click Add Key to create a key and name it Interface.
- Click the new key and add the following XML-structure to list the Workflow Templates with the corresponding settings for the component custom type:
<interface><templates><add-templatekey="ARA.INSTALL.<CustomType>(.DEFAULT)">PCK.<pack-name>.PUB.TEMPLATE.INSTALL.<WF-name>(.DEFAULT)</add-template><add-templatekey="ARA.UNINSTALL.<CustomType>.DEFAULT">PCK.<pack-name>.PUB.TEMPLATE.UNINSTALL.<WF-name>(.DEFAULT)</add-template></templates>For example:
Install key=
"ARA.INSTALL.TOMCAT.DEFAULT">PCK.CUSTOM_COMPONENT_WORKFLOW_TEMPLATE.PUB.TEMPLATE.INSTALL
- Go to the Action Pack main folder (example: PCK.CUSTOM_COMPONENT_WORKFLOW_TEMPLATE).
- Open the metadata VARA object (example: PCK.CUSTOM_COMPONENT_WORKFLOW_TEMPLATE.PUB.VAR.METADATA) and, if needed, redefine the files.
- In the Dependencies row, enter any dependent Action Pack. (An Action Pack depends on another if Actions of this Action Pack are used inside the Template workflow).
- Optionally, enter a description for the Action Pack.
Open the DOCUMENTATION folder and double-click the PUB.DOC DOCU object.
Click the Documentation accordion tab and enter any general information that may be helpful to use the Action Pack.
- Back to the DOCUMENTATION folder, open the PUB.LICENSES DOCU object and enter any relevant information related to licensing (for example, this Action Pack may not be modified).
- Create template workflows:
- Open the TEMPLATES folder.
- Click Add Object.
- Unfold the Workflow (_FLOWS) object and select COMPONENT_FLOW Workflow.
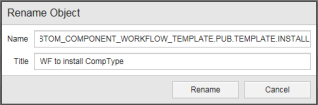
- Click Add Object. The Rename Object dialog is displayed.
Enter the same names as those specified in the XML VARA object and set the title accordingly.
Use the Process Assembly to design the template workflows by dragging and dropping the desired Actions into the workflow and setting the parameters.
Note: A copy of an existing component workflow can be used as a starting point to design a workflow template.
Important! The keys that are specified in the interface-XML must follow the previously mentioned structure. Workflow names must follow the naming conventions too.
- Export the Action Pack:
Packs can be exported in the Process Assembly perspective to be reused in another client or system.
Important!
- When exporting a Pack, ensure that the metadata contains the correct values. Increase the version number with subsequent releases of your Pack to distinguish between different versions. The version number can be set in the Metadata object of the Pack.
- Packs exported in the new format (.json) cannot be imported into older CDA versions (12.2 and lower)
To Export an Action Pack
On the Packs page of the Process Assembly perspective, right-click the relevant Action Pack and select Export.
On the Export Pack window, select Export to validate and build the Pack automatically.
Select Download to download the Pack and select a destination.
A semantic check is performed before exporting the Action Pack, thus ensuring that the Actions are defined correctly. The following properties are checked:
- Generate Job at = Runtime
- Deactivate on Finish = After error-free execution.
- Error-free status = ANY_OK
- Overwrite Agent's value = “&AGENT#“ or leave it empty
Tip: Do not export Action Packs with a hard-coded Agent/Login set.
Note: You can configure the export method in the PACKS_COMPATIBILITY_MODE parameter of the UC_CLIENT_SETTINGS (see:UC_CLIENT_SETTINGS - Various Client Settings).
This Action Pack can be used to install the created workflow template into other CDA systems.
Note: Templates can only be used in the same AE/ARA-System where the Action Pack was created if they are installed via the Package Manager.