Preparing for the Container-Based Installation
As a system administrator, you follow a number of steps before installing your container-based system.
Tip! This section contains information relevant for container-based systems. If you are searching for information relevant to manually installed, on premises systems, see Preparing for the Manual Installation.
Notes:
-
Proper use of the Automation Engine requires at least two systems to be installed: a test and production system. For more information, see Test and Production Systems - Best Practices.
-
Make sure you have considered all sizing requirements. For more information, see Sizing of Automic Automation Kubernetes Edition.
-
Do not use blank spaces when naming the directories for the Automation Engine and the Agents. For more information, see https://support.microsoft.com/en-us/help/102739/long-filenames-or-paths-with-spaces-require-quotation-marks.
This page includes the following:
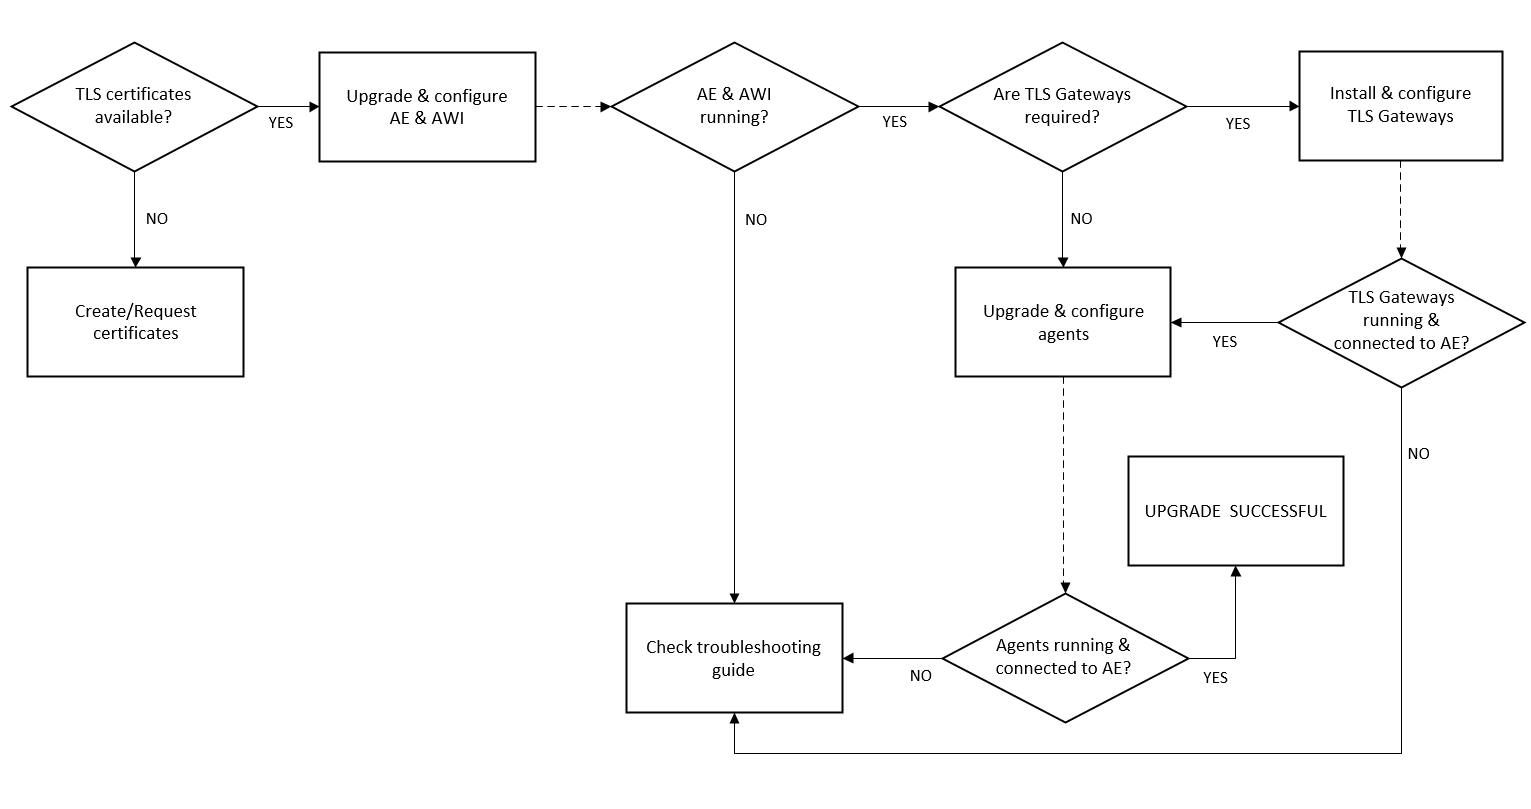
TLS/SSL Implementation Overview
The chart below depicts the process required for the TLS/SSL implementation and helps you understand not only the components involved but also the process itself.
Click the image to expand it.
Related topics:
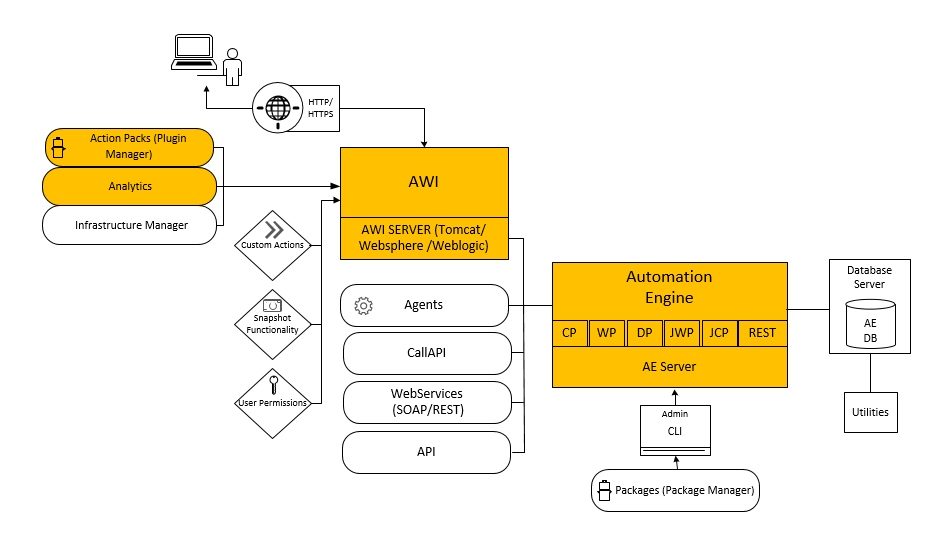
System Overview
Click the image to expand it.
Downloading the Automic Automation Kubernetes Edition Offering
The Automic Automation Kubernetes Edition (AAKE) offering comprises all core and container-specific components, the provided installation customizations for Automic Automation and Automic Intelligent Remediation, as well as a number of Action Packs that are loaded by default. You can download the offering from https://downloads.automic.com/, where you can also see the complete content of the offering.
To download the offering follow these steps:
-
Log into https://downloads.automic.com/ with your Broadcom credentials and select Automic Automation Kubernetes Edition.
On the offering download page, download the AAKE offering and request access to the Automic public docker registry.
-
Once you have access to your company's GCP Service account, download the automic-image-pull-secret.json file and create the secret with the command provided.
This allows your container platform to pull images from our password protected repository.
The offering zip file includes:
-
All Automic Automation components
-
Automic Automation Helm Chart
Includes the values.yaml file that you can use to customize the AAKE deployment/installation.
-
Automic Automation Helm Plugin
Used to monitor the status of the AAKE installation and to run a Helm upgrade for an existing AAKE instalaltion.
Installing the Automic Automation Helm Plugin
You have to install the Automic Automation Helm plugin to manage and monitor the update process. You can also use during the first installation. The Automic Automation Helm plugin requires the Helm Kubernetes Packagemanager.
Use the following commands to install the Helm plugin:
tar zxvf automic-automation-plugin-<version>.tgz
helm plugin install automic-automation-plugin-<version>
The following commands allow you to check the status of the update:
- update updated the instance in the current namespace
- status show the status of the instance in the current namespace
- logs show the logs of the operator
Example
To monitor the installation use the plugin with the following command:
$ helm automic-automation status
Once the installation is complete the status is provisioned, the target and current versions should match the desired version. If this is not the case, check the Troubleshooting section of README.md file found in the Helm chart.
Note: This Helm Plugin works with Linux and can be used from a Linux CLI. If you use a Windows CLI, you might not be able to run all upgrade commands from it and might have to run them directly in Linux.
For more information, see Automic Automation Helm Plugin.
Preparing the Ingress and TLS/SSL Certificates
Make sure you have all required certificates for the TLS/SSL communication in place.
In Automic Automation Kubernetes Edition, the TLS/SSL Agents, the Automic Web Interface and REST clients connect to the Kubernetes cluster through an ingress / HTTPS load balancer. In this case, the required certificates must be in place for the ingress/load balancer.
Ingresses contain the configuration and rules that external (HTTP or HTTPS) components must use to reach services within the Kubernetes cluster. Ingress controllers from cloud based services such as AWS, Azure, or Google Cloud Platform use the information in the ingress and the services associated to it to create a load balancer (HTTP or HTTPS) and configure it accordingly.
Before the installation you must decide which kind of ingress you require. You can use automatically generated ingresses or other ingresses.
More information:
Automatically Generated Ingresses and Corresponding Certificates
You can adapt the values.yaml file to enable the ingress (enabled: true), to provide an application hostname and a TLS/SSL secret, which is used for all the generated ingresses. The application hostname is usually a public address or domain name used to reach the ingress/load balancer from outside the cluster.
In this case, ingresses for the AWI, the JCP, and the REST process are created by default and are configured for an NGINX controller, see Connecting to AWI, the JCP and REST Processes Using an Ingress.
You have to create the private key and certificate before deploying AAKE.
For more information about the different certificate types and for detailed instructions on how to create and use them, see What Kind of Certificates Should I Use for Automic Automation v21.
Once you have decided which kind of certificate to use and have a private key and certificate, make sure you also create the corresponding TLS secret, for example:
kubectl create secret tls certificate-tls-secret --key private_key.pem --cert certificate.pem
You must configure the TSL secret in the values.yaml file before the deployment.
Example
ingress:
  enabled: true
  applicationHostname: <your-domain.example.com>
  secretName: certificate-tls-secret
The TLS Agents use this application hostname to connect to the ingress/load balancer and perform the TLS hostname verification.
Note: If you use these ingresses, the used Kubernetes API is only supported for Kubernetes versions 1.21 to 1.23.
Other Ingresses and Corresponding Certificates
You can leave the ingress disabled (enabled: false) for example, if you want to have only one ingress or want to use a different ingress controller. In this case you have to deploy your own ingresses.
If you use cloud based services such as AWS, Azure, or Google Cloud Platform, make sure you follow their guidelines.
Examples
-
For Google Cloud Platform, you can create a managed certificate and configure it accordingly in the ingress:
kind: Ingress metadata: name: aake-ingress annotations: kubernetes.io/ingress.global-static-ip-name: aake-static-ip networking.gke.io/managed-certificates: aake-cert-default -
For AWS, you can use the AWS Load Balancer Controller with the ingress.
In this case, the certificate is created beforehand and uploaded to the AWS Certificate Manager. Once uploaded, the certificate arn is created and you can use it to configure the ingress as required.
kind: Ingress
metadata:
  name: aake-ingress
  annotations:
    kubernetes.io/ingress.class: alb
    alb.ingress.kubernetes.io/target-type: ip
    alb.ingress.kubernetes.io/scheme: internet-facing
    alb.ingress.kubernetes.io/listen-ports: '[{"HTTPS": 443}, {"HTTPS":8443}]'
    alb.ingress.kubernetes.io/backend-protocol: HTTPS
    alb.ingress.kubernetes.io/certificate-arn: arn:aws:acm:eu-central-1:<aws account>:certificate/<certificate arn>
Preparing the AE and Analytics Databases for the Container Installation
You have to prepare new, empty AE and Analytics databases if you want to install a new (v21) AAKE system including an Analytics deployment. You can also decide not to deploy Analytics. For more information, see Disabling the Analytics Installation.
Note: The Event Engine feature is not supported in the Automic Automation Kubernetes Edition.
You also have the option to use a backup of your existing databases. For more information, see Using an Existing Database.
Alternatively, you can also use managed databases provided on platforms such as AWS, Azure, and Google Cloud Platform.
The Enterprise Software Academy provides examples of how to deploy a new PostgreSQL database for the respective platform:
More information:
Using a New Database
The Automation Engine supports Oracle and PostgreSQL databases for the container-based system. Analytics supports only PostgreSQL databases. Only PostgreSQL versions 10 or 11 are supported. Make sure that the databases can be reached from the cluster.
To use a PostgreSQL or Oracle database for the Automation Engine, you have to prepare the database as usual.
In both cases, you have to adapt the values.yaml file. It also allows you to state the default tablespaces provided for the AAKE installation as alternative ones in case you are using cloud-hosted databases and do not have the permissions required to create or rename tablespaces.
Make sure you also adapt the connection settings for the databases that you prepared in the values.yaml, if you want to enable an ingress. For more information, see Connecting to AWI, the JCP and REST Processes Using an Ingress.
You can configure each of the required database connections independently. They can point to the same database server, if that is the case.
Important! It is recommended to use a Kubernetes secret to pass the relevant database connection information.
You have to provide the Kubernetes secret with the name defined in the same namespace.
databases:
  automationEngine:
    secretName: ae-db
  analytics:
    secretName: analytics-db
The Kubernetes secret must contain the following parameters:
-
vendor: vendor name, either postgres or oracle
-
host: hostname where the database can be reached
-
port: port where the database can be reached
-
db: name of the database
-
user: username for the database
-
password: password for the user
-
data-tablespace-name: name of the data-tablespace (only AE DB)
-
index-tablespace-name: name of the index-tablespace (only AE DB)
-
additional-parameters: additional parameters for vendor specific parameters which are sometimes needed, depending on the database configuration
The host parameter definition can vary depending on the database you use and where it is located. For example, if you use a managed database located outside the cluster, the host could be a domain name (<your-db-instance-domain>), an IP address (<your-db-instance-ip-address>), etc. Your cloud provider provides those values. If it is an on-premises database outside the cluster, the definition could be a specific hostname.
If you use, for example, a PostgreSQL database in the same cluster in which AAKE runs, the definition of the host parameter requires a specific format: <db-instance>.<namespace>.svc.cluster.local.
Example AE DB - Oracle
kubectl create secret generic ae-db-oracle \
  --from-literal=host=external-oracle.location \
  --from-literal=vendor=oracle \
  --from-literal=port='1521' \
  --from-literal=user=username \
  --from-literal=db=ORCLCDB.localdomain \
  --from-literal=password=S3cret \
  --from-literal=additional-parameters=";SP=NLS_LANGUAGE=AMERICAN,NLS_TERRITORY=AMERICA,CODESET=WE8MSWIN1252,NLS_LENGTH_SEMANTICS=CHAR"
Example AE DB - PostgreSQL
$ kubectl create secret generic ae-db-postgres \
--from-literal=host=external-postgres.location \
--from-literal=vendor=postgres \
--from-literal=port='1521' \
--from-literal=user=username \
--from-literal=db=POSTGRESDB.localdomain \
--from-literal=password=S3cret \
--from-literal=data-tablespace-name=ae_data \
--from-literal=index-tablespace-name=ae_index \
--from-literal=additional-parameters="connect_timeout=10 client_encoding=LATIN9"
Example Analytics DB - PostgreSQL
The Kubernetes secret for the Analytics database does not require you to define the data-tablespace-name and index-tablespace-name parameters. The respective tablespace names are defined on the fly as Analytics is deployed.
kubectl create secret generic analytics-db-postgres \
  --from-literal=host=external-postgres.test.svc.cluster.local \
  --from-literal=vendor=postgres \
  --from-literal=port='1521' \
  --from-literal=user=username \
  --from-literal=db=POSTGRESDB.localdomain \
  --from-literal=password=S3cret
Another option is to define the database connection required in the values.yaml file. However, keep in mind that the values.yaml file definition is also stored in a configmap and passwords may be exposed.
Example Oracle
For Oracle databases, set the vendor parameter to "oracle" and define the additionalParamaters as required.
databases:
  automationEngine:
    vendor: oracle
    host: external-oracle.location
    port: "5432"
    name: ae
    user: ae
    password: ae
    additionalParameters: ;SP=NLS_LANGUAGE=AMERICAN,NLS_TERRITORY=AMERICA,CODESET=WE8MSWIN1252,NLS_LENGTH_SEMANTICS=CHAR
  analytics:
    host: external-postgres.location
    port: "5432"
    user: analytics
    password: analytics
    name: analytics
Example PostgreSQL
For PostgreSQL databases, set the vendor parameter to "postgres". For the AE database, define the dataTablespaceName and indexTablespaceName parameters as required.
No specific setup is required for a new Analytics database. You only have to define the host, port, user, password and database name. The dataTablespaceName and dataTablespaceName parameters are defined on the fly as Analytics is deployed.
databases:
  automationEngine:
    vendor: postgres
    host: external-postgres.location
    port: "5432"
    name: ae
    user: ae
    password: ae
    dataTablespaceName: ae_data
    indexTablespaceName: ae_index
  analytics:
    host: external-postgres.location
    port: "5432"
    user: analytics
    password: analytics
    name: analytics
Using an Existing Database
Using an existing Analytics database does not require any special configuration. You only have to configure the database connection as described before using the data from your existing database.
In the case of the AE database, you use a backup of your existing (12.3) database if you want to migrate your existing on-premises system to a higher AAKE version.
More information:
Pre-Migration Checklist
Before starting the migration, go through the following issues and make sure you have all requirements in place:
-
For the Automation Engine, Automic Automation Kubernetes Edition only supports PostgreSQL and Oracle databases
-
Make sure that you have configured the database connection to the existing AE database
Example AE DB - PostgreSQL
$ kubectl create secret generic ae-db-postgres \
--from-literal=host=external-postgres.location \
--from-literal=vendor=postgres \
--from-literal=port='1521' \
--from-literal=user=username \
--from-literal=db=POSTGRESDB.localdomain \
--from-literal=password=S3cret \
--from-literal=data-tablespace-name=ae_data \
--from-literal=index-tablespace-name=ae_index \
--from-literal=additional-parameters="connect_timeout=10 client_encoding=LATIN9"
-
Make sure that you set the existing system name for the Automation Engine and the Automic Web Interface using the respective environment variable in the values.yaml file
-
AUTOMIC_GLOBAL_SYSTEM for the Automation Engine
-
AUTOMIC_SYSTEM_NAME for the Automic Web Interface
For more information, see Environment Variables Relevant for Migration.
-
-
Create a Kubernetes secret that contains the admin credentials for the existing Client 0. The secret must be created in the namespace in which the AAKE system is installed.
Example
kubectl create secret generic client0-user \
  --from-literal=client='0' \
  --from-literal=user='ADMIN' \
  --from-literal=department='ADMIN' \
  --from-literal=password='UC4'
-
Set the operator.migrate parameter in the values.yaml file is set to true
Disabling the Analytics Installation
All required components to install and upgrade your system are provided as pre-built container images which are automatically installed by the Install Operator. For more information, see Container-Based Installation - Automic Automation Kubernetes Edition.
Analytics is one of these components. However, you can choose not to install it.
To do so, you have to disable the relevant parameter in the values.yaml file before the installation:
analytics:
  enabled: false
Important! If you already have an Automic Automation Kubernetes Edition instance with Analytics running, do not disable it.
Setting Environment Variables
You can use the values.yaml file to set environment variables before you install your system. Automic Web Interface settings that are normally changed by editing the uc4.config.xml file can be set as environment variables. After the installation is provisioned, you must use the configmap to change any environment variable. For more information, see Configuring Container-Based Systems.
Important! There are fixed environment variables that ensure that containers work properly and must not be changed. You can look them up in the corresponding deployment file.
Environment Variables Relevant for Migration
When you migrate to a container-based system, use the corresponding environment variables to define the names of your existing Automation Engine and Automic Web Interface instances in the values.yaml file :
-
Environment variable key: AUTOMIC_GLOBAL_SYSTEM
Value: Name of the AE system
Example: AUTOMIC
-
Environment variable key: AUTOMIC_SYSTEM_NAME
Value: Name of the Automic Web Interface system
Example: AUTOMIC
Environment Variables for Automation Engine Connections
Each environment variable for the AE uses the syntax pattern ${PREFIX_SECTION_KEY:DEFINITION}:
-
PREFIX: AUTOMIC
Constant prefix for these environment variables.
-
SECTION:
Defines the section of the INI file in which the key you want to define is located.
-
KEY:
Specifies the key you want to substitute.
-
DEFINITION:
The value that you want to define for the key.
Environment Variables for General AWI Properties
All AWI settings use the syntax pattern ${PREFIX_KEYNAME:DEFINITION}:
-
PREFIX: AUTOMIC
Constant prefix for all AWI settings.
-
KEYNAME:
Matches the property name as defined in the configuration.properties.xml and corlors.properties.xml files. The KEYNAME is written in uppercase and dots are replaces by underscores. For example, the session.colors property becomes AUTOMIC_SESSION_COLORS.
-
DEFINITION:
The value that you want to define for the key
More information:
- configuration.properties - Configuring Your Local Setup
- colors.properties - Configuring the Color Scheme
Example
-
Environment variable key: AUTOMIC_SSO_SAML_ENABLED
Value: Specifies whether single sign-on (SSO) can be used for AWI log in
Example: true
Configuring the Connection between Analytics On-Premises and AAKE
To use your Analytics on-premises installation with Automic Automation Kubernetes Edition, you have to follow the steps below before migrating your Automic Automation system to the Automic Automation Kubernetes Edition:
-
Upgrade your Analytics on-premises installation to the relevant version. For more information, see Upgrading the Analytics Backend/IA Agent.
-
Define where the new Automic Web Interface in the AAKE cluster can find the Analytics backend (IA Agent) once it is deployed.
To do so, use the values.yaml file to set the UC_BACKEND_API_KEY and UC_BACKEND_ENDPOINT environment variables. You find these values in the plugin.properties file located in the Tomcat\webapps\awi\config\webui-plugin-analytics folder in your on-premises Analytics directory.
-
Update the INI file of the Analytics backend / IA Agent (ucxedda.ini) accordingly.
Since the TLS/SSL Agents and in AAKE establish a connection to an Ingress / HTTPS load balancer and not the JCP directly, you have to make sure the Analytics backend / IA Agent can reach the load balancer in AAKE. For more information, see Connecting to AWI, the JCP and REST Processes Using an Ingress.
More information:
Setting up Single Sign-On
As a system administrator, you can set up single sign-on (SSO) for the Automation Engine system, which allows users to login only once, without having to enter user credentials over and over again. The Automic Automation Kubernetes Edition supports the Security Assertion Markup Language 2.0 (SAML 2.0) protocol.
You must enable single sign-on to use the SAML protocol. If you want to do is before the installation, set the AUTOMIC_SSO_SAML_ENABLED environment variable to true in the values.yaml file.
More information:
Setting Up LDAP for Automic Automation Kubernetes Edition
LDAP enables users to log onto Automic Automation by using their company-wide credentials.
To use LDAP over TLS, you must use the Java work process (JWP). It requires certain configuration to connect to the LDAP server, such as defining the JWP keystore configuration. In the Automic Automation Kubernetes Edition, the keystore file of the JWP is passed on to the AAKE system using Kubernetes secrets. Therefore, you must create the jwp-keystore Kubernetes secret for the LDAP server before installing Automic Automation Kubernetes Edition.
You can do so by using the following kubectl command:
kubectl create secret generic jwp-keystore --from-file ./cacerts
After installing Automic Automation Kubernetes Edition, if the jwp-keystore secret exists, it is automatically mounted in all JWP pods using the default path '/usr/server/bin/secrets/jwp-keystore/cacerts.
This default path must be set also in the JWP_KEYSTORE_PATH key of the UC_SYSTEM_SETTINGS variable. For more information, see JWP_KEYSTORE_PATH.
Note: You cannot change neither the secret name nor the default path.
More information:
Reaching the JCP and REST Endpoints
When you use your own ingress and not automatically generated ones, you can define where to reach the JCP and REST processes before the installation if the following applies:
-
you know the relevant JCP and REST addresses to be used before the installation
-
you have not enabled an ingress (ingress: false)
In this case, you can use the JCP_WS_EXTERNAL_ENDPOINT and JCP_REST_EXTERNAL_ENDPOINT environment variables in the values.yaml file to add the URLs.
Example
JCP_WS_EXTERNAL_ENDPOINT: "https://jcp-ws.<your-domain.example.com>:443"
For more information on how to reach the endpoints after the installation and/or if you are using an ingress, see Connecting to AWI, the JCP and REST Processes Using an Ingress.
Reaching the CP Endpoint
A new AAKE environment does not require communication processes (CPs). However, if you want to connect non-TLS/SSL Agents or OS CallAPIs and cannot use the TLS Gateway, you do require a CP.
The CP replicas are set to zero by default. If you do require a CP, make sure set the CP replicas to scale your deployment as required. For more information, see Scaling Deployments.
If you know the relevant address before the installation, you can also use the CP_EXTERNAL_ENDPOINT environment variable in the values.yaml file to add the URL.
For more information, see Connecting to the CP.
See also: